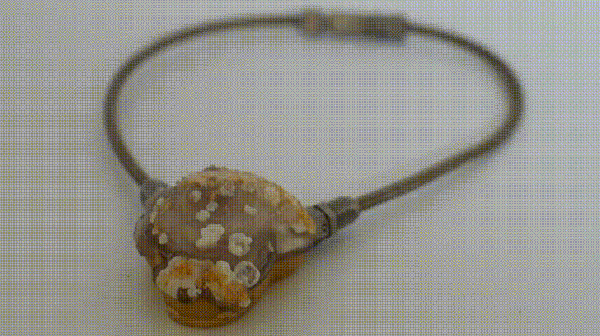
It’s one thing to see science-fiction slowly become reality, but quite another to take that process into your own hands. Inspired by a movie prop, [Eric Strebel] decided to build himself a 21st science-fiction artifact: a pulsing, life-force amulet.
At the — aheam — heart of this amulet is a blinking LED circuit which [Strebel] modified into a slow pulse with the help of his friends. To add to the surreal quality of the amulet, he sourced a stone from a local gem show, bringing his circuit along to get an idea of what the final product would look like. Once [Strebel] had shaped the stone to a more manageable size, he took a polyester filler mold of its rear face to use as a base from which to cast a durable resin housing for the circuit.
[Strebel] is using a pair of coin cell batteries which fit snugly behind the glowing LED, and in case he ever needs to get inside the amulet, he’s attached the stone to the rear with sew-on straps — super-gluing them to each piece. He went for a bit of an industrial look for the necklace — a braided oil line with a modified quick-release clasp that works like a charm.
How does this amulet stack up to one from the 23rd century? You be the judge!
If you want to work with wearables, you have to pay a little more attention to color. It is one thing to have a 3D printer board colored green or purple with lots of different color components onboard. But if it is something people will wear, they are going to be more choosy. [Sdekon] shows us his technique of using Leuco dye to create items that change color electrically. Well, technically, the dye is heat-sensitive, but it is easy to convert electricity to heat. You can see the final result in the video, below.
The electronics here isn’t a big deal — just some nichrome wire. But the textile art processes are well worth a read. Using a piece of pantyhose as a silk screen, he uses ModPodge to mask the screen. Then he weaves nichrome wire with regular yarn to create a heatable fabric. Don’t have a loom for weaving? No problem. Just make one out of cardboard. There’s even a technique called couching, so there’s lots of variety in the textile arts used to create the project.
If you think of wearable electronic projects, in many cases what may come to mind are the use of addressable LEDs, perhaps on strips or on sewable PCBs like the Neopixel and similar products. They make an attractive twinkling fashion show, but there remains a feeling that in many cases once you have seen one project, you have seen them all.
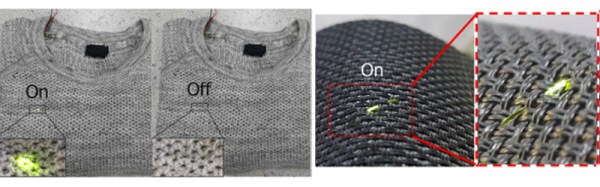
So if you are tiring of static sewable LED projects and would like to look forward to something altogether more exciting, take a look at some bleeding-edge research from a team at KAIST, the Korean Advanced Institute of Science & Technology. They have created OLED fibres and woven them into fabric in a way that appears such that they can be lit at individual points to create addressable pixels. In this way there is potential for fabrics that incorporate entire LED displays within their construction rather than in which they serve as a substrate.
The especially interesting feature of the OLED fibres from the KAIST team is that their process does not require any high temperatures, meaning that a whole range of everyday textile fibres can be used as substrates for OLEDs. The results are durable and do not lose OLED performance under tension, meaning that there is the possibility of their becoming practical fabrics for use in garments.
While this technology is a little way away from a piece of clothing you might buy from a store, the fact that it does not rely on special processes during weaving means that when the fibres become commercially available we are likely to see their speedy adoption. Meanwhile you can buy conductive fabric, but you might have to take a multimeter to the store to find it.
There is a huge amount of interest among our community in wearable electronics, but it is fair to say that it is a technology that has a way to go at our level in terms of its application. Some twinkly LEDs are all very well, but unless you have the arrived-on-a-spaceship-from-the-future aesthetic of someone like [Naomi Wu] to carry them off they get old rather quickly.
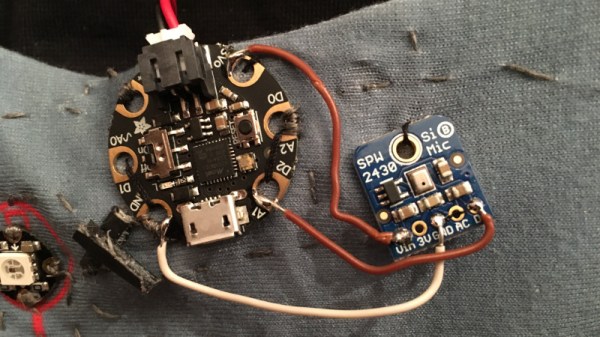
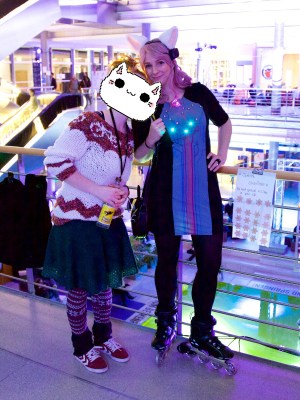
What the sew-on LED sector of wearable electronics is waiting for are some applications, wearable lights that do something rather than just look pretty. And [Moko] has a project that takes them in that direction, with her color organ dress, a garment whose LEDs react to ambient sound with the aid of a MEMS microphone and an Adafruit Gemma M0 microcontroller board. The LEDs form a color wheel which rotates, and stops at a point proportional to the sound level at the time.
The write-up is an interesting one, going into a little detail as it does in the images on the construction of an electronically-enhanced piece of clothing. Wiring everything up is one thing, but there are other considerations such as the incorporation of extra panels to protect them from mechanical stress, and from sweat. From a dressmaker’s perspective it’s a well constructed garment in its own right with an attractive PCB-style pattern (Where did she get that fabric? Or did she print it herself?) and it appears that she’s the fortunate owner of a serger (overlocker).
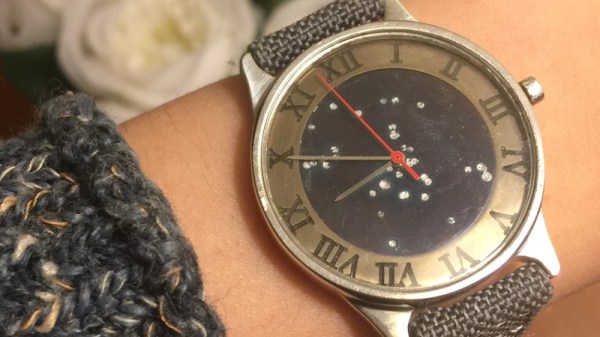
It’s becoming abundantly clear that [Colin Merkel] doesn’t know the definition of “good enough”. Not only has he recently completed his third (and most impressive) wristwatch build, but he also managed to put together one of the most ridiculously romantic gifts ever conceived. While some of us are giving our significant others a gift card to Starbucks, he made his girlfriend a watch with a chart on the face representing the position of the stars at the time and place of their first meeting.
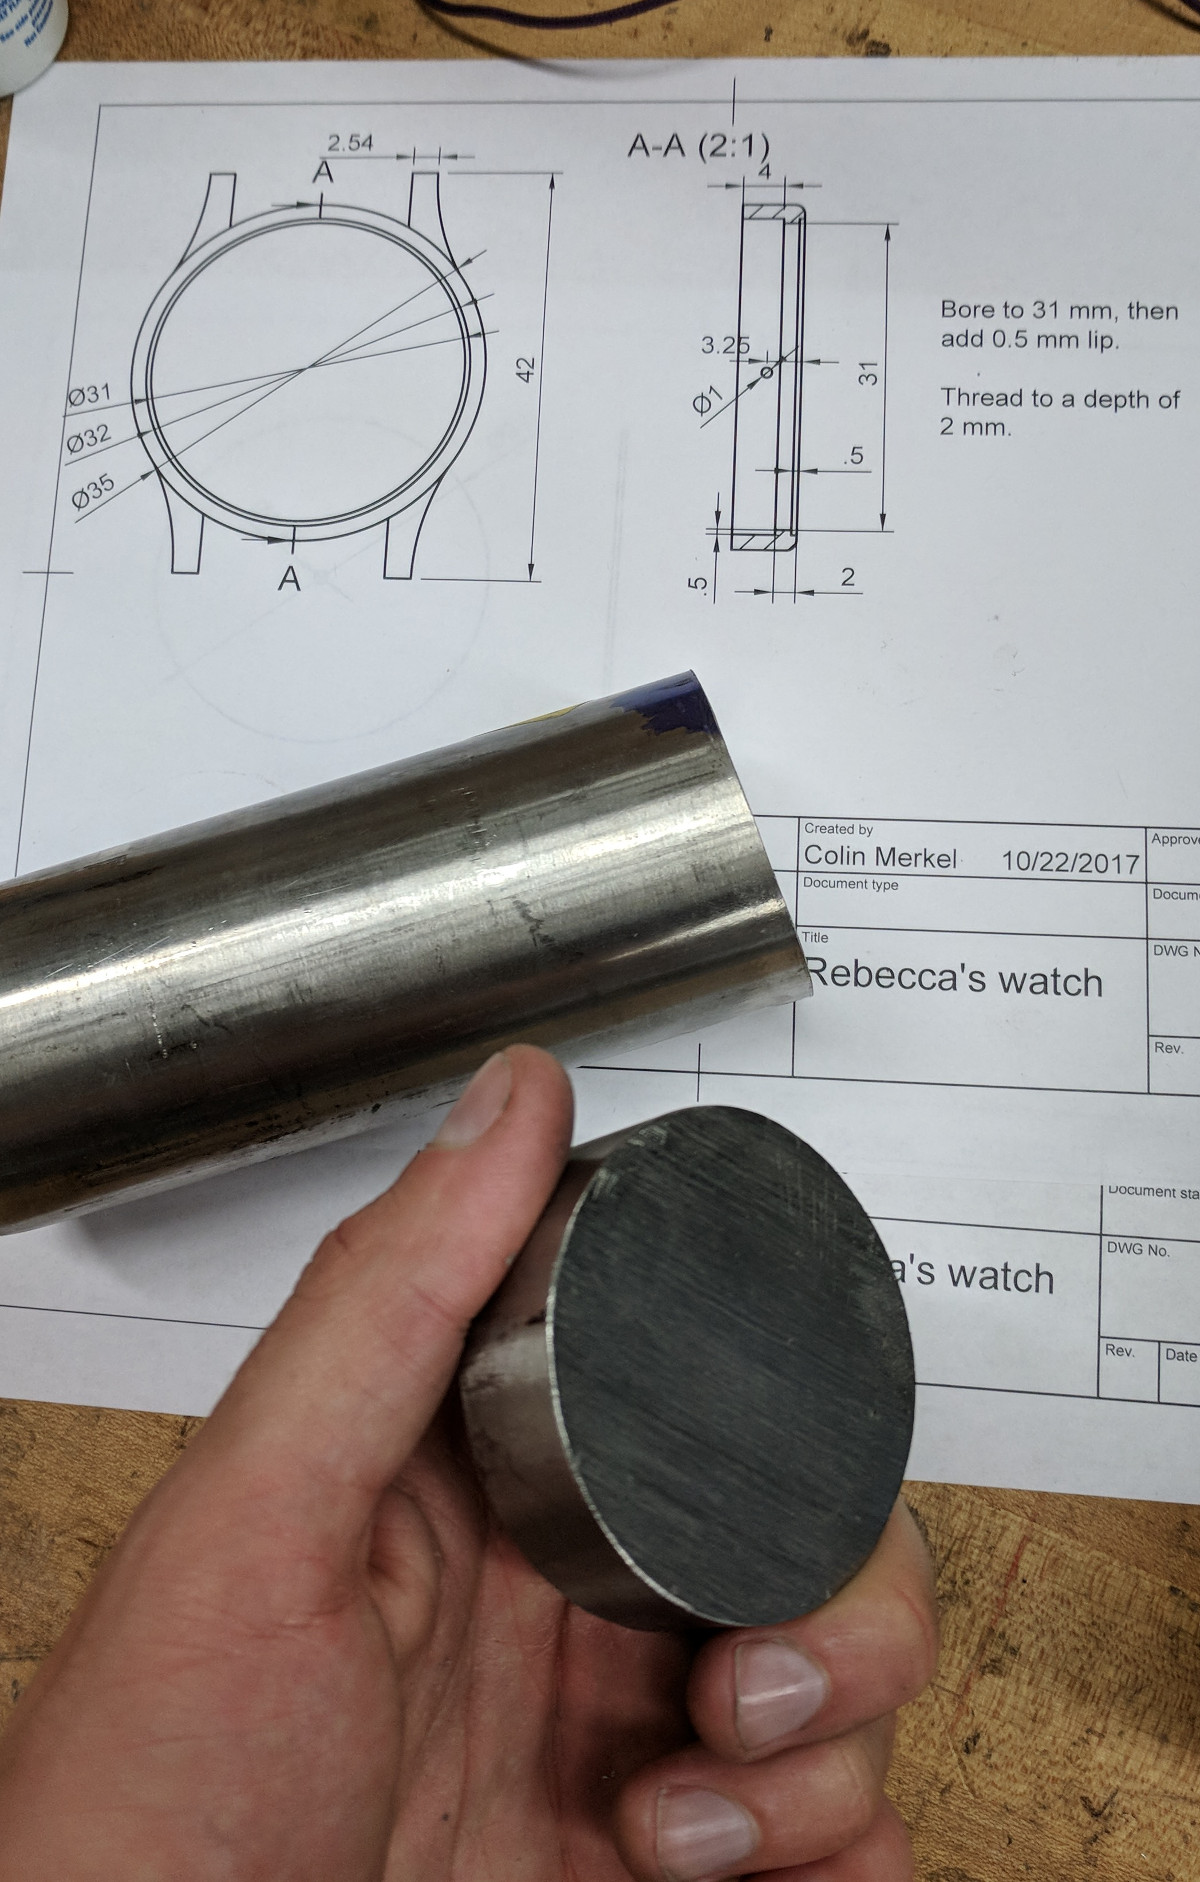
As per his usual style, the documentation on this build is phenomenal. If paging through his gallery of build images doesn’t make you want to get a lathe and start learning metal working, nothing will. A chunk of stainless steel rod miraculously becomes a gorgeous wrist watch over the course of a few dozen images, perfectly encapsulating that old adage of “making it look easy”.
All you have to do is turn this into that. Easy.
Certainly the highlight of this build is the star chart on the face. To make it, he used PyEphem to plot the position of the brightest stars that were visible at the time and place of their first meeting. He then wrote a script to take those stars and convert their positions to G-Code the CNC could use to drill holes in the appropriate locations. The depth of the hole even corresponds to the magnitude (brightness) of each star, giving the chart a subtle 3D effect.
Unfortunately, [Colin] made a couple of mistakes during this build, to the point that he’s not exactly sure how to proceed. He mentions he might even be forced to start over from scratch. It’s hard to imagine how something that looks this good could ever end up being a failure, but the world of watch making is unkind.
To start with, he used 304 stainless instead of 303. This made machining the case much more difficult, and from his very first cut he realized it was going to be a problem. While it was an annoyance he mentions a couple times during the build log, he was at least was able to work through it.
The real problem came at the end, when he put the watch together. He originally made his designs assuming a front glass which was 0.5 mm thick, but in actuality used a piece that is 0.8 mm thick. This slight difference is just enough to cause the seconds hand to rub up on the glass, putting drag on the movement. The end result is that the battery dies extremely quickly, effectively rendering the watch useless.
We can’t imagine the heartbreak [Colin] felt when he realized what happened; we felt bad just reading about it. But given his track record, we have no doubt he’ll get the issue sorted out. It would be a shame to start over completely, but there’s some consolation in knowing it’s part of the learning process: you don’t become a master of your craft without making a couple mistakes along the way.
If you want to build wearables, you need to know how to sew, right? Maybe not. While we’re sure it would come in handy, [Drato] (also known as [RobotMama]) shows how she prints designs directly on a net-like fabric. You can see a video of the process below.
The video after the break shows an Ultimaker, but there’s really nothing particularly special about the printer. The trick is to print a few layers, pause, and then insert the fabric under the printer before resuming the print.
[Drato] holds the fabric down after inserting it, and mentions you can use glue to hold it down, too. We wondered if some bulldog or alligator clips might work. The only thing we worried about is if the fabric were made of some synthetic, it might not take hot plastic without melting.
[Drato] mentions she uses Organza, which is a sheer fabric often found on wedding gowns. However, she doesn’t mention if she is using the polyester, silk, or nylon type of the fabric. A little research shows that polyester and nylon fabrics melt at about 295 C. Silk was harder to track down, but since you can iron it on a medium setting, that might work, too. Of course, the temperature where it melts and the temperature where it just deforms beyond use might be different, so some experimentation is probably wise.
What really piqued our interest was the application to creating wearables without sewing. We’ll be curious what other applications you could find for printing directly on a fabric substrate.
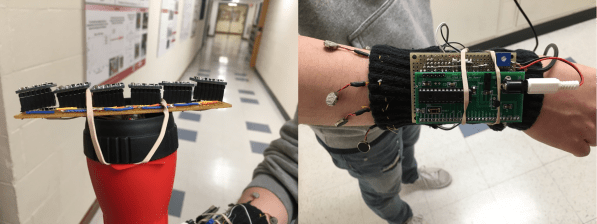
For their final project in embedded microcontroller class, [Aaheli, Jun, and Naomi] turned their focus toward assistive technology and created an Electronic Travel Aid (ETA) for the visually impaired that uses haptic feedback to report the presence of obstacles.
We have seen a few of these types of devices in the past, and they almost always use ultrasonic sensors to gauge distance. Not so with this ETA; it uses six VL53L0X time-of-flight (ToF) sensors mounted at slightly different angles from each other, which provides a wide sensing map. It is capable of detecting objects in a one-meter-wide swath at a range of one meter from the sensors.
The device consists of two parts, a wayfinding wand and a feedback module. The six ToF sensors are strapped across the end of a flashlight body and wired to an Arduino Mini inside the body. The Mini receives the sensor data over UART and sends it to the requisite PIC32, which is attached to a sleeve on the user’s forearm. The PIC decodes these UART signals into PWM and lights up six corresponding vibrating disc motors that dangle from the sleeve and form a sensory cuff bracelet around the upper forearm.
We like the use of ToF over ultrasonic for wayfinding. Whether ToF is faster or not, the footprint is much smaller, so its more practical for discreet assistive wearables. Plus, you know, lasers. You can see how well it works in the demo video after the break.

 What the sew-on LED sector of wearable electronics is waiting for are some applications, wearable lights that do something rather than just look pretty. And [Moko] has a project that takes them in that direction, with her