Fused Deposition Modelling (FDM) 3D printers which squirt out molten plastic layer by layer are by far the most popular type in general use. Most machines extrude plastic through a nozzle above print bed, and struggle to produce parts with overhangs without using support material. However, a German team of researchers have recently come up with a solution.
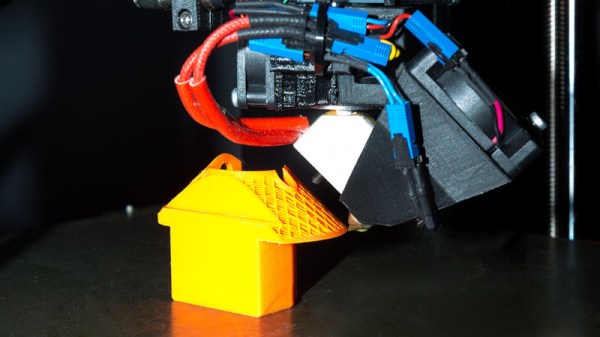
In a prototype built by researchers at the Zurich University of Applied Sciences (ZHAW), a standard Cartesian printer has a third rotary axis added, upon which the nozzle can rotate. Additionally, the nozzle is angled at 45 degrees to the print bed, rather than the usual perpendicular setup. This allows layers of a print to be built up in such a way that support material is not needed for the vast majority of typical overhangs. This is particularly useful for hollow parts, where removing support material can be particularly difficult.
The team believes that such technology could be implemented on existing printers by way of a simple upgrade kit, and we can imagine a few experimenters will be champing at the bit to try it out. If you do, be sure to drop us a line. Alternatively, consider using a marker to make removing supports easier. Video after the break.
A recent research paper shows a way to create multicolor 3D prints using a single extruder if you are too lazy to babysit the machine and switch filament. The concept: print your own “programmable” filament that has the right colors in the right place. This is the same idea as manually splicing filament but presumably is more efficient since the process works with one color at a time and doesn’t repeat. In other words, to print the 64 squares of a chessboard you’d swap filament at least 64 times on each layer. Using programmable filament, you’d load one spool, print half of the filament, load another spool, print the other half, and then finally load the newly created filament and print the chessboard. Notice that the first two operations aren’t printing the chessboard. They are printing the spool of filament you feed through on the third pass.
There are machines made to do this, of course, although they generally just splice lengths of filament together for you automatically. Using one filament solves the problems of keeping multiple heads in alignment as well as the added cost and complexity. However, you now have different problems such as the transition between materials and knowing exactly how much material will be at each point in the print.
When 3D pens first became available, many assumed them to be gimmicky or part of a general fad that would eventually die out. Like most revolutionary technologies, though, they’ve found a firm foothold, especially in the art community where the ability to 3D print in freehand is incredibly valuable. There are still some shortcomings with the technology, though, but [tterev3] recently tore into a 3doodler pen to make some necessary upgrades.
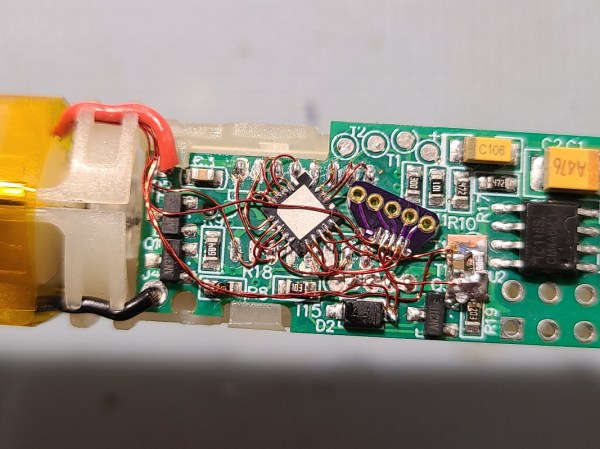
First, this pen has some design choices that are curious, to say the least. The cooling fan runs regardless of temperature, and it has pushbuttons for start and stop rather than a momentary button that controls the extrusion. To fix these issues, as well as change the filament size, improve the cooling, and provide greater control over the extrusion speed, [tterev3] completely rewrote the firmware, changed the microcontroller on the PCB, and made several hardware upgrades to accommodate these changes. He also went ahead and installed a USB-C port for charging, which should be standard practice on all low-voltage consumer electronics by now anyway.
The detail work on this project is impressive, given the small size of the pen itself and the amount of precision hardware needed to make the changes. Especially regarding the replacement of the microcontroller on the board itself, which is an impressive feat even without the incredibly small dimensions. The firmware upgrade is available on his GitHub page as well if you have your own 3doodler that needs modifications, and if you’re still struggling to find uses for these handy devices, we’ve seen them used with interesting effect to build drones.
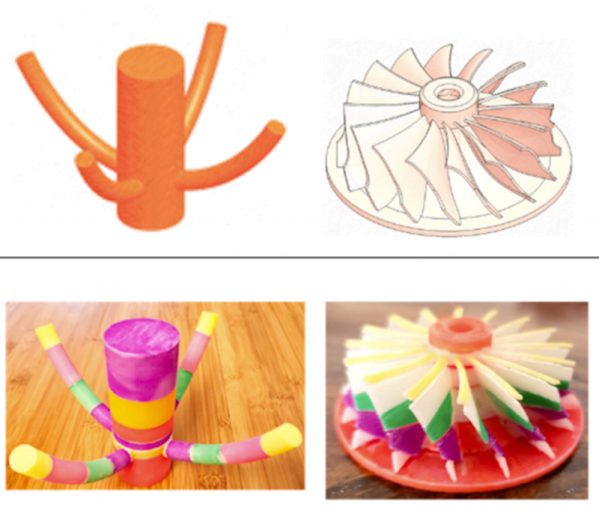
Just when you thought your 3D printer was hot stuff, along comes a 5D printer. Two doctoral students at Penn State want to add two more axes to get rid of overhangs. This means that instead of supports or breaking objects into pieces, the printer simply orients the print so each region of the part is printing as if it were flat. Of course, 5D printers aren’t really new, even though you don’t hear much about them. However, the paper details a new algorithm that eliminates manually defining print regions and rotations.
You do this all the time manually when you’re setting the print up. For example, if you want to print a letter T, you could print it with supports under the cross pieces or flip it upside down and print it with no support at all. The difference here is the printer can flip the workpiece itself to different angles and can change it on the fly during printing. The printer might print the shaft of the T, rotate it to draw half of the crossbar, then rotate it 180 degrees to print the other half. In all three zones, the print head is depositing materials flat with no overhang. In a simple case like a T that doesn’t really require a special machine or an algorithm, but in the general case, you often can’t just rotate a model to avoid using supports.
Over the past years, additive manufacturing (AM) has become a common tool for hackers and makers, with first FDM and now SLA 3D printers becoming affordable for the masses. While these machines are incredibly useful, they utilize a slow layer-by-layer approach to produce objects. A relatively new technology called Volumetric Additive Manufacturing (VAM) promises to change all that by printing the entire object in one go, and according to a recent article in Nature, it just got a big resolution boost.
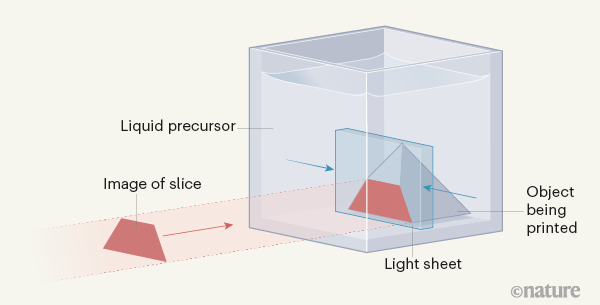
The concept is similar to SLA printing, but instead of curing the resin by projecting a 2D image of the current layer into the container, VAM uses multiple lasers to create intersecting points within the liquid. After exposing the resin to this projection for several seconds, the 3D model is built all at once. Not only is this far faster, but it removes the need for support materials and even a traditional build plate is unnecessary.
Visualization of the dual-color printing process as used by Regehly et al. (Credit: Nature)
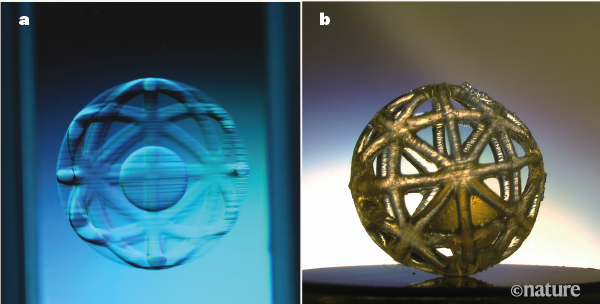
Up till now the resolution and maximum object size of VAM has left a lot to be desired, but in this new research by Regehly et al. claim to have accomplished a feature resolution of ‘up to 25 micrometers’ and a solidification rate of ‘up to 55 cm3/s’. They used two crossing laser beams of different wavelengths, one to form the ‘light sheet’ (blue in the graphic) and a second beam (in red) to project the slide onto this light sheet. They refer to this technique as ‘xolography’, as a mesh-up of ‘holo’ (Greek for ‘whole’) and the ‘X’ shape formed by the crossing laser beams.
Key to making this work is the chemistry of the resin: the first wavelength excites the molecules called DCPI (Dual-Color Photo Initiators) that are dissolved in the resin. The second wavelength when hitting the same molecules initiates the resin polymerization process. The object pictured at the top of the page was a test print; producing such a design on a traditional 3D printer would have required a considerable amount of difficult to remove support material.
While this is obviously not a technology hobbyists will be using to replace their FDM and SLA printers with any time soon, there are still many companies and institutes working on various VAM technologies and approaches. As more and more of the complexities and challenges are dealt with, who knows when VAM may become a viable replacement for at least some SLA applications?
There’s an old joke that the CEO of IKEA is running to be Prime Minister of Sweden. He says he’ll be able to put together his cabinet in no time. We don’t speak Swedish, but [Adam Miklosi] tells us that the word “uppgradera” means “upgrade” in Swedish. His website, uppgradera.co has several IKEA upgrade designs you can 3D print.
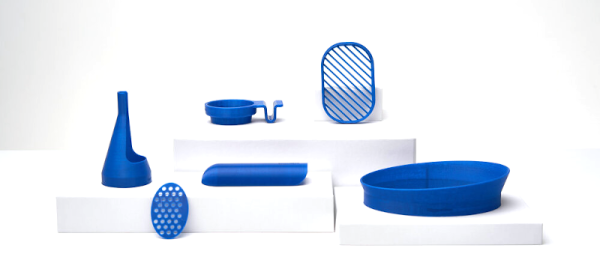
There are currently six designs that all appear to be simple prints that have some real value. These are all meant to attach to some IKEA product and solve some consumer problem.
For example, the KL01 is a cup holder with a clip that snaps into the groove of a KLIPSK bed tray. Without it, apparently, your coffee mug will tend to slide around the surface of the tray. The CH01 adds a ring around a cheese grater. There are drains for a soap dish and a toothbrush holder, shoulder pads for coat hangers, and a lampshade.
We worry a little about the safety of the cheese grater and the toothbrush because you will presumably put the cheese and the toothbrush into your mouth. Food safe 3D printing is not trivial. However, the other ones look handy enough, and we know a lot of people feel that PLA is safe enough for things that don’t make a lot of contact with food.
Honestly, none of these are going to change your life, but they are great examples of how simple things you can 3D print can make products better. People new to 3D printing often seem to have unrealistic expectations about what they can print and are disappointed that they can’t easily print a complete robot or whatever. However, these examples show that even simple designs that are easily printed can be quite useful.
If you don’t have a printer, it looks like as though site will also sell you the pieces and they aren’t terribly expensive. We don’t know why IKEA invites so many hacks, but even they provide 3D printer files to improve the accessibility of some products.
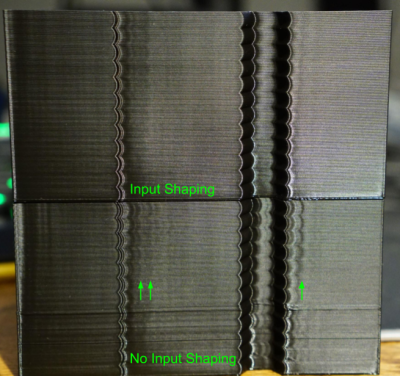
It seems as though we still can’t hit the ceiling on better control schemes for 3D Printers. Input Shaping is the latest technique to land on our radar, a form of resonance compensation that all but eliminates the ghosting (aka: vertical ringing) artifacts we see on the walls of printed parts. While the technique has been around for decades, only recently did [Dmitry Butyugin] both apply it to 3D printer control and merge their hard work into the open source firmware package Klipper. Once tuned, the results are simply astonishing–especially since this scheme can augment the print quality of even the most budget printer.
A Split A/B Test with and without Klipper’s Input Shaping feature courtesy of [@LukesLaboratory]Assuming your 3D printer isn’t infinitely stiff, when your nozzle moves from point to point or changes direction, it vibrates in response to having its speed altered. The result is that the nozzle wobbles along the ideal path it’s trying to track. The result is ghosting, an aesthetic blemish that looks like vertical waves on the sides of your printed part.
Input Shaping is a feed-forward controls technique for cancelling the mechanical vibrations that create ghosting. The idea is that, if we wanted to move the machine from point to point, we send it two impulses. The first impulse kicks the machine into moving and the second impulse follows up at a precise time to cancel the vibrations we would see when the machine comes to a stop. Albeit, moving any machine by sending it two impulses is pretty crude, so we take these impulses, adjust their amplitudes so that they sum to 1, and convolve them with a control input signal that we’d actually like to send it. The result is that the resonance cancellation part of the signal seamlessly “mixes” into the control input signal, and the machine moves from point to point with significantly less vibration at the end of the travel move. For more info on the maths behind this process, have a look at the first four pages of this paper from [Singh and Singhose].
The only hiccup is that you need to do some up-front system characterization of your 3D Printer running Klipper before you can take advantage of this technique. Thankfully the Klipper update comes with a set of step-by-step instructions for characterizing your machine up-front. After a couple test prints to measure the periodicity of your ringing, you can simply apply your measurement results to your config file, and you’re set.
Input Shaping is a prime example of “just wrap a computer around it!“–fixing hardware by characterizing and cancelling unwanted behaviors with software. If you’re hungry for more clever, characterized hardware control schemes, look no further than this Anti-Cogging algorithm for BLDC Motors. And for a video walkthrough of the Klipper implementation, have a look at [eddietheengineer]’s breakdown after the break.
Does your 3D Printer run Klipper? We’d love to see some of your Input Shaping results in the comments.