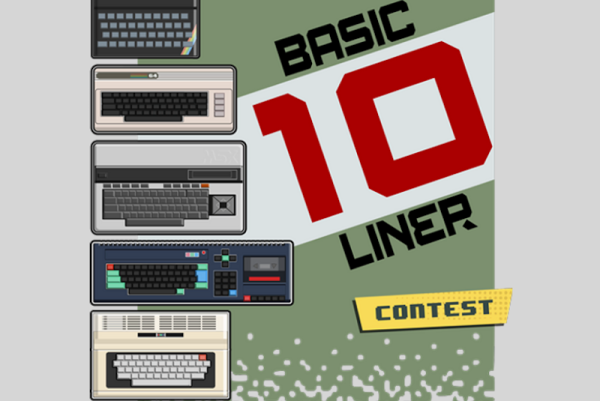
For the last 11 years [Gunnar Kanold] has run the annual BASIC 10 Liner contest, and the rules for the 2021 edition are now available. There are four categories and each category has specific definitions of what constitutes a line. All entries must run on an 8-bit computer system that can be emulated.
The first three categories are for games but differ in the line length allowed. You can elect to compete with 80 character lines, 120 character lines, or 256 character lines. There’s also a category for demos, tools, and other applications that must constrain lines to 256 characters.
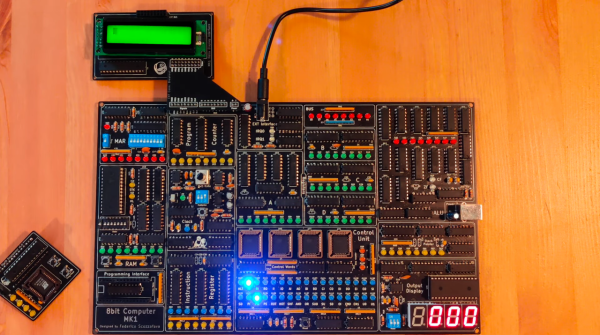
Some projects are a rite of passage within their respected fields. For computer science, building one’s own computer from scratch is certainly among those projects. Of course, we’re not talking about buying components online and snapping together a modern x86 machine. We mean building something closer to a fully-programmable 8-bit computer from the ground up, like this one from [Federico] based on 74LS logic chips.
The computer was designed and built from scratch which is impressive enough, but [Federico] completed this project in about a month as well. It can be programmed manually through DIP switches or via a USB connection to another computer, and also includes an adjustable clock which can perform steps anywhere from 1 Hz to 32 kHz. Complete with a 1024 byte memory, a capable ALU, four seven-segment LEDs and (in the second version of the computer) a 2×16 LCD disply, this 8-bit computer has it all.
Not only is this a capable machine designed by someone who clearly knows his way around a logic chip, but [Federico] has also made the code and schematics available on his GitHub page. It’s worth a read even without building your own, but if you want to go that route without printing an enormous PCB you can always follow the breadboard route.
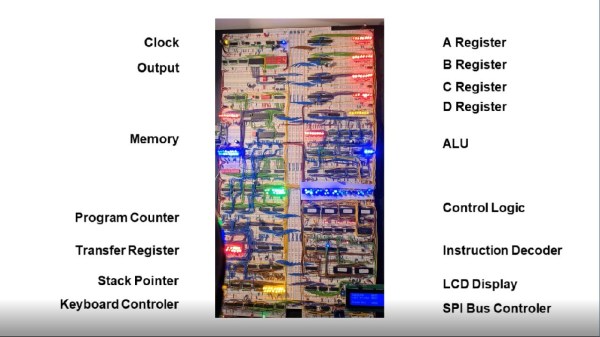
Getting into a big electronics project often involves the use of specialized tools, namely the use of some sort of soldering iron or other way to apply solder to often intricate, tiny, and heat-sensitive parts. While it’s best to learn to pick up this skill at some point, it’s not always necessary, even for big, complicated projects like [DerULF1]’s full 8-bit computer that he built entirely on breadboards.
For a fully featured 8-bit computer, this build goes deep into the details of how the computer works. The clock allows programs to be stepped through one cycle at a time, and even the memory can be individually accessed with a set of switches. There are plenty of other interesting features as well, such as using registers to access extra memory. It features an SPI port and PS/2 keyboard controller and also loads programs from an SD card.
The build was inspired by some of [Ben Eater]’s projects which famously focus on using logic gates and TTL chips to perform complex tasks, such as another breadboard computer which plays snake on a small display. It’s certainly a great way to learn about the inner function of computers, and better still that no soldering is required. But you may need a few extra breadboards.
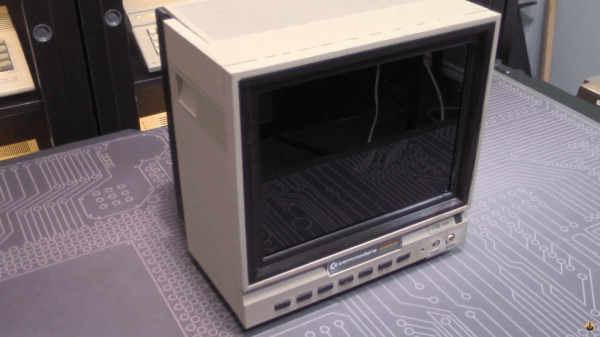
While putting together a retro computer is a great project and can teach a lot about the inner workings of electronics, hooking that 70s- or 80s-era machine up to a modern 144 Hz 1440p display tends to be a little bit anticlimactic. To really recreate the true 8-bit experience it’s important to get a CRT display of some sort, but those are in short supply now as most are in a landfill somewhere now. [Tony] decided to create a hybrid solution of sorts by 3D printing his own Commodore replica monitor for that true nostalgia feel.
This build is a matching mini scale replica of the Commodore 1702 monitor, a color monitor produced by Commodore specifically for their machines. At the time it was top-of-the-line and even included an early predecessor of the S-Video method of video signalling. This monitor was modeled in Fusion 360 and then sent to the 3D printer for assembly, then populated with a screen with a period-correct 4:3 aspect ratio, required electronics for handling the Commodore’s video signal, and even includes an upgrade over the original monitor: stereo speakers instead of the single-channel speaker that was featured in the 80s.
While this monitor doesn’t use a CRT, it’s an impressive replica nonetheless, right down to the Commodore serial number sticker on the back. If you need a Commodore 64 to go along with it, there are plenty of possibilities available to consider like this emulated C64 on a Raspberry Pi or these refurbished OEM Commodores.
Despite all the incredible advancements made in video game technology over the last few decades, the 8-bit classics never seem to go out of style. Even if you weren’t old enough to experience these games when they were new, it’s impossible not to be impressed by what the early video game pioneers were able to do with such meager hardware. They’re a reminder of what can be accomplished with dedication and technical mastery.
The grid has been split up for easier printing.
If you’d like to put a little retro inspiration on your desk, take a look at this fantastic 16 x 16 LED matrix put together by [Josh Gerdes]. While it’s obviously not the only thing you could use it for, the display certainly seems particularly adept at showing old school video game sprites in all their pixelated glory. There’s something about the internal 3D printed grid that gives the sprites a three dimensional look, while the diffused glow reminds us of nights spent hunched over a flickering CRT.
The best part might be how easy it is to put one of these together for yourself. You’ve probably got most of what you need in the parts bin; essentially it’s just a WS2812B strip long enough to liberate 256 LEDs from and a microcontroller to drive them. [Josh] used an Arduino Nano, but anything compatible with the FastLED library would be a drop-in replacement. You’ll also need a 3D printer to run off the grid, and something to put the whole thing into. The 12×12 shadowbox used here looks great, but we imagine clever folks such as yourselves could make do with whatever might be laying around if you can’t nip off to the arts and crafts store right now.
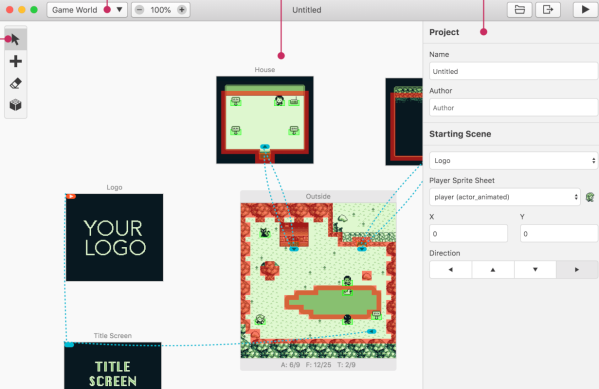
It takes a lot of work to build a modern video game. Typically an entire company will spend months (at least) developing the gameplay, selecting or programming an engine, and working out the bugs. This amount of effort isn’t strictly necessary for older video game systems though, and homebrew developers are quite often able to develop entire games singlehandedly for classic systems. In the past it would have taken some special software, programming knowledge, and possibly hardware, but now anyone can build games for the original Game Boy with minimal barriers of entry.
The project is known as GB Studio and allows people to develop homebrew games for the 8-bit handheld system without programming knowledge. Once built, the games can be played on any emulator or even loaded onto a cartridge and played on original hardware if a flash cart is available. Graphics can be created with anything that can create a .png image, and there are also some features that allow the game to be played over a web browser or on a mobile device.
While it seems like the gameplay is limited to RPG-style games, this is still an impressive feat, and highly useful for anyone curious about game development. It could also be an entry into more involved game programming if it makes the code of the games available to the user. It could even lead to things like emulating entire cartridges on the original hardware.
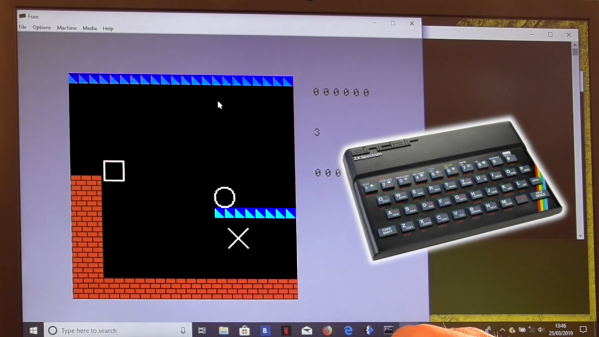
[Jonathan]’s project is called the Multi Platform Arcade Game Designer, so named for its ability to create games for several 8-bit systems of yesteryear. Currently, the Spectrum, Amstrad CPC, and Acorn Atom are all supported, with plans to add more down the track.
Creating a game is a simple affair, which [Jonathan] explores in a video tutorial series. Sprite and background editors are built into the software. Scripts can be automatically generated to create a wide variety of basic game types, from scrolling shoot-em-ups to classic platformers. There’s also functionality that allows advanced users to add further functionality by supplying some of their own code.
If point-and-click isn’t for you, you can always forge your ZX Spectrum games the classic way, with assembly and BASIC. Video after the break.