ESP8266 Adds Web Control To Old Home Theater

There was a time when you could hold onto a TV or A/V receiver for the better part of the decade and not feel as though you were missing out on the latest and greatest features. But today you’re lucky to get three years out of a “smart” TV before it’s either supplanted by a vastly improved version, or falls victim to some weird issue that (surprise, surprise) means you need to buy a new one.

A simple touch interface hosted on the ESP8266

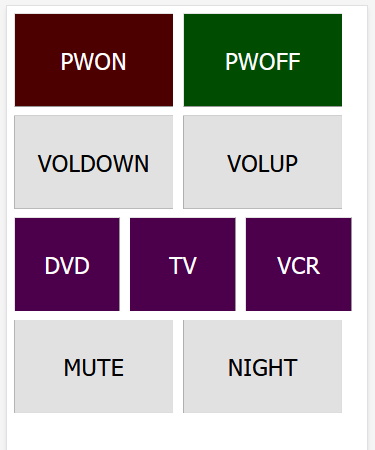
Not content with the status quo of planned obsolescence, [aamarioneta] recently set out to add a sprinkling of modern convenience to a circa 2008 Denon AVR 2308 home theater receiver. Like any good A/V receiver, the AVR 2308 features a dizzying array of ports on the back panel, one of which happens to be for an external infrared receiver. This turned out to be the perfect place to jack in an ESP8266, earning this 12 year old receiver an honorary membership into the Internet of Things.

The interesting thing about this hack is that there’s actually no IR involved. Sure, the code could be used to drive an IR LED attached to the ESP8266’s GPIO pins, and the AVR 2308 would respond as if the original remote was being used; but where’s the fun in that? Thanks to the receiver port, they’re able to inject the IR codes directly into the device. It’s the same protocol, just without the photons.

With a simple web-interface running on the ESP8266, they can control the AVR 2308 from a smartphone’s browser anywhere in the house. From here it would only take a few more lines of code to tie it into an existing home automation system or add in support for Alexa voice control.

We love seeing projects that add modern features to older hardware, as that’s one less piece of gear sent to an early grave because its owner felt they were behind the curve. It’s getting a bit unfriendly out there for consumers, and anything that puts the power back into the owner’s hands is a step in the right direction.

A Minimal ESP8266 Digital Picture Frame

Over the last few years, the price of a good digital picture frame has dropped to the point that we don’t often see DIY versions anymore. As much as we might hate to admit it, it’s hard to justify building something yourself when the economies of scale have made it so you can buy the final product for less than the cost of the parts themselves. But of course, there are always fringe cases where building it might be the only way to get what you need.

Granted we’re not sure that [Tony Liu] actually needs a 1.8-inch digital picture frame, but we’re sure somebody out there does. The ST7735R display used in this project is a real TFT, so the color and refresh rate is pretty good; but with a resolution of just 128×160, we’d recommend keeping your expectations low in regards to visual fidelity.

What’s really interesting about this project is how low the part count is. All you need is the ST7735R display and the ESP8266 itself (or the development board of your choice, naturally). Even the 3D printed frame is technically optional. The display is driven by SPI, so with the power added in, that’s only eight wires that need to be soldered between the two devices. If you’re looking for an easy way to add a photo slideshow to a small device, say a conference badge, this is about as easy as it gets.

But where are the images coming from? You might think SPIFFS, but in this case [Tony] has converted the images to bitmaps and is loading them into the Arduino Sketch as a header file with PROGMEM. Helpfully, he provides the link for the tool he uses to convert the images into an array the graphics library can understand. This makes adding new images slightly time consuming, but we imagine if you have the need for something like this, it’s probably only showing a pretty specific set of images anyway.

If you’re looking for something bigger, or maybe just an excuse to put that dusty Raspberry Pi to use, you might be interested in one of the more substantial builds we’ve seen over the years.

Continue reading “A Minimal ESP8266 Digital Picture Frame”

Never Miss A Doorbell With This Notifier

[PatH] tells us that he tragically missed a craft beer delivery to his home, and vowed never to let this happen again. His problem was that he’d missed the doorbell, resulting in one of those annoying notes from the delivery guy. His solution? An ESP8266-driven doorbell detector, that both sends him an SMS and records each doorbell press to a Google Sheet.

The doorbell detection is surprising but simple and non-intrusive, instead of running a GPIO line through some kind of interface to the button itself he’s added a reed switch to his ESP8266 board and used that to detect the magnetic field of the bell solenoids. It’s a convenient method, but one that only works with an old-style bell.

When the bell rings the magnetic field triggers the reed switch, and in turn the sketch running on the ESP calls out to IFTTT which triggers both an SMS and a write to a Google Sheets document that records each doorbell activation.

The ESP8266 seems to be a popular choice with doorbell automatprs probably because of its built-in networking and low price, but it’s not the only option. This optocoupler-sensed effort for example uses a Particle Xenon.

Flashing Sonoff Devices With Tasmota Gets Easier

Tasmota is an alternative firmware for ESP boards  that provides a wealth of handy features, and [Mat] has written up a guide to flashing with far greater ease by using Tasmotizer. Among other things, it makes it simple to return your ESP-based devices, like various Sonoff offerings, to factory settings, so hack away!

Tasmotizer is a front end that also makes common tasks like backing up existing firmware and setting configuration options like, WiFi credentials, effortless. Of course, one can’t really discuss Tasmotizer without bringing up Tasmota, the alternative firmware for a variety of ESP-based devices, so they should be considered together.

Hacks based on Sonoff devices are popular home automation projects, and [Mat] has also written all about what it was like to convert an old-style theromostat into a NEST-like device for about $5 by using Tasmota. A video on using Tasmotizer is embedded below, so give it a watch to get a head start on using it to hack some Sonoff devices.

Continue reading “Flashing Sonoff Devices With Tasmota Gets Easier”

Star Wars Themed Laser Badge: All That Is Missing Is The Pew Pew Sound Effect

In the quest to advance the art of the electronic badge, the boundaries of what is possible to manufacture in small quantities are continually tested. Full-colour PCBs, injection moulding, custom keyboards, and other wow factor techniques have all been tried, leading to some extremely impressive creations. With all this innovation then it’s sometimes easy to forget that clever design and a really good idea can produce an exceptional badge with far more mundane materials.

The 10th InCTF cybersecurity contest held at Amrita, Kerala, India, had a Star Wars themed badge designed by Team bi0s for the event. It takes the form of a Millennium Falcon-shaped PCB, with a NodeMCU ESP8266 board mounted on it, a shift register, small OLED display, and the usual array of buttons and LEDs. The fun doesn’t stop there though, because it also packs a light-dependent resistor and a laser pointer diode that forms part of one of its games. Power for this ensemble comes courtesy of a set of AA cells on its underside.

They took a novel approach to the badge’s firmware, with a range of different firmwares for different functions instead of all functions contained in one. These could be loaded through means of a web-based OTA updater. Aside from a firmware for serial exploits there was an Asteroids game, a Conway’s Game Of Life, and for us the star of the show: a Millennium Cannon laser-tag game using that laser. With this, attendees could “shoot” others’ LDRs, with three “hits” putting their opponent’s badge out of action for a couple of minutes.

Unusually this badge is a through-hole design as a soldering teaching aid, but its aesthetics do not suffer for that. We like its design and we especially like the laser game, we look forward to whatever next Team bi0s produce in the way of badges.

This isn’t the first badge packing a laser we’ve seen, at last year’s Def Con there was a laser synth badge. No laser tag battles though.

Airport Split-Flap Letters Carry On As Spotify Display

Today’s tale of being in the right place at the right time comes from [fabe1999], who was doing an intern gig at the airport when the controller on their split-flap display bought a one-way ticket going south. They were just going to throw away thousands of these letters and replace them with monitors, but the intern intervened.

[fabe1999] grabbed an armload, took them home, and set about making them flap again, one letter at a time. An ATtiny worked okay, but it wasn’t really fast enough to flip them at their full clacking potential, so [fabe1999] switched to an ESP8266. So now there is one ESP for each of the 20 characters, and another that runs a web server where text can be directly entered for immediate display.

Each letter uses two sensors to flap to the right letter. The first one acts as a start sensor, detecting the blackness of a blank character. Another sensor counts the letters and makes the ESP stop the motor on the right one. So far, [fabe1999] hasn’t figured out how to recognize when a blank character can stay blank, so they flap all the way around back to blank for now. It certainly adds to the rich, flappy sound, but that can’t be good for the long-term life of the letters. Your flight is now departing for Post Break Island, where the letters are spending part of their retirement showing song titles from Spotify.

No chance of split flaps falling into your lap? Here’s a tip: you can fab your own flip.

Continue reading “Airport Split-Flap Letters Carry On As Spotify Display”

New Part Day: The Wi-Fi Stepper Gets Ideas Working Faster

Like most of us, I sometimes indulge in buying a part for its potential or anticipated utility rather than for a specific project or purpose. That’s exactly how I ended up with the WSX100 Wi-Fi Stepper, a single board device intended to be one of the fastest and easiest ways to get a stepper motor integrated into a project. Mine came from their Crowd Supply campaign, which raised money for production and continues to accept orders.

What’s It For?

The WSX100 Wi-Fi Stepper Driver (with motor), by Good Robotics

The main reason the Wi-Fi Stepper exists is to make getting a stepper motor up and running fast and simple, in a way that doesn’t paint a design into a corner. The device can certainly be used outside of prototyping, but I think one of its best features is the ability to help quickly turn an idea into something physical. When prototyping, it’s always better to spend less time on basic bits like driving motors.

In a way, stepper motors are a bit like RGB LEDs or LCD displays were before integrated drivers and easy interfaces became common for them. Steppers require work (and suitable power supplies) to get up and running, and that effort can be a barrier to getting an idea off the ground. With the Wi-Fi Stepper, a motor can be fired up and given positional commands (or set to a speed and direction) in no time at all. By sending commands over WiFi, there isn’t even the need to wire up any control logic.

Continue reading “New Part Day: The Wi-Fi Stepper Gets Ideas Working Faster”