Left: a DIY chording keyboard with seven keys Right: the guts of said keyboard

Chording Keyboard Leaves Your Mouse Hand Free

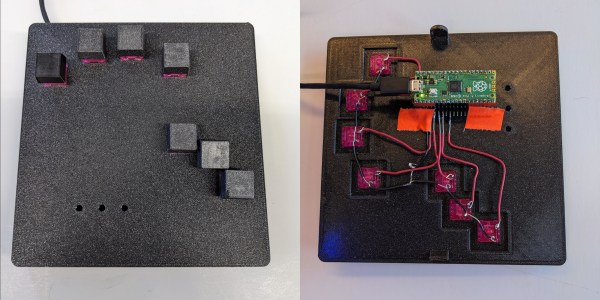
[akmnos22] was getting tired of moving one hand to the mouse and back to the keyboard. Rather than integrating mouse controls into a keyboard, they decided to really lean in and create a chording keyboard — one that creates characters with combinations of key presses, like playing chords on a piano.

This project was inspired in part by the Infogrip BAT, which has graced these pages before. Much like the BAT, this uses a total of seven Cherry MX switches: one for each finger, and three for the thumb. In order to get the placement just right for you, [akmnos22] suggests laying your hand in a comfortable position on a piece of paper and marking where your fingers naturally rest, then importing these markings into CAD software to decide where the key switch holes should be.

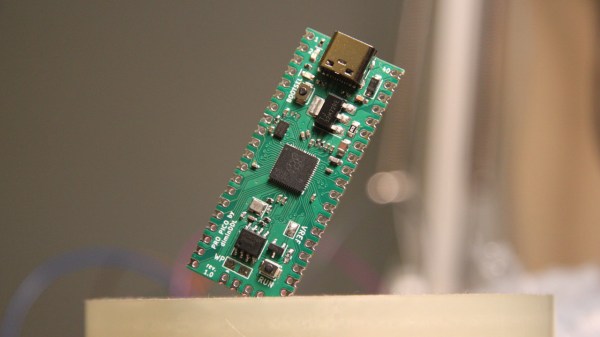
The brains of this operation is a Raspberry Pi Pico, which provides more than enough GPIO pins to do the job. [akmnos22] does a nice job of explaining exactly how to put one of these together, from the design concept through the programming process and how to actually chord on the thing.

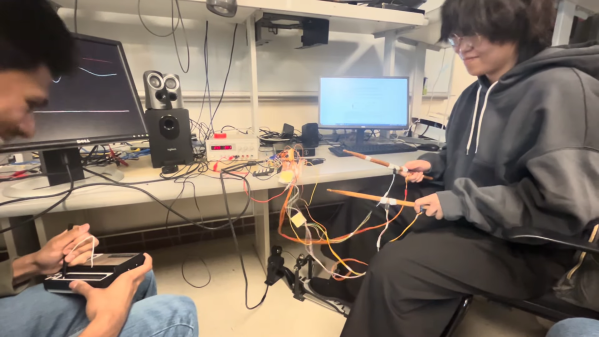
Would you rather chord with two hands? It might be even faster.

Thumbs Up To This Pico MIDI Kalimba

The kalimba, or thumb piano, is an easy way to make some music even if you have next to no idea what you’re doing. The only real downside is that they are limited to the twinkly sounds of metal tines being plucked by thumbs.

[Jeremy Cook] broke the sonic possibilities wide open by converting a couple of kalimbas into capacitive-touch MIDI instruments using the Raspberry Pi Pico. He started with a small one that is curiously made of solid wood. Usually these instruments are at least partially hollow to allow air to resonate inside the body.

After soldering up all the 1 MΩ resistors necessary to utilize the capacitive touch capabilities of the Pico, [Jeremy] found it a bit difficult to play individual notes on such a small instrument, so he made version two out of a much larger specimen.

This time, [Jeremy] cooked up a custom PCB which he is calling the Pico Touch 2, which adds the necessary resistors at the SMD level for capacitive touch sensing and in turn cleans up the wiring a bit. Be sure to check it out in action after the break.

Okay, so you don’t have an iota of musical talent. You could always build a kalimba that plays itself.

Continue reading “Thumbs Up To This Pico MIDI Kalimba”

The Pi Pico replacement board in question, assembled, held diagonally in some type of holder

ProPico For Your Pro Pico Needs

Ever feel like the Pi Pico board could be doing way more given its footprint? Does it bother you that the RP2040’s ADC quality is even further decreased because of the noisy onboard switching regulator? Miffed about decisions like the MicroUSB socket, the 2MB flash, or lack of the reset button? [Dmytro] brings us an open-source Pi Pico design, sporting the same RP2040 and a fully compatible footprint, but adding a number of improvements to its surroundings.

There’s a good few additions, all of them hacker-friendly – [Dmytro] adds comfortably-spaced reset and boot buttons, a USB-C socket, a dedicated low-noise voltage reference for the ADC, one more LED, and an I2C EEPROM footprint socket that is compatible with FRAM chips. Everything worth preserving is preserved – the pinout stays the same, including the SWD connector, which now sports an extra RESET pin. The bottom side USB testpoints remain, with only the four testpoints changed for more useful signals. Last but not least, the switching regulator is replaced by the venerable 1117 – you lose the ability to power your Pico from two AAs, and the capacitor series resistor requirement isn’t great, but you can easily put one of the drop-in 1117 replacement regulators on there.

What’s great is that the design is fully open-source, with KiCad files available. Want to design your own Pi Pico footprint board, improve upon this one even further, or maybe make a more tailored one? Treat yourself to the GitHub repository! There’s also a pinout diagram and a KiCanvas schematic for all your tinkering needs. We’ve covered drop-in replacements for classic drawer-inhabiting parts like the Pi Zero, for the 7805 (twice!), the 6502 CPU, and even for the DE9 serial port connector. No matter the purpose, they’re always a joy to see.

Impressively Responsive Air Drums Built Using The Raspberry Pi Pico

Drum kits are excellent fun and a terrific way to learn a sense of rhythm. They’re also huge and unwieldy. In contrast, air drums can be altogether more compact, if lacking the same impact as the real thing. In any case, students [Ang], [Devin] and [Kaiyuan] decided to build a set of air drums themselves for their ECE 4760 microcontroller class at Cornell.

As per the current crop of ECE4760 projects, the build relies on the Raspberry Pi Pico microcontroller as the brains of the operation. The Pico is charged with reading the output of MPU6050 inertial measurement units mounted to a pair of drum sticks. The kick pedal itself simply uses a button instead.

Where the project gets really interesting, though, is in the sound synthesis. The build doesn’t simply play different pre-recorded samples for different drums. Instead, it uses the Karplus-Strong Drum Synthesis function combined with a wavetable to generate different sounds.

In the demo video, we get to hear the air drums in action, complete with a Stylophone playing melody. Unlike some toy versions that trigger seemingly at random with no rhythm, these air drums are remarkably responsive and sound great. They could be a great performance instrument if designed for the purpose.

We’ve seen similar builds before, too.

Continue reading “Impressively Responsive Air Drums Built Using The Raspberry Pi Pico”

An exploded view render of a red 3D printed case with a green PCB is inside with visible USB-A connectors with a mouse and keyboard graphic above each and "A" and "B" labels above USB-C connectors on the other side.

Building A Better Keyboard And Mouse Switch

Switching inputs between desktops seems like something that should be simple but can prove to be a pain in reality. [Hrvoje Cavrak] decided to take matters into his own hands and build a better keyboard and mouse switch.

DeskHop is built from two Raspberry Pi Pico boards connected via UART and separated by an Analog Devices ADuM1201 dual-channel digital isolator. Through the magic of Pico-PIO-USB these RP2040s can be both host and device. To keep things simple, the PCB is single-sided, and the BOM only has five distinct components.

Once hooked up to your Windows, Mac, or Linux device, your mouse pointer “magically” goes from one screen to the other when dragged across the screen edge. Keyboard LEDs can be reprogrammed to indicate which device is active, and the real beauty of the device is that since it’s a hardware solution, you don’t have to install any software on a computer you might not have admin access to.

If you want to see some more ideas for keyboard and mouse switching, check out this Pi KVM with ATX signaling, this USB triplexer, or this Pi KVM on a PCIe card.

Radiochat Is A Simple LoRa Interface Over WiFi

LoRa is often talked about as a potentially useful solution for emergency communication. The problem is, few of us are running around with LoRa hardware on a day-to-day basis. Student [William Barkoff] designed the Radiochat device as a simple tool that could pair with virtually anything over WiFi, and allow it to send and receive LoRa messages.

Radiochat is based on the Raspberry Pi Pico W, and uses the microcontroller’s wireless hardware to communicate with other devices. It provides a WiFi network that devices like laptops or smartphones can connect to. The Pico serves up a simple web page which accepts text input. Type in a message and hitting enter and the Pico will command a LoRa radio module over SPI to send that message out over the airwaves. It can then be picked up by another Radiochat module which displays the message on its own webpage.

It’s in an early state of development, and the demo video shows there are still some bugs to work out. Ultimately, though, it could be a cheap battery-powered device that lets smartphones and laptops chat over LoRa in remote areas. Indeed, [William’s] trips to New Mexico on model rocketry expeditions were a big inspiration for the project.

Continue reading “Radiochat Is A Simple LoRa Interface Over WiFi”

Raspberry Pi Pico Becomes MIDI-Compatible Synth

ECE 4760 is a microcontroller course that runs at Cornell every year, and it gives students a wide remit to pursue various kinds of microcontroller projects. [Pelham Bergesen] took the class and built himself a MIDI-controllable synthesizer out of a Raspberry Pi Pico.

[Pelham] coded a library to parse MIDI messages on the Pico, with the microcontroller’s UART charged with receiving the input data. MIDI is basically just serial at a baud rate of 31.25k, with a set message structure, after all. From there, the Pico takes the note data and plays the relevant frequencies by synthesizing square waves using a PWM output. A second PWM channel can also be blended with the first to generate more complex tones.  The synthesizer is designed to be used with a source of MIDI note data such as a keyboard controller; [Pelham] demonstrates the project in use with a Roland JD-XI. It’s a fairly basic synthesizer, but [Pelham] does a good job of explaining all the steps required to get this far. If you’ve never done an audio or MIDI project before, you might find his guide very helpful for the way it steps through the basics.

[Pelham] didn’t get to implement fancier features like direct digital synthesis (DDS) or analog audio effects before the class closed out. However, that would be an excellent project for anyone else developing their own Pico synthesizer. If you whip up something that sounds good, or even just interesting, be sure to notify us on the tipsline. Video after the break.

Continue reading “Raspberry Pi Pico Becomes MIDI-Compatible Synth”