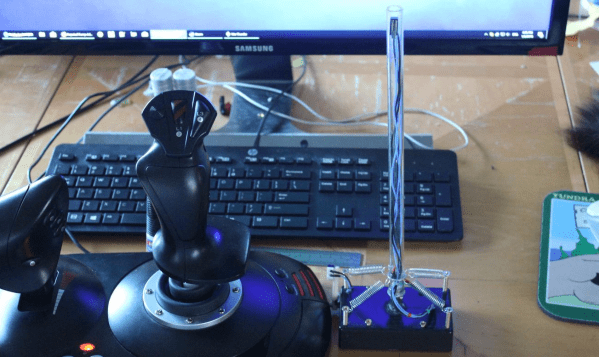
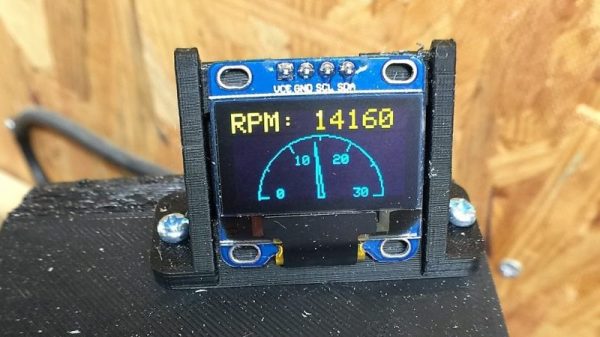
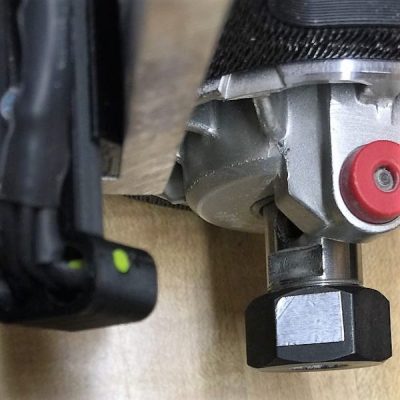
With CNC machines, getting the best results depends on knowing how fast your tool is moving relative to the workpiece. But entry-level CNC routers don’t often include a spindle tachometer, forcing the operator to basically guess at the speed. This DIY optical spindle tach aims to fix that, and has a few nice construction tips to boot.
The CNC router in question is the popular Sienci, and the 3D-printed brackets for the photodiode and LED are somewhat specific for that machine. But [tmbarbour] has included STL files in his exhaustively detailed write-up, so modifying them to fit another machine should be easy. The sensor hangs down just far enough to watch a reflector on one of the flats of the collet nut; we’d worry about the reflector surviving tool changes, but it’s just a piece of shiny tape that’s easily replaced. The sensor feeds into a DIO pin on a Nano, and a small OLED display shows a digital readout along with an analog gauge. The display update speed is decent — not too laggy. Impressive build overall, and we like the idea of using a piece of PLA filament as a rivet to hold the diodes into the sensor arm.
A delightful version of a clever one-dimensional game has been made by [Critters] which he calls TWANG! because the joystick is made from a spring doorstop with an accelerometer in the tip. The game itself is played out on an RGB LED strip. As a result, the game world, the player, goal, and enemies are all represented on a single line of LEDs.
How can a dungeon crawler game be represented in 1D, and how is this unusual game played? The goal is for the player (a green dot) to reach the goal (a blue dot) to advance to the next level. Making this more difficult are enemies (red dots) which move in different ways. The joystick is moved left or right to advance the player’s blue dot left or right, and the player can attack with a “twang” motion of the joystick, which eliminates nearby enemies. By playing with brightness and color, a surprising amount of gameplay can be jammed into a one-dimensional display!
Code for TWANG! is on github and models for 3D printing the physical pieces are on Thingiverse. The video (embedded below) focuses mainly on the development process, but does have the gameplay elements explained as well and demonstrates some slick animations and sharp feedback.
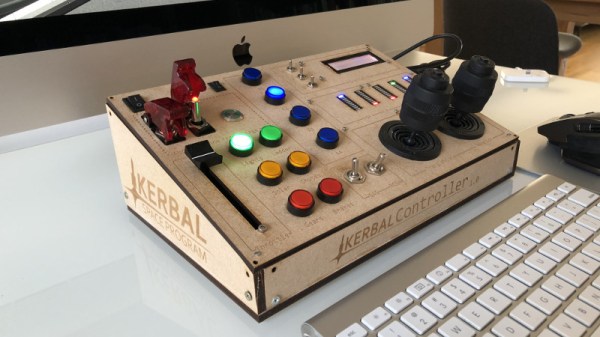
If you have even the most passing interest in space and what it takes to get there, you’ve probably already played Kerbal Space Program (KSP). If you haven’t, then you should set aside about ten hours today to go check that out real quick. Don’t worry, Hackaday will still be here when you get back. Right now you need to focus on getting those rockets built and establishing a network of communication satellites so you can get out of low orbit.
For those of you who’ve played the game (or are joining us again after playing KSP for the prescribed 10, 12, 16 hours), you’ll know that the humble computer keyboard is not very well suited to jaunts through space. You really want a joystick and throttle at the absolute minimum for accurate maneuvers, but even you’ll be spending plenty of time back on the keyboard to operate the craft’s various systems. If you want the ultimate KSP control setup, you’ll need to follow in the footsteps of [Hugo Peeters] and build your own. Luckily for us, he’s written up an exceptionally well detailed guide on building KSP controllers that should prove useful even if you don’t want to clone his.
Wiring switches and buttons to the Arduino.
At the most basic level, building a KSP controller consists of hooking a bunch of switches and buttons to a microcontroller such as the Arduino or Teensy, and converting those to USB HID key presses that the game understands. This works fine up to a point, but is limited because it’s only a one-way method of communication. For his controller, [Hugo] forked KSPSerialIO, a plugin for KSP that allows bidirectional communication between the game and your controller, enabling things like digital readouts of speed and fuel levels on the controller’s panel.
Once the logistics of how you’ll talk to the game are settled, the rest is really up to the individual. The first step in building your own KSP controller is deciding what you want it to do. Are you looking to fly planes? Control a rover? Maybe you just want a master control panel for your space station. There’s a whole lot of things you can build in KSP, and the layout, inputs, and displays on your controller should ideally reflect your play style.
[Hugo] went with a fairly general purpose panel, but did spend quite a bit of extra time to get some slick LED bar graphs hooked up to display resource levels of different systems on his craft. That’s an extra step that isn’t strictly required for a build like this, but once you see it, you’re going to have a hard time not wanting to include it on your own panel. He also went through the expense of having the panel and case professionally laser cut and etched, which definitely gives it a polished feel.
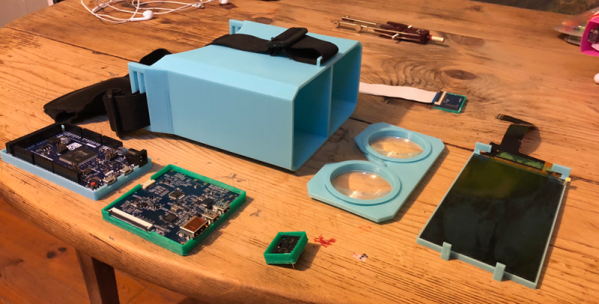
Like a lot of 16-year-olds, [Maxime Coutté] wanted an Oculus Rift. Unlike a lot of 16-year-olds, [Maxime] and friends [Gabriel] and [Jonas] built one themselves for about a hundred bucks and posted it on GitHub. We’ll admit that at 16 we weren’t throwing around words like quaternions and antiderivatives, so we were duly impressed.
Before you assume this is just a box to put a phone in like a Google Cardboard, take a look at the bill of materials: an Arduino Due, a 2K LCD screen, a Fresnel lens, and an accelerometer/gyro. The team notes that the screen is what will push the price unpredictably, but they got by for about a hundred euro. At the current exchange rate, if you add up all the parts, they went a little over $100, but they were still under $150 assuming you have a 3D printer to print the mechanical parts.
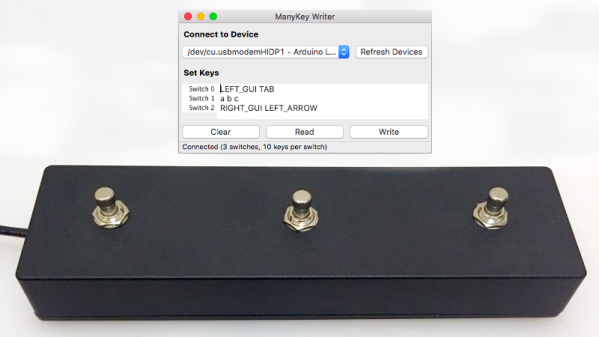
Macros are useful things. They allow one to execute a series of commands with a single keypress. There exists a wide variety of hardware and software solutions to create and use macros to improve your workflow, and now [Evan] has brought the open-source ManyKey into the fray, along with a build tutorial to boot.
The tutorial acts as a great introduction to ManyKey, as [Evan] walks through the construction of a macro keyboard designed to be operated by the feet. Based around the Arduino Leonardo and using off-the-shelf footswitches commonly used in guitar effects, it’s accessible while still hinting at the flexibility of the system. Macros are programmed into the keyboard through a Python app which communicates over serial, and configurations are saved into the Arduino’s onboard EEPROM. The ManyKey source is naturally available over at GitHub.
[Evan] tells us he uses his setup to run DJ software with his feet while his hands are busy on the turntables. That said, there’s all manner of other applications this could be used for. Efficiency is everything, and we love to see keyboard projects that aim to improve workflow with new ideas and custom builds – this shortcut keyboard makes a great example.
An Arduino and a data radio can make a great remote sensor node. Often in such situations, the hardware ends up installed somewhere hard to get to – be it in a light fitting, behind a wall, or secreted somewhere outdoors. Not places that you’d want to squeeze a cable repeatedly into while debugging.
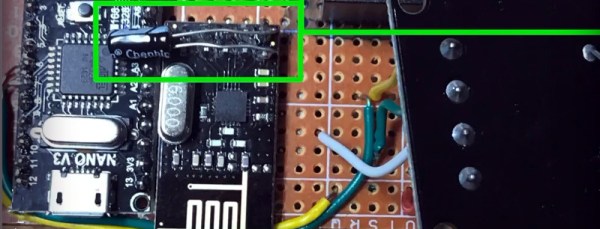
Using the NRF24L01 chip with the Arduino is a popular choice to add wireless communications to a small project. By installing one of these radios on both the remote hardware and a local Arduino connected to the programming computer, it’s possible to remotely flash the Arduino without any physical contact whatsoever using Optiboot.
The writeup is comprehensive and covers both the required hardware setup for both ends of the operation as well as how to install the relevant bootloaders. If you’re already using the NRF24L01 in your projects, this could be the ideal solution to your programming woes. Perhaps you’re using a different platform though – like an Arduino on WiFi? Don’t worry – you can do OTA updates that way, too.
There are plenty of PC joysticks out there, but that didn’t stop [dizekat] from building his own. Most joysticks measure position mechanically using potentiometers or encoders. Only a few high-end models use Hall effect sensors. That’s the route [dizekat] took.
Hall effect sensors are non-contact devices which measure magnetic fields. They can be used to measure the position and orientation of a magnet. That’s exactly how [dizekat] is using a trio of sensors in his design. The core of the joystick is a universal joint from an old R/C car. The center section of the joint (called a spider) has two one millimeter thick disc magnets glued to it. The Hall sensors themselves are mounted in the universal itself. [Dizekat] used a small piece of a chopstick to hold the sensors in position while he found the zero point and glued them in. A third Hall effect sensor is used to measure a throttle stick positioned on the side of the box.
An Arduino micro reads the sensors and converts the analog signal to USB. The Arduino Joystick Library by [Matthew Heironimus] formats the data into something a PC can understand.
While this is definitely a rough work in progress, we’re excited by how much [dizekat] has accomplished with simple hand tools and glue. You don’t need a 3D printer, laser cutter, and a CNC to pull off an awesome hack!
 The CNC router in question is the popular Sienci, and the 3D-printed brackets for the photodiode and LED are somewhat specific for that machine. But [tmbarbour] has included STL files in his exhaustively detailed write-up, so modifying them to fit another machine should be easy. The sensor hangs down just far enough to watch a reflector on one of the flats of the collet nut; we’d worry about the reflector surviving tool changes, but it’s just a piece of shiny tape that’s easily replaced. The sensor feeds into a DIO pin on a Nano, and a small OLED display shows a digital readout along with an analog gauge. The display update speed is decent — not too laggy. Impressive build overall, and we like the idea of using a piece of PLA filament as a rivet to hold the diodes into the sensor arm.
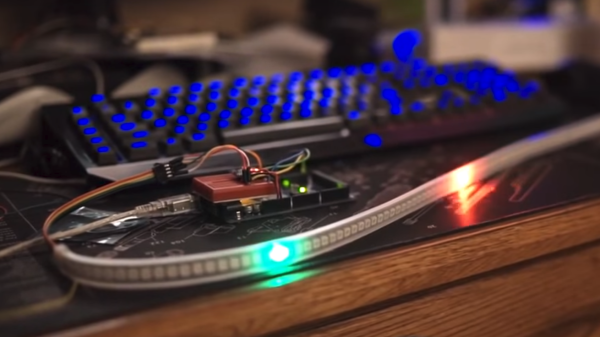
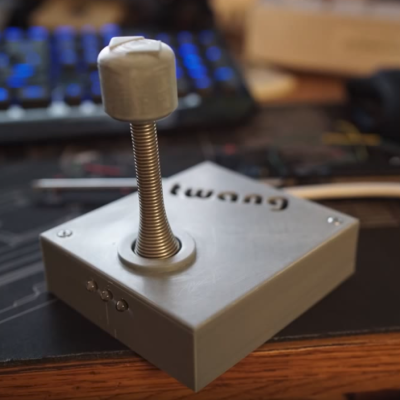 A delightful version of a clever one-dimensional game has been made by [Critters] which he calls