When you’re sick or have a headache, you tend to see things a bit differently. An ill-feeling human will display a cognitive bias and expect the world to punish them further. The same is true of honey bees. They are intelligent creatures that exhibit a variety of life skills, such as decision-making and learning.
It was proven back in 2011 that honey bees will make more pessimistic decisions after being shaken in a way that simulates an attack by varroa destructor mites. The bees were trained to associate a reward of sugar-water with a particular odor and to associate foul-tasting punishment water with another odor—that of formic acid, a common treatment against varroa mites. When a third stimulus created by mixing the two odors was presented, the experimenters found that the aggravated bees were more likely to expect the bad odor. Sure enough, they kept their tongues in their mouths when they smelled the third odor. All the bees that weren’t shaken looked forward to sucking down a bit of sugar-water.
So, how does one judge a honey bee’s response? Whenever their antennae come in contact with something appetizing, they stick out their proboscis involuntarily to have a taste. This is called proboscis extension reflex (PER), and it’s the ingrained, day-one behavior that leads them to suck the nectar out of flower blossoms and regurgitate it to make honey.
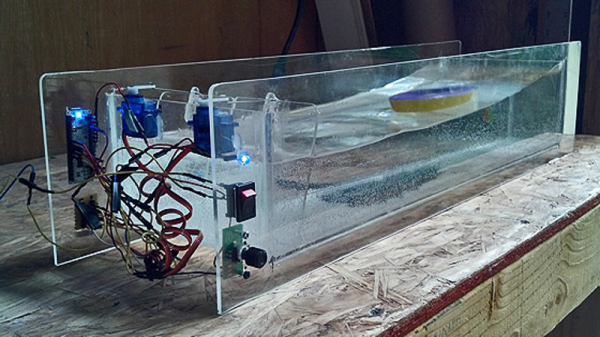
[LJohann] is a behavioral biologist who wanted to test the effects of varroa mite treatment on bee-havior by itself, without agitating the bees. He built a testing apparatus to pump odors toward bees and judge their response which is shown in a few brief demo videos after the break. This device enables [LJohann] to restrain a bee, tantalize its antennae with sucrose, and pump a stimulus odor at its face on the cue of an LED and piezo buzzer. A fan mounted behind the bee helps clear the air of the previous scents. We especially like the use of a servo to swing the tube in and out of the bee’s face between tests.
[LJohann] and his colleagues concluded that the varroa mite treatment by itself does not make the bees pessimistic. This is great news for concerned apiarists who might be skeptical about using formic acid in the fight against the honey bee’s worst predator. Check out the brief demo videos after the break.
Hackaday has long been abuzz about bees whether they produce honey or not. We’ve covered many kinds of sweet projects like intelligent hives, remote hive weight monitoring, and man-made bee nest alternatives. Continue reading “Hassle-Free Classical Conditioning For Honey Bees”