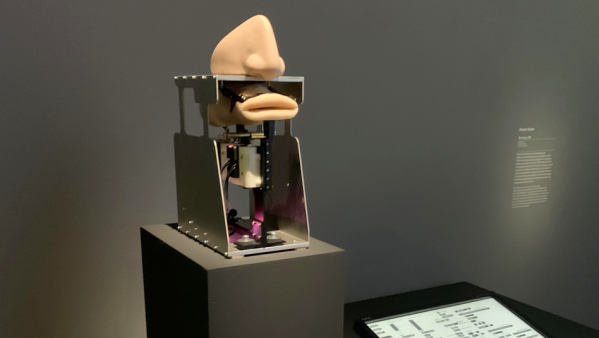
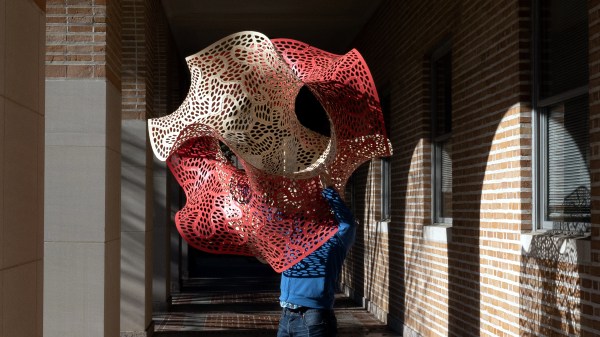
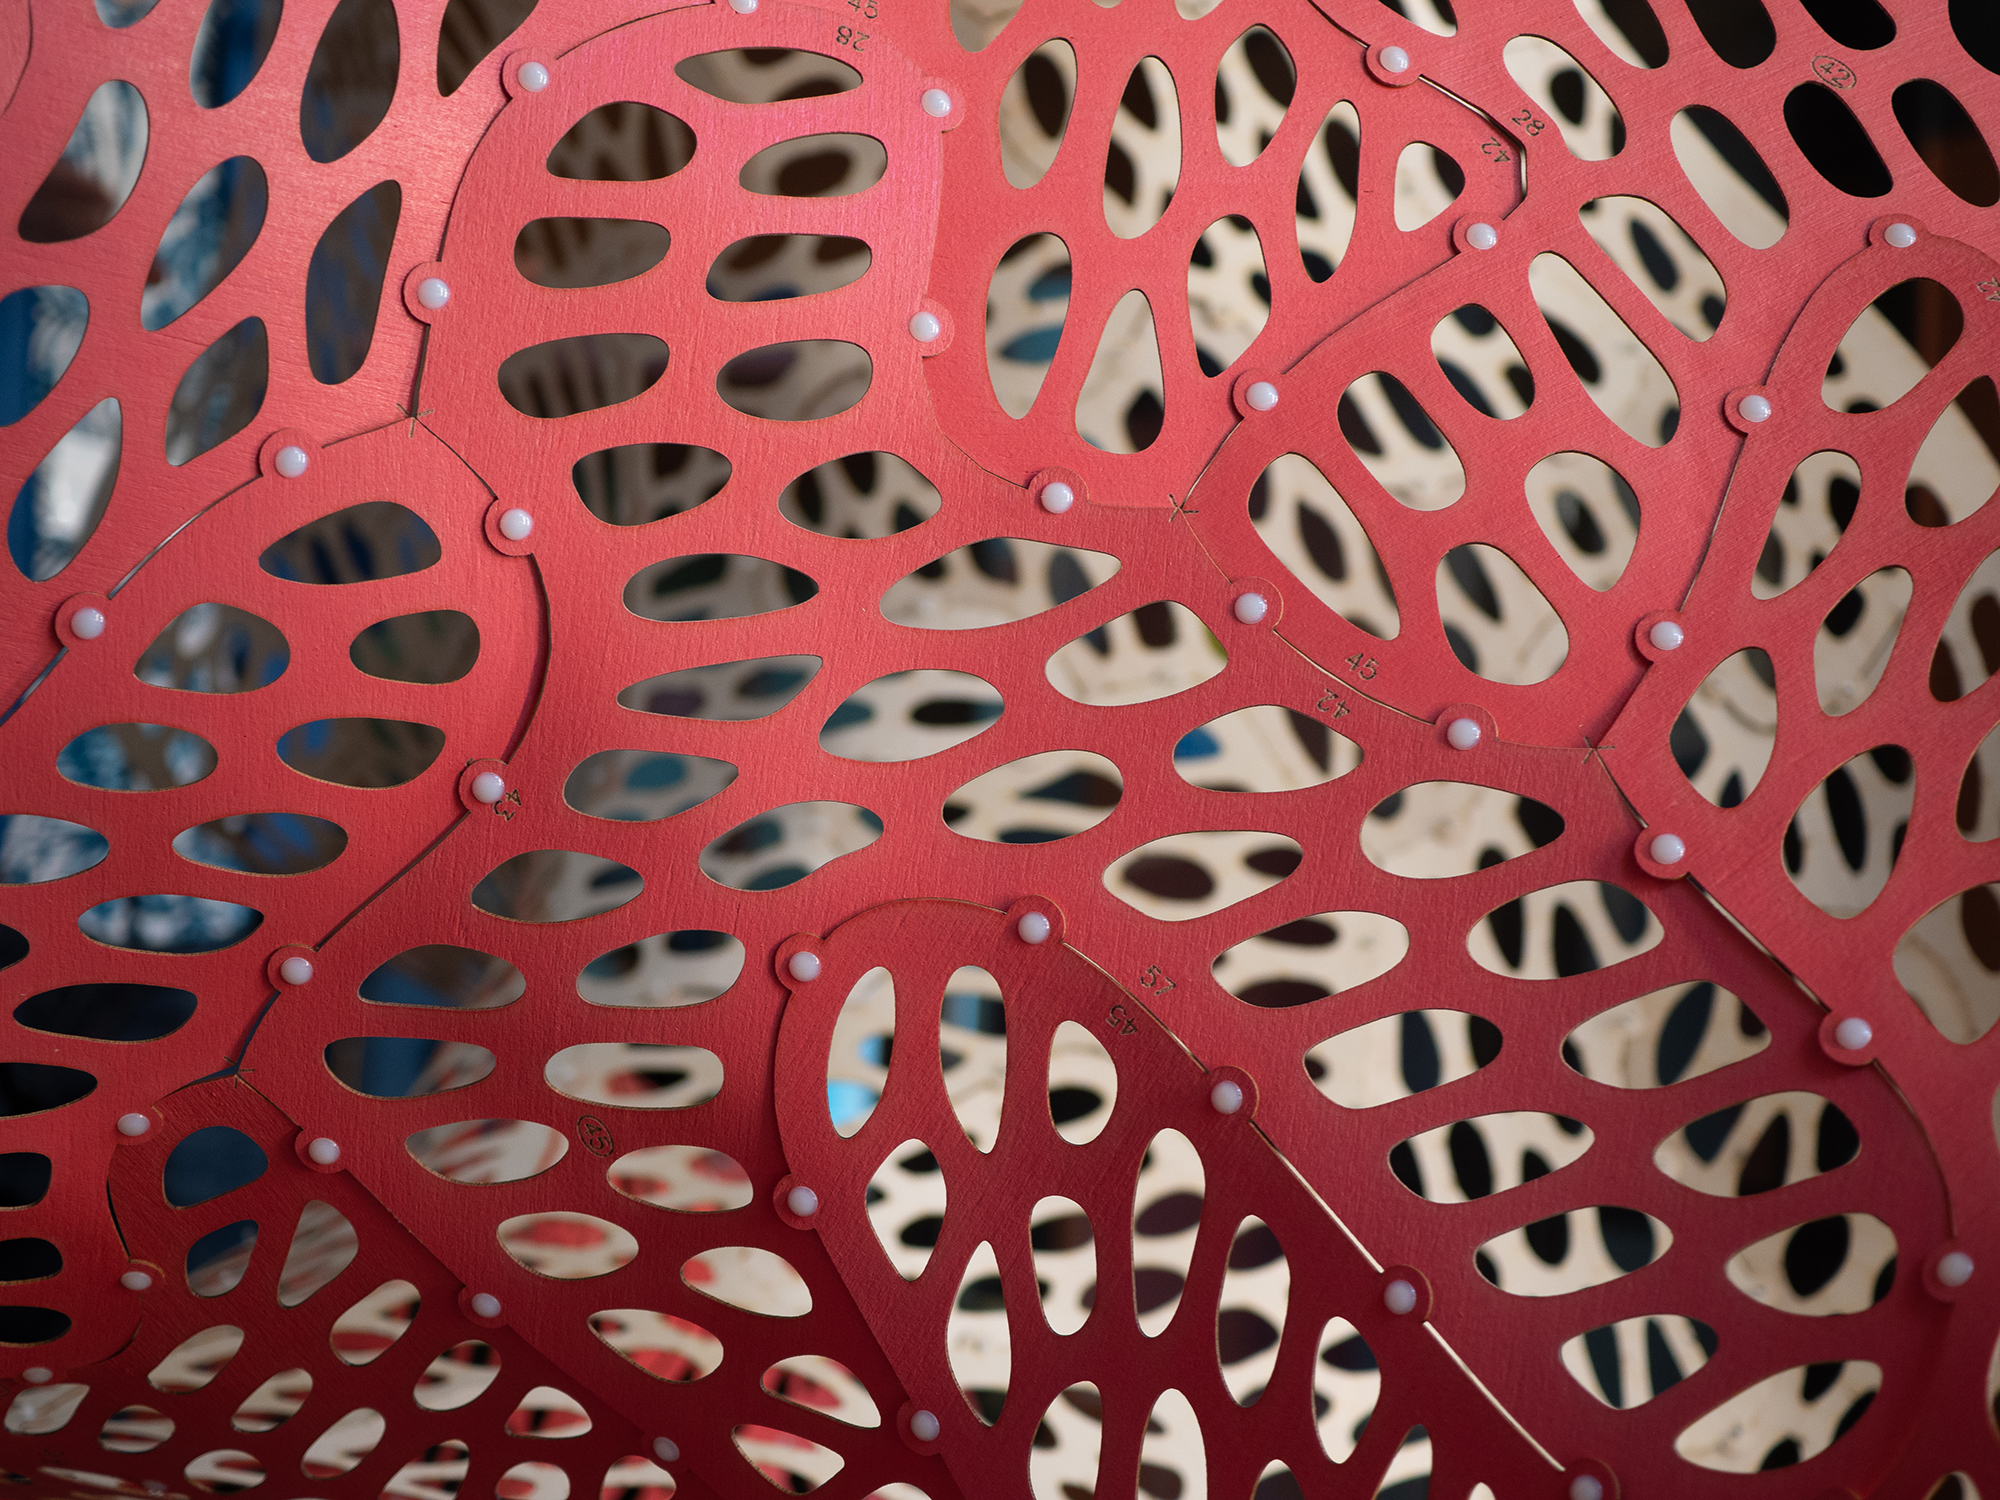
East Coast RepRap Festival Comes Alive In Second Year

By pretty much any metric you care to use, the inaugural East Coast RepRap Festival (ERRF) in 2018 was an incredible success. There was plenty to see, the venue was accommodating, and the ticket prices were exceptionally reasonable. But being a first-time event, there was an understandable amount of trepidation from both exhibitors and the attendees. Convincing people to travel hundreds of miles to an event with no track record can be a difficult thing, and if there was a phrase that would best describe the feel of that first ERRF, it would probably have been “cautious optimism”.

But this year, now that they had some idea of what to expect, the 3D printing community descended on Bel Air, Maryland with a vengeance. In 2019, everything at ERRF was bigger and better. There were more people, more printers, and of course, more incredible prints. Activities like the 3D Printed Derby returned, and were joined by new attractions including full-body 3D scanning and a shooting gallery where attendees could try out the latest in printable NERF weaponry.

The official tally shows that attendance nearly doubled over last year, and with growth like that, we wouldn’t be surprised if the ERRF organizers consider relocating to a larger venue for 2020 or 2021. As far as problems go, growth so explosive that it requires you to rethink where you hold the event isn’t a bad one to have. The Midwest RepRap Festival, which served as the inspiration for ERRF, found they too needed to move into more spacious digs after a few years. Something to keep in mind the next time somebody tells you the bubble has burst on desktop 3D printing.

Trying to distill an event as large and vibrant as ERRF 2019 into a few articles is always difficult. Even after spending hours walking around the show floor, you would still stumble upon something you hadn’t seen previously. As such, this article is merely a taste of what was on hand. The East Coast RepRap Festival 2020 should absolutely be marked on your calendar for next year, but until then let’s take a look at just some of what made this year’s event such a smash.

Continue reading “East Coast RepRap Festival Comes Alive In Second Year”

Mechanical Seven-Segment Display Mixes Art With Hacking

We’re not sure what to call this one. Is it a circuit sculpture? Sort of, but it moves, so perhaps it’s a kinetic circuit sculpture. Creator [Tomohiro Tsuchita] calls it “something beautiful but totally useless,” which we find a tad harsh. But whatever you call it, we think this mechanical seven-segment display is really, really cool.

Before anyone gets to thinking that this is something like the other mechanical seven-segment displays we’ve seen lately, think again. This one is not addressable; it simply goes through the ten digits in order. So you won’t be building a clock from it, although we suppose the mechanism could be modified to allow that. Then again, looking at that drive train of laser-cut acrylic cams, maybe not. Each segment has its own cam with lobes or valleys for each segment. A cam follower lowers and raises the segments as the cams rotate on a common shaft. A full-rotation servo powers the display under the control of a Micro:bit; the microcontroller is overkill for now but will be used in version two, which will allow the speed to change in response to sensors.

Watching this display change at its stately pace is strangely soothing. We love the look of this, but then again, we’re partial to objets d’art-circuit. After all, we ran a circuit sculpture contest earlier in the year, and just wrapped up a Hack Chat dedicated to the subject.

Continue reading “Mechanical Seven-Segment Display Mixes Art With Hacking”

Circuit Sculpture Hack Chat

Join us on Wednesday, November 6 at noon Pacific for the Circuit Sculpture Hack Chat with Mohit Bhoite!

For all the effort engineers put into electronic design, very few people ever get to appreciate it. All the hard work that goes into laying out a good PCB and carefully selecting just the right components is hidden the moment the board is slipped into an enclosure, only to be interacted with again through a user interface that gets all the credit for the look and feel of the product.

And yet there are some who design circuits purely as works of art. They may do something interesting or useful, but function is generally secondary to form for these circuit sculptors. Often consisting of skeletons of brass wire bent at precise angles to form intricate structures, circuit sculptures are the zen garden of electronic design: they’re where the designer turns to quiet the madness of making deadlines and meeting specs by focusing on the beauty of components themselves and putting them on display for all to enjoy.

By day, our host Mohit designs and builds hardware at Particle. By night, however, the wires and pliers come out, and he makes circuit sculptures that come alive. Check out his portfolio; you won’t be disappointed. This Hack Chat will be your chance to find out everything that goes into making these sculptures. Find out where Mohit gets his inspiration, learn his secrets for such precise, satisfyingly crisp wire-bending, and see what it takes to turn silicon into art.

join-hack-chat

Our Hack Chats are live community events in the Hackaday.io Hack Chat group messaging. This week we’ll be sitting down on Wednesday, November 6 at 12:00 PM Pacific time. If time zones have got you down, we have a handy time zone converter.

Click that speech bubble to the right, and you’ll be taken directly to the Hack Chat group on Hackaday.io. You don’t have to wait until Wednesday; join whenever you want and you can see what the community is talking about. Continue reading “Circuit Sculpture Hack Chat”

Brachiograph: A Simple And Cheap Pen-Plotter

The BrachiGraph project consists out of two parts, the hardware design for a servo-driven drawing arm (pen plotter) and software utilities (written in Python) that allow the drawing arm’s servos to be controlled in order to convert a bitmap image into a collection of lines that can be used to draw an image resembling the original, in a variety of styles. All of the software and designs needed to make your own version can be found on the Github page for the project.

docs/images/readme_combined_image.png

Considering an estimated €14 worth of materials for the project, the produced results are nothing short of amazing, even if the principles behind the project go back to the Ancient Greek , of course. The basic hardware is that of a pantograph, which provides the basic clues for how the servos on the plotter arm are being driven.

The main achievement here is definitely that of minimalism, with three dirt-cheap SG-90 microservos along with some bits of wood, a clothes-peg or equivalent, and of course a pen providing a functional plotter that anyone can assemble on a slow Sunday afternoon from random bits lying around the workshop.


Turntable Spins Color And Sound Together

If you can’t grow your own synesthesia, buying electronics to do it for you is fine. Such is the case with the CHROMATIC by [Xavier Gazon], an artist who turns all kinds of electronics into circuit-bent musical art pieces. His project turns an old Philips Music 5120 turntable into a colorful MIDI sequencer, inspired by older 20th century instruments such as the Optophonic Piano and the Luminaphone.

The CHROMATIC uses colored pucks placed on a converted turntable to perform a looping sequence of chords in a given musical scale, generating MIDI data as output. Where its inspirations used primitive optics as their medium, this project employs a Teensy microcontroller and two modern optical sensors to do the work. One of these is a simple infrared sensor which tracks a white spot on the edge of the turntable, generating a MIDI clock signal to keep everything quantized and in sync. The other is a color sensor mounted on the tone arm, which can tell what color it sees and the height of the arm from the turntable.

While the instrument is still in beta testing phase details on how notes are generated aren’t yet given, though the general idea is that they are dictated by the color the tone arm sees and its position above the platter. Moving the tone arm changes which pucks it tracks, and the speed of the turntable can also be adjusted, changing how the melody sounds.​

The CHROMATIC is a very interesting project, but it’s not the first optical-based turntable hack we’ve seen here. We’ve also seen a much weirder use for a color sensor, too. Check out the video of this one in action after the break.

Continue reading “Turntable Spins Color And Sound Together”

Faux Cow Munches Faux Grass On A Faux Roomba

Out in the countryside, having a cow or to two wouldn’t be a big deal. You can have a cattle shed full of them, and no one will bat an eyelid. But what if you’re living in the big city and have no need of pet dogs or cats, but a pet cow. It wouldn’t be easy getting it to ride in the elevator, and you’d have a high chance of being very, very unpopular in the neighbourhood. [Dane & Nicole], aka [8 Bits and a Byte] were undaunted though, and built the Moomba – the Cow Roomba to keep them company in their small city apartment.

The main platform is built from a few pieces of lumber and since it needs to look like a Roomba, cut in a circular shape. Locomotion comes from two DC geared motors, and a third swivel free wheel, all attached directly to the wooden frame. The motors get their 12V juice from eight “AA” batteries. The free range bovine also needs some smarts to allow it to roam at will. For this, it uses a Raspberry Pi powered by a power bank. The Pi drives a 2-channel relay board which controls the voltage applied to the two motors. Unfortunately, this prevents the Moomba from backing out if it gets stuck at a dead end. For anyone else trying to build this it should be easy enough to fix with an electronic speed controller or even by adding a second 2-channel relay board which can reverse the voltage applied to the motors. The Moomba needs to “Moo” when it feels like, so the Raspberry Pi streams a prerecorded mp3 audio clip to a pair of USB speakers.

If you see the video after the break, you’ll notice that making the Moomba sentient is a simple matter of doing “ctrl+C” and “ctrl+V” and you’re good to go. The python code is straight forward, doing one of four actions – move forward, turn left, turn right or play audio. The code picks a random number from 0 to 3, and then performs the action associated with that number. Finally, as an added bonus, the Moomba gets a lush carpet of artificial green grass and it’s free to roam the range.

At first sight, many may quip “where’s the hack” ? But simple, easy to execute projects like these are ideal for getting younglings started down the path to hacking, with adult supervision. The final result may appear frivolous, but it’ll excite young minds as they learn from watching.

Continue reading “Faux Cow Munches Faux Grass On A Faux Roomba”

Daisy Chained Seven Segment Art Display


This seven segment art display makes use of a 81 seven segment red common cathode LED displays. The LEDs are arranged onto 100x100mm boards that each contain an Arduino Nano and 9 seven segment displays, daisy chained through three-pin headers located on the sides of the boards. The pins (power, ground, and serial) provide the signals necessary for propagating a program across each of the connected boards.

The first board – with two Arduino Nanos – sends instructions for which digits to light and drives the display, sending the instructions over to the next board on the chain.

In a multiplexed arrangement, a single Arduino Nano is able to drive up to 12 seven segment displays, but only 9 needed to be driven for the program, keeping D13’s built in LED and the serial pins free. Since no resistors are featured on the boards, current limiting is done through software. This was inspired by the Bubble LED displays on the Sinclair Scientific Calculator, and was done in order to achieve a greater brightness by controlling the current through the duty cycle.

The time between digits lighting up is 2ms, giving them some time to cool down. The animations in the demos featured falling and incrementing digits, as well as a random number generator using a linear feedback shift register.

Continue reading “Daisy Chained Seven Segment Art Display”