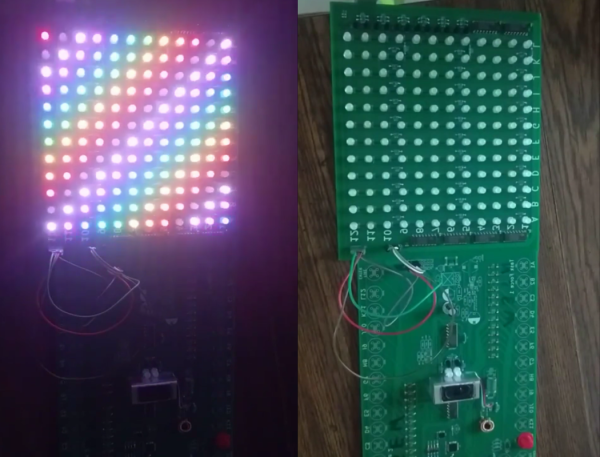
Minimal TinyAVR 0 Programming

When [Alain] wanted to use some of the new TinyAVR 0 chips — specifically, the Attiny406 — it seemed overkill to use the Windows IDE. There are plenty of sources of information on programming other AVR chips using simple command line tools, but not for these newer 0-series parts which use a new programming protocol known as UPDI. That led to a deep diving into how to program a TinyAVR 0 with a text editor, makefile, and USB-to-serial cable.

The Attiny406 has 4K of flash, 256 bytes of RAM and can run at 20 MHz with no external clock. You might think programming would be similar to a regular AVR part, but these tiny devices use UPDI (Unified Programming and Debug Interface) which uses 3 pins for programming. Older devices used different protocols.

It is very easy to create a UPDI programmer. A USB to logic-level serial cable and a 4.7K resistor is all it takes. There’s Python code that knows how to drive the protocol, too. You can also use the logic-level serial port on the Raspberry Pi with some device tree modifications explained in the code’s documentation.

[Alain] made a nice breakout board for the device. It fits a breadboard, allows for 5V or 3.3V operation, and has an LED and switch. Nothing fancy, but handy. Once you know how to ship a hex file to the chip, the rest is pretty standard. While the AVR version of gcc doesn’t cross-compile for the ATTiny out of the box, there is a device pack from Microchip that enables that feature.

The trend is to go to bigger processors, not smaller, but when you need to cram something in a small space, save a few pennies per unit, or draw very little power, these tiny processors can be just the ticket. The processors may be small, but if you work you can do some pretty big things with them.

You Don’t Need That Bulky CRT Oscilloscope Anymore

While it might be nice to use a $4,000 oscilloscope in a lab at a university or well-funded corporate environment, a good portion of us won’t have access to that kind of equipment in our own home shops. There are a few ways of getting a working oscilloscope without breaking the bank, though. One option is to find old CRT-based unit for maybe $50 on craigslist which might still have 60% of its original 1970s-era equipment still operational. A more reliable, and similarly-priced, way of getting an oscilloscope is to just convert a device you already have.

The EspoTek Labrador is an open-source way of converting a Raspberry Pi, Android device, or even a regular run-of-the-mill computer into a working oscilloscope. It’s a small USB device with about a two square inch PCB footprint that includes some other features as well like a signal generator and logic analyzer. It’s based on an ATxmega which is your standard Arduino-style AVR microcontroller but geared for low power usage. It looks as though it is pretty simple to use as well, and the only requirements are that you can install the software needed for the device on whatever computing platform you decide to use.

While the Labrador is available for sale at their website, it is definitely a bonus when companies offer products like this but also release the hardware and software as open source. That’s certainly a good way to get our attention, at least. You can build your own if you’d like, but if you’d rather save the time you have pre-built options. And it doesn’t hurt that most of the reviews of this product seem to be very favorable (although we haven’t tried one out ourselves). If you’d prefer an option without a company backing it, though, we have you covered there too.

Rad-Hard ARM Microcontrollers, Because Ceramic Components Are Just Cooler

If you’re building a cubesat, great, just grab a microcontroller off the shelf, you probably don’t need to worry about radiation hardening. If you’re building an experiment for the ISS, just use any old microcontroller. Deep space? That’s a little harder, and you might need to look into radiation tolerant and radiation hardened microcontrollers. Microchip has just announced the release of two micros that meet this spec, in both radiation-tolerant and radiation-hardened varieties.

The new devices are the SAMV71Q21RT (radiation-tolerant) and the SAMRH71 (rad-hard), both ARM Cortex-M7 chips running at around 300 MHz with enough RAM to do pretty much anything you would want to do with a microcontroller. Peripherals include CAN-FD and Ethernet-AVB, analog front-end controllers, and the usual support for I2C, SPI, and other standards. This chip does it in space, and comes in a ceramic quad flat package with gold lead frames. These are beautiful devices.

Microchip has an incredible number of space-rated, rad-hard hardware; this is mostly due to their acquisition of Atmel a few years ago, and yes, it absolutely is possible to build a rad-hard Arduino Mega using the chip, space rated.

Of course, there are very, very, very few people who would actually ever need a rad-hard microcontroller; I would honestly expect this to be relevant to only one or two people reading this, and they too probably got the press release. If you’ve ever wanted to build something that goes to space, and you’d like to over-engineer everything about it, you now have the option for an ARM Cortex-M7.

See The Fabulous Workmanship In This Smart Pressure Regulator

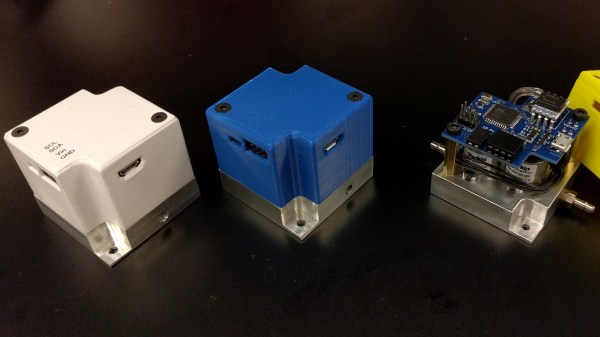
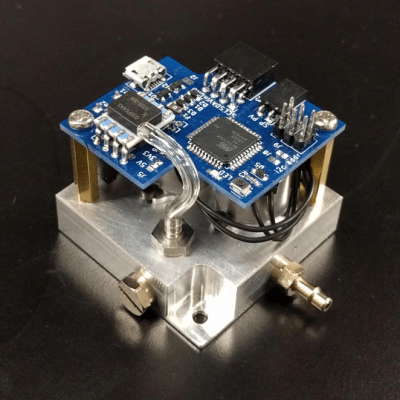
For many projects that require control of air pressure, the usual option is to hook up a pump, maybe with a motor controller to turn it on and off, and work with that. If one’s requirements can’t be filled by that level of equipment and control, then it’s time to look at commercial regulators. [Craig Watson] did exactly that, but found the results as disappointing as they were expensive. He found that commercial offerings — especially at low pressures — tended to leak air, occasionally reported incorrect pressures, and in general just weren’t very precise. Out of a sense of necessity he set out to design his own electronically controlled, closed-loop pressure regulator. The metal block is a custom manifold with valve hardware mounted onto it, and the PCB mounted on top holds the control system. The project logs have some great pictures and details of the prototyping and fabrication process.

This project was the result of [Craig]’s work on a microfluidics control system, conceived because he discovered that much of the equipment involved in these useful systems is prohibitively expensive for small labs or individuals. In the course of developing the electronic pressure regulator, he realized it could have applications beyond microfluidics control, and created it as a modular device that can easily be integrated into other systems and handle either positive or negative pressure. It’s especially well-suited for anything with low air requirements and a limited supply, but with a need for precise control.

The Smaller, Tinier Arduino Platform

While many of the Arduino platforms are great tools for gaining easy access to microcontrollers, there are a few downsides. Price and availability may be the highest on the list, and for those reasons, some have chosen to deploy their own open-source Arduino-compatible boards.

The latest we’ve seen is the Franzininho, an Arduino Gemma-like board that’s based on the ATtiny85, a capable but tiny microcontroller by Atmel in a compact 8-pin configuration. This board has everything the Gemma has, including a built-in LED and breakout pins. One of the other perks of the Franzininho over the Gemma is that everything is based on through-hole components, making the assembly much easier than the surface mount components of the Gemma.

It’s worth noting that while these boards are open source, the Arduinos are as well. It’s equally possible to build your own 100% identical Arduino almost as easily. If you want more features, you can add your own by starting from one of these platforms and do whatever you want with it, like this semi-educational Atmel breakout board.

Thanks to [Clovis] for the tip!

ATtiny Chip Abused In RFID Application

One of Atmel’s smallest microcontrollers, the ATtiny, is among the most inexpensive and reliable chips around for small applications. It’s also one of the most popular. If you don’t need more than a few inputs or outputs, there’s nothing better. As a show of its ability to thrive under adverse conditions, [Trammell Hudson] was able to shoehorn an ATtiny into an RFID circuit in a way that tests the limits of the chip design.

The RFID circuit only uses two of the ATtiny’s pins and neither of which is the ground or power pin. The ATtiny is equipped with protective diodes on its input pins, and if you apply an AC waveform to the input pins, the chip is able to use the leakage current to power itself. Once that little hurdle is crossed, the ATtiny can do the rest of its job handling the RFID circuitry.

This project takes a deep dive into the internals of the ATtiny. If you’ve ever wondered what was going on inside of everyone’s favorite tiny microcontroller, or if you’re looking for an RFID circuit that keeps parts counts to an absolute minimum, this is the project for you.  The ATtiny is more than just a rugged, well-designed chip, though. It’s capable of a lot more than such a small chip should be able to.

Thanks to [adnidor] for the tip!

Teensy Script Plays Nintendo Switch, Strikes Out

The most recent of the Zelda franchise, Breath of the Wild, is known for its many, many puzzles.  One of the more frustrating ones involved bowling with a giant snowball at the top of a hillside.  [Bertrand] did not like this, so he cheated the system hacked the Nintendo Switch so that he “genuinely earned” a strike every time he played.  He achieved this by writing a script for a Teensy module that got him those sweet rupees.

The Teensy houses an Atmel 90USB1286 microcontroller.  When paired with LUFA software, it can emulate numerous controllers including keyboards, joysticks, etc.  It also handily has a Mini-B USB connector located on its rear, allowing it to communicate to the Switch with ease.  After confirming the hardware was compatible, [Bertrand] looked towards the software side noticing the similarity between what already existed and what he was attempting to accomplish.  He happened upon this in a Splatoon 2 fork that allows players to draw posts. 

In essence, it takes image files as input and emulates the controls and buttons to draw a 1-bit version of the image automatically.  This takes care of syncing the hardware as well as how to simulate the button presses.  But instead of reading an image file, it needed to take a custom script as the input.  This required starting from scratch.  The first logical step — of course — was to create a language similar to Logo, a name that surely brings back memories of the time of big hair and shoulder pads.  He only needed a handful of simple commands to control Link:

typedef enum {
	UP,
	DOWN,
	LEFT,
	RIGHT,
	X,
	Y,
	A,
	B,
	L,
	R,
	THROW,
	NOTHING,
	TRIGGERS
} Buttons_t;

Continue reading “Teensy Script Plays Nintendo Switch, Strikes Out”