ATTiny85 as fan controller

An ATTiny GPU Fan Controller That Sticks

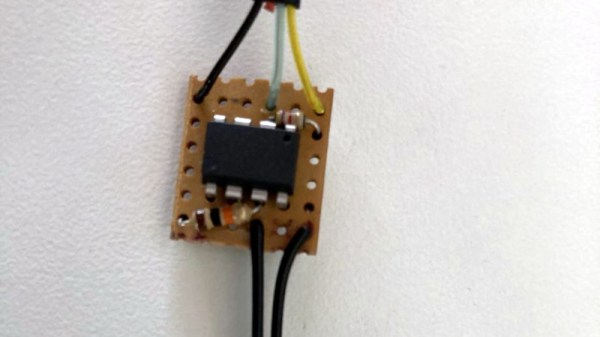
When your GPU fan goes rogue with an unholy screech, you either shell out for a new one or you go full hacker mode. Well, [ashafq] did the latter. The result is a delightfully nerdy fan controller powered by an ATTiny85 and governed by a DS18B20 temperature sensor. We all know a silent workstation is golden, and there’s no fun in throwing money at an off-the-shelf solution. [ashafq]’s custom build transforms a whiny Radeon RX 550 into a cool, quiet operator. Best of all: it’s built from bits likely already in your junk drawer.

To challenge himself a bit, [ashafq] rolled his own temperature-triggered PWM logic using 1-wire protocol on an ATtiny85, all without libraries or bloated firmware. The fan’s speed only ramps up when the GPU gets toasty, just like it should. It’s efficient and clever, and that makes it a fine hack. The entire system runs off a scavenged 12V fan. He could have used a 3D printer, but decided to stick onto the card with double-sided tape. McGyver would approve.

The results don’t lie: idle temps at 40 °C, load peaking at 60 °C. Quieter than stock, smarter than stock, and way cheaper too. The double-sided tape may not last, but that leaves room for improvement. In case you want to start on it yourself, read the full write-up and feel inspired to build your own. Hackaday.io is ready for the documentation of your take on it.

Modifying fans is a tradition around here. Does it always take a processor? Nope.

Business Card-Tro

ATtiny-Powered Business Card Plays Cracktro Hits

These cards plug into a USB port for power and have over a dozen small LEDs that light up the stars on the front, and a small buzzer that can play over ten minutes of cracktro music. To keep the cost down, [VCC] went with an ATtiny1616 microcontroller costing under 50 cents and still having plenty of outputs to drive the buzzer and LEDs. The final per-unit cost prior to shipping came out to only 1.5 euros, enabling them to be handed out without worrying about breaking the bank.

To aid in the assembly of the cards, [VCC] 3D printed a jig to apply material to the back of the USB connector, building up its thickness to securely fit in the USB port. He also wrote a small script for assembly-line programming the cards, getting the programming process down to around ten seconds per card and letting him turn through prepping the cards. Thanks, [VCC], for sending in your project—it’s a great addition to other PCB business cards we’ve featured.

Continue reading “ATtiny-Powered Business Card Plays Cracktro Hits”

Configurable Custom Logic (CCL) Block Diagram.

Getting Started With ATtiny Configurable Custom Logic (CCL)

In the Microchip tinyAVR {0,1,2}-series we see Configurable Custom Logic (CCL) among the Core Independent Peripherals (CIP) available on the chip. In this YouTube video [Grug Huhler] shows us how to make your own digital logic in hardware using the ATtiny CCL peripheral.

If you have spare pins on your tinyAVR micro you can use them with the CCL for “glue logic” and save on your bill of materials (BOM) cost. The CCL can do simple to moderately complex logic, and it does it without the need for support from the processor core, which is why it’s called a core independent peripheral. A good place to learn about the CCL capabilities in these tinyAVR series is Microchip Technical Brief TB3218: Getting Started with Configurable Custom Logic (CCL) or if you need more information see a datasheet, such as the ATtiny3226 datasheet mentioned in the video.

Continue reading “Getting Started With ATtiny Configurable Custom Logic (CCL)”

A Smarter Solar Water Heater

Installing solar power at a home is a great way to reduce electricity bills, especially as the cost of solar panels and their associated electronics continue to plummet. Not every utility allows selling solar back to the grid, though, so if you’re like [Rogan] who lives in South Africa you’ll need to come up with some clever tricks to use the solar energy each day while it’s available to keep from wasting any. He’s devised this system for his water heater that takes care of some of this excess incoming energy.

A normal water heater, at least one based on electric resistive heaters, attempts to maintain a small range of temperatures within the insulated tank. If the temperature drops due to use or loss to the environment, the heaters turn on to bring the temperature back up. This automation system does essentially the same thing, but allows a much wider range of temperatures depending on the time of day. Essentially, it allows the water heater to get much hotter during times when solar energy is available, and lets it drop to lower values before running the heater on utility electricity during times when it isn’t. Using a combination ESP32 and ATtiny to both control the heater and report its temperature, all that’s left is to program Home Assistant to get the new system to interact with the solar system’s battery charge state and available incoming solar energy.

While it’s an elegantly simple system that also affords ample hot water for morning showers, large efficiency gains like this can be low-hanging fruit to even more home energy savings than solar alone provides on paper. Effectively the water heater becomes another type of battery in [Rogan]’s home, capable of storing energy at least for the day in the form of hot water. There are a few other ways of storing excess renewable energy as well, although they might require more resources than are typically available at home.

Spice Up Your Earrings With Microelectronics

We’ve covered [mitxela] in the past and if you know him, you’ll likely know him for putting the micro in microelectronics. This year, he’s at it again with his LED Industrial Piercing.

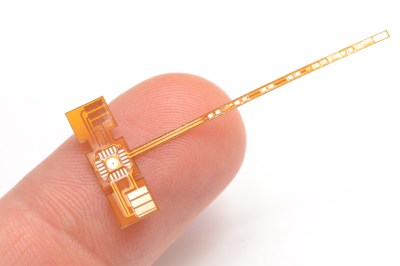
A T-shaped flexible PCB that is smaller than an index finger
This tiny PCB is really pushing the limits of fabrication

Inspired by the absolutely tiny 0402 LEDs and industrial piercings, [mitxela] started thinking of a way to construct the 5cm long device. He found some normal LED earrings to steal the battery compartment from. Then, with a tick needle and some more steel, he created a new industrial earring with some holes.

Of course, no [mitxela] project is complete without comically tiny microsoldering and this project makes the VQFN ATTiny he used look large. He puts his PCB suppliers to the test with a merely 1mm wide flex PCB for the LEDs to be mounted on. Finally, he combines the flex PCB, the earring and some epoxy to create yet another piece of LED jewelry.

Video after the break.
Continue reading “Spice Up Your Earrings With Microelectronics”

Arduino Measures Remaining Battery Power With Zero Components, No I/O Pin

[Trent M. Wyatt]’s CPUVolt library provides a fast way to measure voltage using no external components, and no I/O pin. It only applies to certain microcontrollers, but he provides example Arduino code showing how handy this can be for battery-powered projects.

The usual way to measure VCC is simple, but has shortcomings.

The classical way to measure a system’s voltage is to connect one of your MCU’s ADC pins to a voltage divider made from a couple resistors. A simple calculation yields a reading of the system’s voltage, but this approach has two disadvantages: one is that it constantly consumes power, and the other is that it ties up a pin that you might want to use for something else.

There are ways to mitigate these issues, but it would be best to avoid them entirely. Microchip application note 2447 describes a method of doing exactly that, and that’s precisely what [Trent]’s Arduino library implements.

What happens in this method is one selects Vbg (a fixed internal voltage reference that is temperature-independent) as Vin, and selects Vcc as the ADC’s voltage reference. This is essentially backwards from how the ADC is normally used, but it requires no external hookup and is only a bit of calculation away from determining Vcc in millivolts. There is some non-linearity in the results, but for the purposes of measuring battery power in a system or deciding when to send a “low battery” signal, it’s an attractive solution.

Being an Arduino library, CPUVolt makes this idea very easy to use, but the concept and method is actually something we have seen before. If you’re interested in the low-level details, then check out our earlier coverage which goes into some detail on exactly what is going on, using an ATtiny84.

ACK1 Makes Getting To Know The ATtiny1616 Easy

Many readers will be familiar with Microchip’s ATtiny85, which has been a popular choice for DIY projects in the past for its low price and (for the time) small size. But those looking for a more modern and capable 8-bit chip may find the ATtiny1616-MNR of interest. It offers expanded flash storage, more GPIO, and ditches SPI programming in favor of UPDI — a protocol that can be done using nothing more than an USB-UART converter and a resistor.

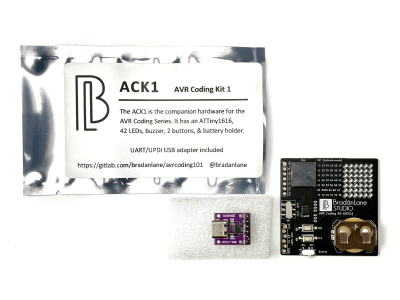
The contents of the ACK1 kit
What’s in the kit if you buy it.

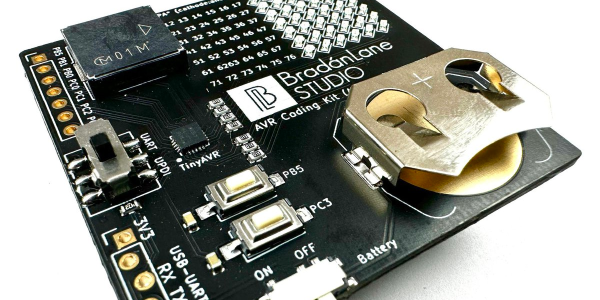
But here’s the catch: the new chip is only available in SMD and there are far fewer tutorials for it! That’s why [Bradán Lane] has created ACK1, a cute little AVR Coding Kit for those of us who want to play with the ATtiny1616 and a companion for his free and open-source course.

The board contains an array of 6 by 7 LEDs in a charlieplexed configuration, a large piezo buzzer, two push buttons, an on/off switch, and a CR2032 battery holder to keep it on without the need for a cable. The kit looks gorgeous in its white-on-black theme with gold plated contacts and can be had for $20 on Tindie at the time of writing.

The ATtiny1616 itself runs at up to 20 MHz and has 17 GPIO pins, 16 KiB of flash storage, 2 KiB of RAM, and 256 bytes of EEPROM for configuration — making it roughly on par with the original Arduino Uno.

The course that goes hand-in-hand with the ACK1 is all about the features of the ATtiny1616, from the basics of using the programmer to reading the buttons, using timers, driving the charlieplexed LEDs, storing data in the EEPROM and much more. Though it does not cover the basics of C, the course is free, and even licensed MIT, so that anyone can share it and improve upon it.

If you enjoy seeing beautiful microcontrollers, you’ll definitely want to see the stylish Uno Plus+.