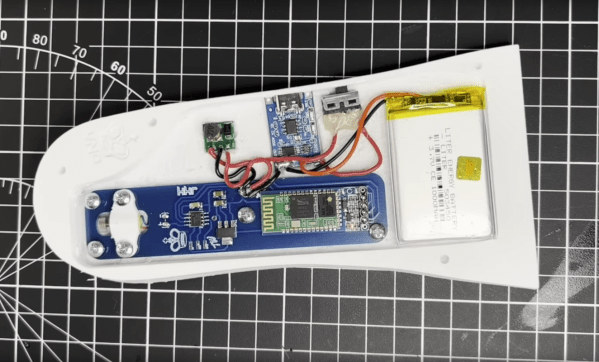
TickTag, a tiny GPS logger with 3d printed case, LiPo battery and a 1 Euro coin for size reference

Tiny GPS Logger For The Internet Of Animals

[Trichl] has created a tiny GPS logger, called ‘TickTag’, designed as an inexpensive location tracking option for animal studies. The low cost, tiny form factor, and large power density of the LiPo battery give it the ability to track large populations of small animals, including dogs and bats.

The TickTag is capable of getting 10,000 GPS fixes from its 30 mAh cell. Each unit is equipped with an L70B-M39 GPS module controlled by an Atmel ATtiny1626 microcontroller and sports a tiny AXE610124 10-pin connection header for programming and communication. GPS data is stored on a 128 kB EEPROM chip with each GPS location fix using 25 bits for latitude, 26 bits for longitude, and 29 bits for a timestamp. Add it all up and you get 10 bytes per GPS data point (25+26+29=80), giving the 10k GPS fix upper bound.

To record higher quality data and extend battery life, the TickTag can be programmed to record GPS location data using variable frequency intervals or when geofencing bounds have been crossed.

Continue reading “Tiny GPS Logger For The Internet Of Animals”

Pocket Radio Powered By Tiny Microcontroller

Before the days of MP3 players and smartphones, and even before portable CD players, those of us of a certain age remember that our cassette players were about the only way to take music on-the-go. If we were lucky, they also had a built-in radio for when the single tape exhausted both of its sides. Compared to then, it’s much easier to build a portable radio even though cassettes are largely forgotten, as [wagiminator] shows us with this radio design based on an ATtiny.

The build is about as compact as possible, with the aforementioned ATtiny 402/412 as its core, it also makes use of an integrated circuit FM tuner,  an integrated audio amplifier with its own single speaker, and a small OLED display. The unit also boasts its own lithium-polymer battery charger and its user interface consists of only three buttons, plenty for browsing radio stations and controlling volume.

The entire build fits easily in the palm of a hand and is quite capable for a mobile radio, plus all of the schematics and code is available on the project page. While it doesn’t include AM capability, just the fact that FM is this accessible nowadays when a few decades ago it was cutting-edge technology is quite remarkable. If you’re looking for an even smaller FM receiver without some of the bells and whistles of this one, take a look at this project too.

Bug Zapper Counts And Serenades Its Victims

Not many creatures are as universally despised as mosquitoes, whether it’s the harmless kind that, at worst, makes you miss winter, or the more serious ones that can be a real threat to your health. A satisfying way to deal with them is to send them off with a bang using one of those racket-shaped high voltage metal mesh bug zappers. [lmu34] saw big potential for some additional gamification here, and decided to equip his zapper with a kill counter and matching sound effects.

The initial thought was that there has to be a way to detect when a mosquito hits the mesh, and use that to trigger further events — in [lmu34]’s case play a sound file and increment a counter. After taking the zapper apart and doing a bit of research, he put theory into practice using a Digispark Pro board containing an ATtiny167, the DFPlayer module for playing a set of WAV files, and an ambitious four digit 7-segment display to keep track of the “score”. A new 3d-printed cover provided enough space to house all the components, including a charging circuit as he swapped the original two AAA batteries with a rechargeable one, which gave a bit more power for the display.

Of course, with these operation voltages, it would be difficult to detect activity on the high voltage side more than once, so [lmu34] went with current sensing instead. He distinguishes between two different levels here and maps them as normal kill and monster kill for the big zaps respectively, playing different sounds for each. Have a look at the video after the break for some quick demonstration.

All in all, this is a delightfully absurd modification that almost screams for an ESP32 to enable multiplayer mode as next iteration. But if chasing mosquitoes with low-tech gadgets isn’t for you, there’s always lasers and good old torture, although those can’t be repurposed to do some hardware fault injections during the winter months then.

Continue reading “Bug Zapper Counts And Serenades Its Victims”

A purple PCB with an OLED display and various chips

A Neat Little Tool To Reset The Fuses On Your ATtiny

If you’re an experienced hacker, you’ve probably run into a problem at some point and thought “let’s make a tool to automate that”. A few hours later you’ve got your tool, but then realize that the amount of work you put into making the tool vastly exceeds what you would have needed to solve the original problem manually. That really doesn’t matter though: developing a fancy tool can be a rewarding experience that teaches you way more about the original problem than you would have learned otherwise. [sjm4306]’s ATtiny High Voltage Fuse Reset-er is a clever device that firmly falls into this category.

The problem it solves is familiar to anyone who’s ever worked with Atmel/Microchip’s ATtiny series of microcontrollers: set one of the configuration fuses incorrectly and you’re no longer able to reprogram your chip. Getting the ATtiny back to its original configuration requires a high-voltage programming step that involves pulling the reset pin to 12 V in what’s otherwise a 5 V system. You could simply grab a spare 12 V supply and hack together a level shifter with a few transistors, but where’s the fun in that?

[sjm4306]’s solution is built on a pretty purple PCB that contains an ATmega328, an OLED display, and sockets to accommodate various versions of the ATtiny series microcontrollers. To generate the required 12 V, one could simply use an off-the-shelf boost converter IC. But instead, he decided it would be interesting to make such a circuit out of discrete components and control it using the ATmega. After all, this chip already contains timers to generate PWM signals and an ADC to measure the converter’s output voltage, so all it took was to write some control logic in the form of a PID controller.

The end result, as you can see in the video embedded below, is a convenient little PCB that runs off a 5 V USB power supply and resets the fuses on your ATtiny at the push of a button. Sometimes, simple tools that do one thing well are all you need; however, if you’re looking for an all-in-one AVR programmer that also supports HV programming, check out this AVR Multi-Tool.

Continue reading “A Neat Little Tool To Reset The Fuses On Your ATtiny”

Miniature Motorized RC Car Is Massively Impressive

Small is often subjective. For example, a school bus is small compared to an Airbus A380. But other things are just small all on their own and need no comparison to make the point. Such is the case with this micro RC car in the video below the break. It’s an RC model of the Smart Car, that when compared to other vehicles on the road, is quite diminutive, both subjectively and absolutely. But the outward appearance of [diorama111]’s project only tells half the story.

Starting out as a static display model, [diorama111] fully disassembled the 1/87 scale Smart Car and got to work. Fully proportional steering is attained with a very, very small stepper motor that drives custom knuckles attached to handmade suspension. They are works of art in their own right.

Do your projects need tweezers for assembly?

Drive is supplied by another small stepper motor. If [diorama111] had stopped there, it would have been every bit as noteworthy to see a 1/87 Smart Car doing figure eights around small bottles of model paint. Instead, [diorama111] kept going! The car has working turn signals, brake lights (including the 3rd taillight in the back window!) and headlights. There is even a function for hazard lights.

The electronics are all hand built using enameled wire and SMD components on perf board, and are a study in miniaturization all their own. An ATtiny processor seems right at home in this design. We admire [diorama111]s steady hands and patience to build such a small RC car, never mind one with such fine attention paid to all the details.

If downsized hacks like this float your thimble-sized boat, you might also appreciate this precious little PDP-11 and terminal.

Continue reading “Miniature Motorized RC Car Is Massively Impressive”

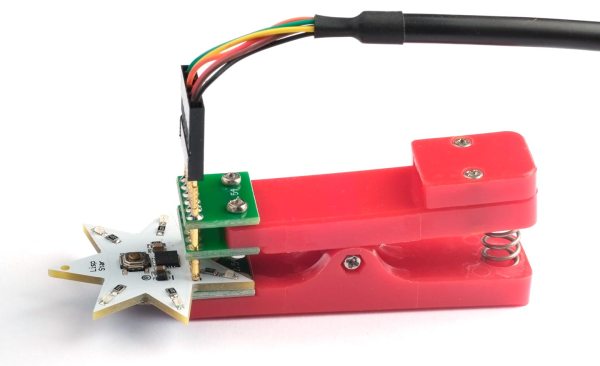
A HVTPI adapter plugged into a USBASP, with a an IDC10 cable plugged into it in turn

HVTPI Primer And Toolkit Equips You For BOM Substitutions

Novel programming interfaces for MCUs might catch us by surprise, but then we inevitably get up to speed with the changes required. Today’s bastion is HVTPI – a “12V reset” addition to the TPI we’ve just started getting used to, and [Sam Ettinger] has shared a simple circuit to teach us all about it, along with PCB files and detailed explanations of how it all works.

HVTPI is an add-on on top of TPI, for which, as Sam explains, you need to hold RST at 12V when TPI would have it be low logic level, and leave it at Vtarget otherwise. For that, he has designed a variety of interposer boards of various complexity and requirements; explaining the choices behind each one and clearing up any misunderstandings that might occur on your way. All of the board files (and the TPI write-up copy) are caringly shared with us in a git repository, too! As a result, if you have an USB-ASP or an Arduino available, now you also have everything to do HVTPI, thanks to Sam’s work and explanations.

We’ve been covering Sam’s exploits before, and can’t help but be grateful for the stop-and-explain detour along the way. HVTPI being used on very small ATTiny parts, we wonder if something new in the vein of his recent FPC board able to fit and function entirely within a Type-C cable end!

With chip shortages, investigating programming interfaces for small and obscure yet in-stock microcontrollers has been, quite literally, paying off, and if you got some projects that need a MCU but won’t consume a whole lot of resources, it could be time to give an ATTiny10 a go. What’s the worst that can happen – you make the smallest chiptunes ever?

I2C To The Max With ATtiny

The Arduino is a powerful platform for interfacing with the real world, but it isn’t without limits. One of those hard limits, even for the Arduino MEGA, is a finite number of pins that the microcontroller can use to interface with the real world. If you’re looking to extend the platform’s reach in one of your own projects, though, there are a couple of options available. This project from [Bill] shows us one of those options by using the ATtiny85 to offload some of an Arduino’s tasks using I2C.

I2C has been around since the early 80s as a way for microcontrollers to communicate with each other using a minimum of hardware. All that is needed is to connect the I2C pins of the microcontrollers and provide each with power. This project uses an Arduino as the controller and an arbitrary number of smaller ATtiny85 microcontrollers as targets. Communicating with the smaller device allows the Arduino to focus on more processor-intensive tasks while giving the simpler tasks to the ATtiny. It also greatly simplifies wiring for projects that may be distributed across a distance. [Bill] also standardizes the build with a custom development board for the ATtiny that can also double as a shield for the Arduino, allowing him to easily expand and modify his projects without too much extra soldering.

Using I2C might not be the most novel of innovations, but making it easy to use is certainly a valuable tool to add to the toolbox when limited on GPIO or by other physical constraints. To that end, [Bill] also includes code for an example project that simplifies the setup of one of these devices on the software end as well. If you’re looking for some examples for what to do with I2C, take a look at this thermometer that communicates with I2C or this project which uses multiple sensors daisy-chained together.

Continue reading “I2C To The Max With ATtiny”