It’s Time For Direct Metal 3D-Printing

It’s tough times for 3D-printing. Stratasys got burned on Makerbot, trustful backers got burned on the Peachy Printer meltdown, I burned my finger on a brand new hotend just yesterday, and that’s only the more recent events. In recent years more than a few startups embarked on the challenge of developing a piece of 3D printing technology that would make a difference. More colors, more materials, more reliable, bigger, faster, cheaper, easier to use. There was even a metal 3D printing startup, MatterFab, which pulled off a functional prototype of a low-cost metal-powder-laser-melting 3D printer, securing $13M in funding, and disappearing silently, poof.

This is just the children’s corner of the mall, and the grown-ups have really just begun pulling out their titanium credit cards. General Electric is on track to introduce 3D printed, FAA-approved fuel nozzles into its aircraft jet engines, Airbus is heading for 3D-printed, lightweight components and interior, and SpaceX has already sent rockets with 3D printed Main Oxidizer Valves (MOV) into orbit, aiming to make the SuperDraco the first fully 3D printed rocket engine. Direct metal 3D printing is transitioning from the experimental research phase to production, and it’s interesting to see how and why large industries, well, disrupt themselves.

Continue reading “It’s Time For Direct Metal 3D-Printing”

V2V: A Safer Commute With Cars Sharing Status Updates

Every year, more than 30,000 people are killed in motor vehicle accidents in the US, and many many more are injured. Humans, in general, aren’t great drivers. Until dependable self-driving cars make their way into garages and driveways across the country, there is still a great amount of work that can be done to improve the safety of automobiles, and the best hope on the horizon is Vehicle to Vehicle communications (V2V). We keep hearing this technology mentioned in news stories, but the underlying technology is almost never discussed. So I decided to take a look at what hardware we can expect in early V2V, and the features you can expect to see when your car begins to build a social network with the others around it.

Continue reading “V2V: A Safer Commute With Cars Sharing Status Updates”

The Year Of The Car Hacks

With the summer’s big security conferences over, now is a good time to take a look back on automotive security. With talks about attacks on Chrysler, GM and Tesla, and a whole new Car Hacking village at DEF CON, it’s becoming clear that autosec is a theme that isn’t going away.

Up until this year, the main theme of autosec has been the in-vehicle network. This is the connection between the controllers that run your engine, pulse your anti-lock brakes, fire your airbags, and play your tunes. In most vehicles, they communicate over a protocol called Controller Area Network (CAN).

An early paper on this research [PDF] was published back in 2010 by The Center for Automotive Embedded Systems Security,a joint research effort between University of California San Diego and the University of Washington. They showed a number of vulnerabilities that could be exploited with physical access to a vehicle’s networks.

A number of talks were given on in-vehicle network security, which revealed a common theme: access to the internal network gives control of the vehicle. We even had a series about it here on Hackaday.

The response from the automotive industry was a collective “yeah, we already knew that.” These networks were never designed to be secure, but focused on providing reliable, real-time data transfer between controllers. With data transfer as the main design goal, it was inevitable there would be a few interesting exploits.

Continue reading “The Year Of The Car Hacks”

Volvo Phone Holder

DIY IPhone Mount For A Volvo

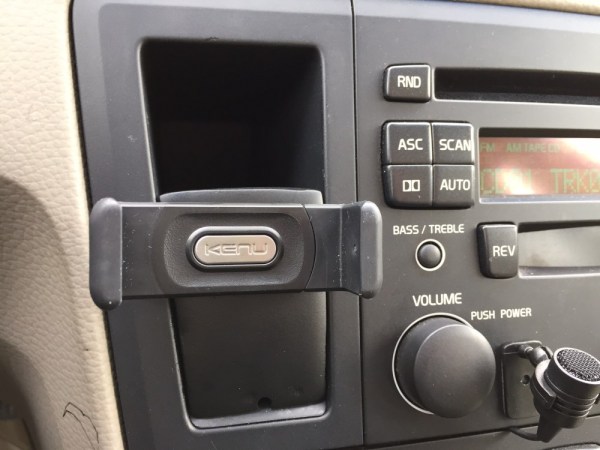
[Seandavid010] recently purchased a 2004 Volvo. He really liked the car except for the fact that it was missing some more modern features. He didn’t come stock with any navigation system or Bluetooth capabilities. After adding Bluetooth functionality to the stock stereo himself, he realized he would need a secure location to place his iPhone. This would allow him to control the stereo or use the navigation functions with ease. He ended up building a custom iPhone mount in just a single afternoon.

The key to this project is that the Volvo has an empty pocket on the left side of the stereo. It’s an oddly shaped vertical pocket that doesn’t seem to have any real use. [Seandavid010] decided this would be the perfect place to mount his phone. The only problem was that he didn’t want to make any permanent changes to his car. This meant no drilling into the dash and no gluing.

[Seandavid010] started by lining the pocket with blue masking tape. He then added an additional lining of plastic wrap. All of this was to protect the dashboard from what was to come next. He filled about half of the pocket with epoxy putty. We’ve seen this stuff used before in a similar project. He left a small opening in the middle with a thick washer mounted perpendicular to the ground. The washer would provide a place for an off-the-shelf iPhone holder to mount onto. [Seandavid010] also placed a flat, wooden paint stirrer underneath the putty. This created a pocket that would allow him to route cables and adapters underneath this new mount.

After letting the epoxy putty cure for an hour, he removed the block from the pocket. The stick was then removed, and any gaps were filled in with putty. The whole block was trimmed and smooth down for a more streamlined look. Finally, it was painted over with some flat black spray paint to match the color of the dashboard. An aftermarket iPhone holder allows [Seandavid010] to mount his cell phone to this new bracket. The cell phone holder allows him to rotate the phone into portrait or landscape mode, and even is adjustable to accommodate different sized phones.

[Mike] Shows Us How To Use An Armature Growler

[Mike] has put up a great video  on his [SmallEngineMechanic] YouTube Channel about a tool we don’t see very often these days. He’s using an armature growler (YouTube link) to test the armature from a generator. Armature growlers (or just growlers for short) were commonplace years ago. Back when cars had generators, just about every auto mechanic had one on hand. They perform three simple tests: Check armature windings for shorts to other windings, for open windings, and for shorts to the armature body. [Mike’s] particular growler came to him as a basket case. The wiring was shot, it was rusty, and generally needed quite a bit of TLC. He restored it to like new condition, and uses it to help with his antique engine and genset addiction hobby.

Growlers essentially are a transformer primary with a V-shaped frame. The primary coil is connected to A/C mains. The armature to be tested sits in the “V” and through the magic of induction, some of the windings become the secondary coils (more on this later). This means some pretty high voltage will be exposed on commutator of the armature under test, so care should be taken when using one!

Testing for shorts to the ground or the core of the armature is a simple continuity test. Instead of a piezo beep though, a short will trigger the growler to turn on, which means the armature will jump a bit and everything will emit a loud A/C hum. It certainly makes testing more interesting!

Checking for open windings is a matter of energizing the growler’s coil, then probing pairs of contacts on the commutator.  Voltage induced in the windings is displayed on the growler’s meter. Open windings will show 0 volts. Not all the armature’s windings will be in the field of the growler at once – so fully testing the armature will mean rotating it several times, as [Mike] shows in his video.

The final test is for shorted coils. This is where things get pretty darn cool. The growler is switched on and a thin piece of ferrous metal – usually an old hacksaw blade, is run along the core of the armature. If a short exists, the hacksaw blade will vibrate against the core of the armature above the shorted windings. We’re not 100% clear on how the coupling between the growler’s primary and two windings causes the blade to vibrate, so feel free to chime in over in the comments to explain things.

Most commercial shops don’t troubleshoot armatures anymore, they just slap new parts in until everything works again. As such the growler isn’t as popular as it once was. Still, if you work with DC motors or generators, it’s a great tool to have around, and it’s operation is a pretty darn cool hack in itself.

Click past the break for [Mike’s] video!

Continue reading “[Mike] Shows Us How To Use An Armature Growler”

Project Binky, Putting A Celica In A Mini The Hard Way

The old Mini – not the new one, mind you – was a fantastic rally car, but fifty odd horsepower won’t get you very far today. The name of the game is souping up a pile of rust from 1980 to create one of the fastest Minis on the planet. That’s the goal of Bad Obsession Motorsport, a project by [Nik Blackhurst], [Richard Brunning], and [Rex Hamilton] as [Abraham Lincoln].

[Nik] has a 1980 Mini 1000, a car-shaped pile of rust. The plan for this multi-year build is to stuff the engine, gearbox, and suspension from a Toyota Celica ST185 GT4 into the old Mini. If you’re wondering, that’s a two liter, turbocharged engine with 200 horsepower and four-wheel drive in a Mini that originally had 50 or 60 horsepower. No, the engine doesn’t fit, but that’s not going to stop these guys.

This isn’t the kind of build you just dive into. Once the guys had the Mini in the garage, a load of measurements were taken from both cars, written down, and the car stripped down. This is not a simple mod, and a few pieces of equipment were custom-made just for this build. The biggest of these is a custom jig the Mini chassis can be bolted down to. This jig gives [Nik] and [Richard] the ability to mount the Mini and engine on rollers, and rotate the entire chassis 90 degrees for easy welding of the underside of the car.

Already there are eight videos covering a year and a half of work, and only now is there a light at the end of the tunnel. Most of the old body panels from the Mini were removed and replaced with reproduction parts. Those parts were quickly ruined with a cutting disk and some custom fabricated panels were put in place. Somehow, it still looks like a Mini but it’s massively strengthened and cut to accommodate the much larger suspension and engine from the Celica.

Grab a cup of coffee (or tea, if you’re into that) and check out the videos below. It’s incredible how much time and work went into this build, and we can’t wait to see the next update in a few months or so.

Continue reading “Project Binky, Putting A Celica In A Mini The Hard Way”

Gearshift Display For A Rally Car

[Andrea] was helping out a local rally racing team with their car and was asked to create a device that would display the current gear on a big, bright display. Of course, a device like this already exists, but the team didn’t want to invest the significant resources into a ready-made product. Instead, [Andrea] was tasked with creating one.

The device is basically a pot attached to the gear shifter, but in testing, [Andrea] ran into a problem; between reverse and 5th gear, the shifter would turn 360 degrees, meaning these gears were indistinguishable.

The solution to this problem was a calibration procedure for when the driver starts the car. By setting a jumper, the driver puts the car into all gears, sorting out the reading and storing the analog values in the microcontroller’s EEPROM.