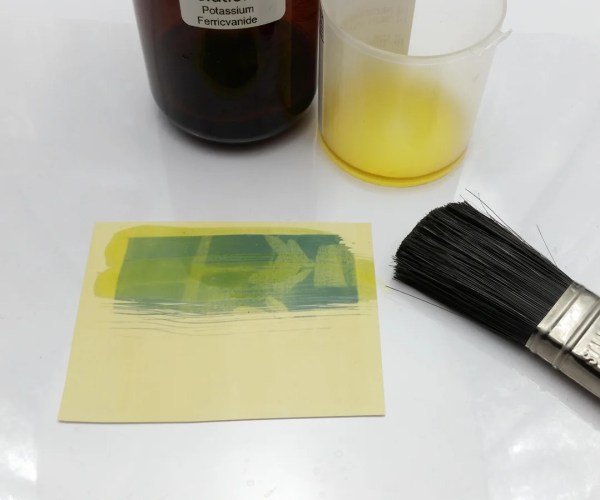
An Instant Camera Using E-Paper As Film

The original Polaroid cameras were a huge hit not just for their instant delivery, but for the convenient size of the permanent images they delivered. It’s something that digital cameras haven’t been able to replicate, which drew [Cameron] to produce a modern alternative. In the place of the chemical film of the original, it uses a removable e-paper display in a frame. The image is stored in the pixels of the e-paper, which can be kept as a digital version of the photograph until reattached and replaced with another freshly taken picture.

At its heart is an ESP32 with a camera, and the “film” is a Waveshare NFC e-paper module. The device is 3D printed, and manages a very creditable early-1970s aesthetic redolent of the more upmarket Polaroids of the day. Using it is as simple as pressing the button and deciding whether you like what’s on the screen. You can see it in action in the video below the break.

We like his project for its aesthetics, as well as for the very idea of using e-paper as a medium. There’s also something to be said for not having to put a Polaroid print in a clip under your armpit while it develops. Meanwhile if you do hanker for the real thing, it’s a subject we’ve looked at in the past.

Continue reading “An Instant Camera Using E-Paper As Film”

Weatherproof Raspberry Pi Camera Enclosure, In A Pinch

The Raspberry Pi is the foundation of many IoT camera projects, but enclosures are often something left up to the user. [Mare] found that a serviceable outdoor enclosure could be made with a trip to the hardware store and inexpensive microscopy supplies.

A suitably-sized plastic junction box is a good starting point, but it takes more than that to make a functional enclosure.

The main component of the enclosure is a small plastic junction box, but it takes more than a box to make a functional outdoor enclosure. First of all, cable should be run into the box with the help of a cable fitting, and this fitting should be pointed toward the ground when the enclosure is mounted. This helps any moisture drip away with gravity, instead of pooling inconveniently.

All wire connections should be kept inside the enclosure, but if that’s not possible, we have seen outdoor-sealed wire junctions with the help of some 3D-printing and silicone sealant. That may help if cable splices are unavoidable.

The other main design concern is providing a window through which the camera can see. [Mare] found that the small Raspberry Pi camera board can be accommodated by drilling a hole into the side of the box, cleaning up the edges, and securing a cover slip  (or clover glass) to the outside with an adhesive. Cover slips are extremely thin pieces of glass used to make microscope slides; ridiculously cheap, and probably already in a citizen scientist’s parts bin. They are also fragile, but if the device doesn’t expect a lot of stress it will do the job nicely.

[Mare] uses the Raspberry Pi and camera as part of Telraam, an open-source project providing a fully-automated traffic counting service that keeps anonymized counts of vehicle, pedestrian, and bicycle activity. Usually such a device is mounted indoors and aimed at a window, but this enclosure method is an option should one need to mount a camera outdoors. There’s good value in using a Raspberry Pi as a DIY security camera, after all.

Film Is Dead. Long Live Film, Say Pentax

If your answer to the question “When did you last shoot a roll of film” is “Less than two decades ago”, the chances are that you’re a camera enthusiast, and that the camera you used was quite old. Such has been the switch from film to digital, that the new film camera is a rarity. Pentax think there may be an opening in the older format though, as they’ve announced in the videos below the break that they’re working on a fresh range of film cameras to serve the enthusiast market.

We don’t know the economics of the camera business, but we’re certainly interested to see what they come up with. In a world that’s still awash with cheap film cameras from a few decades ago, whatever they produce will have to be good, but given that it’s Pentax who are making the announcement we’re guessing the quality will be of a high standard.

Perhaps more interesting in the revival of interest in film is that it comes at a point when designing and making your own camera has almost never been easier. If you’re bored waiting for the new Pentax, make your own!

Continue reading “Film Is Dead. Long Live Film, Say Pentax”

Photography, The Stereo Way

Most consumer-grade audio equipment has been in stereo since at least the 1960s, allowing the listener to experience sounds with a three-dimensional perspective as if they were present when the sound was originally made. Stereo photography has lagged a little behind the stereo audio trend, though, with most of the technology existing as passing fads or requiring clumsy hardware to experience fully. Not so with the DIY stereoscopic cameras like this one produced by this group of 3D photography enthusiasts, who have also some methods to view the photos in 3D without any extra hardware.

The camera uses two imaging sensors to produce a stereo image. One sensor is fixed, and the other is on a slider which allows the user to adjust the “amount” of 3D effect needed for any particular photo. [Jim] is using this camera mostly for macro photography, which means that he only needs a few millimeters of separation between the two sensors to achieve the desired effect, but for more distant objects more separation can be used. The camera uses dual Raspberry Pi processors, a lithium battery, and a touch screen interface. It includes a ton of features as well including things like focus stacking, but to get a more full experience of this build we’d highly recommend checking out the video after the break.

As for viewing the photographs, these stereoscopic 3D images require nothing more than a little practice to view them. This guide is available with some simple examples to get started, and while it does at first feel like a Magic Eye puzzle from the late 90s, it quickly becomes intuitive. Another guide has some more intricate 3D maps at the end to practice on as well. This is quite the step up from needing to use special glasses or a wearable 3D viewer of some sort. There are also some methods available to create 3D images from those taken with a regular 2D camera as well.

Thanks to [Bill] for the tip and the additional links to the guides for viewing these images!

Continue reading “Photography, The Stereo Way”

Printed Film Camera Gets 10 Seconds Out Of A 35mm Roll

When the British budget electronics brand Amstrad released their first budget VHS camcorder in the mid 1980s, they advertised it as making a filmmaker out of everyone. Now everyone truly is a filmmaker of sorts with their always-handy mobile phones, even though possessing a camera does not give you the talent of Steven Spielberg.

Such easy access to video hasn’t dimmed the allure of old-style film though, and there is a band of enthusiasts who seek out the older medium. [Joshua Bird] is one, and he’s produced a rather special 3D printed camera that can capture short videos on a standard roll of 35mm camera film. The downside is that, at the going rate, filming your masterpiece comes out to approximately $600 USD for each 10 minutes of footage. Better keep that dense exposition to a minimum.

The two most important mechanisms in a movie camera are the shutter and the film advance. The first is a disc that spins once a frame with an arc-shaped aperture over a section of it to let the light through, while the second is a hook that engages with the film once a frame after the shutter aperture has passed, to advance it to the next frame. Designing these to work in printed form is no easy task, and [Joshua] takes the reader through the various twists and turns in their development. Beyond that he takes a novel approach to a through-the-lens viewfinder, eschewing a split prism for an angled mirror on the shutter disk.

With each frame taking a fraction of the 35mm frame it’s clear from the video below that this doesn’t deliver the highest quality image. But that’s not the point of a device like this, above all it’s a working movie camera that he made himself. Since some of us have interests in that direction, dare we say we’re envious? Meanwhile, this isn’t the first 3D printed movie camera we’ve brought you.

Continue reading “Printed Film Camera Gets 10 Seconds Out Of A 35mm Roll”

Rocket Mounted 3D Printed Camera Wheel Tries, Succeeds, And Also Fails

[Joe] at BPS.space has a thing for rockets, and his latest quest is to build a rocket that will cross the Kármán Line and launch into the Final Frontier. And being the owner of a YouTube channel, he wants to have excellent on-board video that he can share. The trouble? Spinning. A spinning rocket is a stable rocket, especially as altitude increases. So how would [Joe] get stable video from a rocket spinning at several hundred degrees per second? That’s the question being addressed in the video below the break.

The de-spun video looks quite good

Rather than use processing power to stabilize video digitally, [Joe] decided to take a different approach: Cancelling out the spin with a motor, essentially making a camera-wielding reaction wheel that would stay oriented in one direction, no matter how fast the rocket itself is spinning.

Did it work? Yes… and no. The design was intended to be a proof of concept, and in that sense there was a lot of success and some excellent video was taken. But as with many proof of concept prototypes, the spinning camera module has a lot of room for improvement. [Joe] goes into some details about the changes he’ll be making for revision 2, including a different motor and some software improvements. We certainly look forward to seeing the progress!

To get a better idea of the problem that [Joe] is trying to solve, check out this 360 degree rocket cam that we featured a few years ago.

Continue reading “Rocket Mounted 3D Printed Camera Wheel Tries, Succeeds, And Also Fails”

Taking (Good) Pictures Of PCBs

Snapping pictures is not technically difficult with modern technology, but taking good photographs is another matter. There are a number of things that a photographer needs to account for in order to get the best possible results, and if the subject matter isn’t particularly photogenic to start with it makes the task just a little more difficult. As anyone who’s posted something for sale online can attest, taking pictures of everyday objects can present its own challenges even to seasoned photographers. [Martijn Braam] has a few tricks up his sleeve for pictures like this in his efforts to photograph various circuit boards.

[Martijn] has been updating the images on Hackerboards, an online image reference for single-board computers and other PCBs, and he demands quality in his uploads. To get good pictures of the PCBs, he starts with ample lighting in the form of two wirelessly-controlled flashes in softboxes. He’s also using a high quality macro lens with low distortion, but the real work goes into making sure the image is sharp and the PCBs have well-defined edges. He’s using a Python script to take two pictures with his camera, and some automation in ImageMagic to composite the two images together.

While we’re not all taking pictures of PCBs, it’s a great way of demonstrating the ways that a workflow can be automated in surprising ways, not to mention the proper ways of lighting a photography subject. There are some other excellent ways of lighting subjects that we’ve seen, too, including using broken LCD monitors, or you can take some of these principles to your workspace with this arch lighting system.