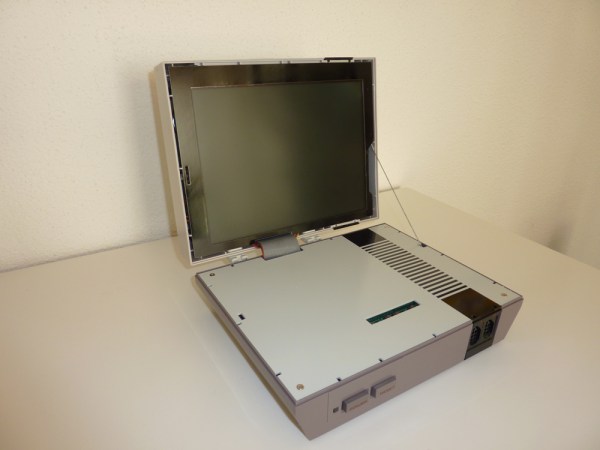
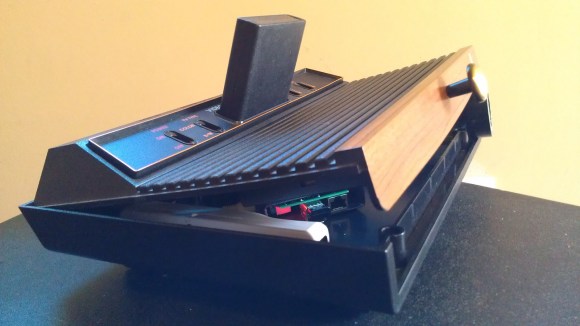
Silent HTPC Build Is An Art Piece For The Livingroom

silent-htpc-build

This sexy beast is [DeFex’s] new silent home theater PC. To give you an idea of scale, that motherboard is a Mini ITX form factor. Mounted below it is the solid state drive which is an SLC version chosen because they tend to last longer than the MLC variety. This distinction comes with a price tag that is $100 more expensive.

But we digress. It’s the custom case that really caught our eye with this build. The frame is made of a huge aluminum heat sink. It measures about 7″ by 10″ and sets the final foot print for the computer. An aluminum puck was added to transmit heat from the processor to the heat sink. Holes were drilled and tapped into the heat sink to accept the brass stand offs which hold the motherboard in place.

The near side of the case is a sheet of acrylic. It connects to the rest of the case using 3D printed brackets at each corner. There is an additional bracket on the bottom to hold the hard drive in place. The sides of the case are filled in with bicycle spokes which also find a home in the corner brackets. Now the hard part will be figuring out which orientation looks the best for displaying his fine craftsmanship.

[via Reddit]

Tutorial Designs 3D Printed Cases For Your Projects

[Landon Cox] recently finished up a 3-part tutorial on designing project enclosures for 3D printing. The series is great if you have not yet tried your hand at this realm of the 3D printing universe, but there’s a lot to take away about design and modeling even if you don’t plan to print your creations.

He starts off part one of the tutorial by explaining the need for 3D printed cases. He believes it’s the natural progression after you’ve made it far enough to have your own PCB manufactured. Why not add a well designed and fabricated case to compliment your meticulously laid out circuitry? In part two he gets the design ball rolling by modeling the top and bottom portions of the case seen above in blue. The final step is to design a face plate that matches the needs of your circuit; in this case it’s DB9 and RJ45 connectors.

It’s not all smooth sailing along the way. [Landon] does actually print the case and the faceplate is just a bit too big for the the rest of the enclosure. But better too big than too small as shaving away a bit of the edges fixes it right up.

[via Adafruit]

Building A Raspi Case In True Hackaday Fashion

[Ben] needed a case for his Raspberry Pi. Instead of going the usual laser-cut plastic or 3D printed route, he took a path far more familiar to us here at Hackaday. His case is built out of aluminum found in his basement, providing a neat reuse for some old aluminum extrusion he had lying around.

Part one of [Ben]’s thoroughly documented build goes over the process of acquiring some of this very handy aluminum extrusion. Part two covers a very neat feature of [Ben]’s scrap of aluminum: because of a pair of internal chamfers, [Ben] was able to mount his Raspi and USB hub to a separate piece of PVC and slide the whole assembly in.

The final assembly included dremeling a piece of aluminum plate for the Raspi and USB hub ports and wiring the whole thing together.

Right now the newly enclosed Raspi is working happily as [Ben]’s home server. Not exactly the use case a rugged aluminum case would see the best use from, but it looks great all the same.

IPad External Battery Case Forced To Work With A Non-iPad Tablet

[Carnivore] uses a Pipo Max M1 tablet. It’s an Android device that is very responsive thanks t the 1.6 GHz dual-core processor and it runs Jellybean (latest version of Android OS). The one thing he wasn’t so happy with is battery life. Under heavy load it lasts about three hours. When reading an eBook that use can be stretched to 10 hours. His solution was to add an external battery. It turns out the 9.7″ screen makes the body of the device almost exactly the same size as an iPad, so he made an iPad external battery case work with the Android tablet.

[Carnivore] started the hack by disassembling an iP6000 case which houses a 6000 mAh battery. He removed the dock connector and fitted in a 2.5mm power jack. Luckily the buttons on the Android tablet are in nearly the exact same place as those on an iPad, with the power button hole needing just a bit of enlargement. The case charges itself and the tablet’s internal battery using a microUSB port which means he no longer needs to carry around a special power cord. The new hardware increased the battery life by about 75%.

Raspberry Pi Case Roundup

raspberry-pi-case-roundup

If you haven’t heard of it yet, the [Raspberry Pi] is all the rage on [HAD] these days, so why not a round up of some of the excellent cases available?

[Nhslzt] wrote in to tell us about his laser cut Bramble Pi finger jointed case.  These are available for only 12 Euros, or roughly $14.95 in the US. Sure, the exchange rate may not be in America’s favor these days, but it’s cheaper than a trip to Dresden, Germany where some of the profits from this are to go towards setting up a makerspace there!

If you’re feeling more into the additive 3D printing DIY process, why not just download one and make it on your printer? [Thingiverse] has an excellent selection of cases many featuring, as you may have guessed, a picture of a Raspberry on the top!  (Here’s the printed case pictured).

Finally for something more colorful (see the pic after the break), you can’t get much better than the [Pibow]. If you’re looking for something colorful, and very solid (as described) this may be the case for you! You can order one here or use the unique design to inspire your own case (Thx Brian!).

As for stuff that we’ve already written about at HAD, this case looks quite slick made out of black acrylic, as does this one, combining the use of a laser cutter and 3D printer. Of course, if you’re going for the strictly utilitarian model, you can always go with one held together with rubber bands and tape!

Continue reading “Raspberry Pi Case Roundup”

Acrylic RPi Case You Can Make Without A CNC Machine

[Simon Inns] is showing off the Raspberry Pi case which he built out of acrylic. It provides a lot more protection than a flimsy film case, but it is also a little bit more involved to fabricate. No, this doesn’t need to be laser cut, but to get the nice edges [Simon] used a band saw which many don’t already have in their shop. Ask around, or poke your head in at the local Hackerspace. It only takes a few minutes to cut out the parts.

It sounds like either 8mm or 6mm acrylic will work for this project. Aluminum pipe serves as a spacer to keep the two main sheets in place. The RPi board itself is held in position by a few well-place acrylic chunks super glued in place. You can see the entire build process, including rounding cut edges with a torch, in his video embedded after the break.

Continue reading “Acrylic RPi Case You Can Make Without A CNC Machine”

Flimsy Pi Case Still Provides A Level Of Protection

This flimsy case isn’t going to protect your Raspberry Pi if you knock it off the workbench. It will provide a level of protection against shorting out from contact with metal objects, or from liquids spilled in the near vicinity. [CGPatterson] ended up making this case from a single sheet of transparency film.

The project is basically papercraft. He started with the dimensions published on the Raspberry Pi FAQ, which turned out to be wrong. Not having a caliper available to help with the precision of the measurements, he grabbed his ruler and did the best he could. The first two cases were a poor fit, but as you can see the third is like a glove. Luckily you don’t have to go through this same trial and error as he release the design. Both A4 and US Letter sized PDFs are available for download. Print them out on the transparency, cut along the lines, apply transparent double-sided tape to the tabs and you’re in business. If you wish to alter the design he has also posted the SVG source he made in Inkscape.

This is certainly a good option for those of us without the ability to produce laser cut parts.