Floppy disks

Floppy Interfacing Hack Chat With Adafruit

Join us on Wednesday, February 2 at noon Pacific for the Floppy Interfacing Hack Chat with Adafruit’s Limor “Ladyada” Fried and Phillip Torrone!

When a tiny fleck of plastic-covered silicon can provide enough capacity to store a fair percentage of humanity’s collected knowledge, it may seem like a waste of time to be fooling around with archaic storage technology like floppy disks. With several orders of magnitude less storage capacity than something like even the cheapest SD card or thumb drive, and access speeds that clock in somewhere between cold molasses and horse and buggy, floppy drives really don’t seem like they have any place on the modern hacker’s bench.

join-hack-chatOr do they? Learning the ins and out of interfacing floppy drives with modern microcontrollers is at least an exercise in hardware hacking that can pay dividends in other projects. A floppy drive is, after all, a pretty complex little device, filled with electromechanical goodies that need to be controlled in a microcontroller environment. And teasing data from a stream of magnetic flux changes ends up needing some neat hacks that might just serve you well down the line.

So don’t dismiss the humble floppy drive as a source for hacking possibilities. The folks at Adafruit sure haven’t, as they’ve been working diligently to get native floppy disk support built right into CircuitPython. To walk us through how they got where they are now, Ladyada and PT will drop by the Hack Chat. Be sure to come with your burning questions on flux transitions, MFM decoding, interface timing issues, and other arcana of spinning rust drives.

Our Hack Chats are live community events in the Hackaday.io Hack Chat group messaging. This week we’ll be sitting down on Wednesday, February 2 at 12:00 PM Pacific time. If time zones have you tied up, we have a handy time zone converter.

Continue reading “Floppy Interfacing Hack Chat With Adafruit”

BFree Brings Intermittent Computing To Python

Generally speaking, we like our computing devices to remain on and active the whole time we’re using them. But there are situations, such as off-grid devices that run on small solar cells, where constant power is by no means a guarantee. That’s where the concept of intermittent computing comes into play, and now thanks to the BFree project, you can develop Python software that persists even when the hardware goes black.

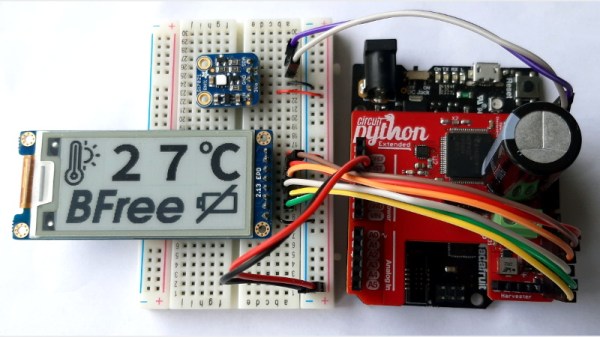
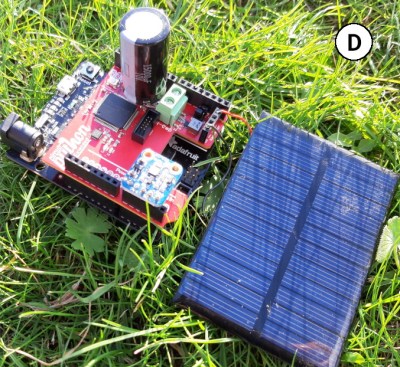
Implemented as a shield that attaches to a Adafruit Metro M0 Express running a modified CircuitPython interpreter, BFree automatically makes “checkpoints” as the user’s code is running so that if the power is unexpectedly cut, it can return the environment to a known-good state instantaneously. The snapshot of the system, including everything from the variables stored in memory to the state of each individual peripheral, is stored on the non-volatile FRAM of the MSP430 microcontroller on the BFree board; meaning even if the power doesn’t come back on for weeks or months, the software will be ready to leap back into action.

In addition to the storage for system checkpoints, the BFree board also includes energy harvesting circuity and connections for a solar panel and large capacitor. Notably, the system has no provision for a traditional battery. You can keep the Metro M0 Express plugged in while developing your code, but once you’re ready to test in the field, the shield is in charge of powering up the system whenever it’s built up enough of a charge.

The product of a collaboration between teams at Northwestern University and Delft University of Technology, BFree is actually an evolution of the battery-free handheld game they developed around this time last year. While that project was used to raise awareness of how intermittent computing works, BFree is clearly a more flexible platform, and is better suited for wider experimentation.

We’ve seen a fair number of devices that store up small amounts of energy over the long term for quick bouts of activity, so we’re very interested to see what the community can come up with when that sort of hardware is combined with software that can be paused until its needed.

Python Your Keyboard Hack Chat With Adafruit

Join us on Wednesday, July 21 at noon Pacific for the Python Your Keyboard Hack Chat with the Adafruit crew!

Especially over the last year and a half, most of us have gotten the feeling that there’s precious little distinction between our computers and ourselves. We seem welded together, inseparable even, attached as we are day and night to our machines as work life and home life blend into one gray, featureless landscape where time passes unmarked except by the accumulation of food wrappers and drink cans around our work areas. Or maybe it just seems that way.

Regardless, there actually is a fine line between machine and operator, and in most instances it’s that electromechanical accessory that we all love to hate: the keyboard. If you buy off the shelf, it’s never quite right — too clicky, not clicky enough, wrong spacing, bad ergonomics, or just plain ugly design. The only real way around these limitations is to join the DIY keyboard crowd and roll your own, specifically customized to your fingers and your needs — at least until you realize that it’s not quite perfect, and need to modify it again.

Hitting this moving target is often as much a software problem as it is a hardware issue, but as is increasingly the case these days, Python is ready to help. To go into depth on how Python can be leveraged for the custom keyboard builder, our good friends at Adafruit, including Limor “Ladyada” Fried, Phillip Torrone, Dan HalbertKattni Rembor, and Scott Shawcroft will stop by the Hack Chat. We suspect they’ll have some cool stuff to show off, in addition to sharing their tips and tricks for making DIY keyboards just right. If you’re building custom keebs, or even if you’re just “keyboard curious”, you won’t want to miss this one.

join-hack-chatOur Hack Chats are live community events in the Hackaday.io Hack Chat group messaging. This week we’ll be sitting down on Wednesday, July 21 at 12:00 PM Pacific time. If time zones have you tied up, we have a handy time zone converter.

Hackaday Links Column Banner

Hackaday Links: May 23, 2021

The epicenter of the Chinese electronics scene drew a lot of attention this week as a 70-story skyscraper started wobbling in exactly the way skyscrapers shouldn’t. The 1,000-ft (305-m) SEG Plaza tower in Shenzhen began its unexpected movements on Tuesday morning, causing a bit of a panic as people ran for their lives. With no earthquakes or severe weather events in the area, there’s no clear cause for the shaking, which was clearly visible from the outside of the building in some of the videos shot by brave souls on the sidewalks below. The preliminary investigation declared the building safe and blamed the shaking on a combination of wind, vibration from a subway line under the building, and a rapid change in outside temperature, all of which we’d suspect would have occurred at some point in the 21-year history of the building. Others are speculating that a Kármán vortex Street, an aerodynamic phenomenon that has been known to catastrophically impact structures before, could be to blame; this seems a bit more likely to us. Regardless, since the first ten floors of SEG Plaza are home to one of the larger electronics markets in Shenzhen, we hope this is resolved quickly and that all our friends there remain safe.

In other architectural news, perched atop Building 54 at the Massachusetts Institute of Technology campus in Cambridge for the last 55 years has been a large, fiberglass geodesic sphere, known simply as The Radome. It’s visible from all over campus, and beyond; we used to work in Kendall Square, and the golf-ball-like structure was an important landmark for navigating the complex streets of Cambridge. The Radome was originally used for experiments with weather radar, but fell out of use as the technology it helped invent moved on. That led to plans to remove the iconic structure, which consequently kicked off a “Save the Radome” campaign. The effort is being led by the students and faculty members of the MIT Radio Society, who have put the radome to good use over the years — it currently houses an amateur radio repeater, and the Radio Society uses the dish within it to conduct Earth-Moon-Earth (EME) microwave communications experiments. The students are serious — they applied for and received a $1.6-million grant from Amateur Radio Digital Communications (ARDC) to finance their efforts. The funds will be used to renovate the deteriorating structure.

Well, this looks like fun: Python on a graphing calculator. Texas Instruments has announced that their TI-84 Plus CE Python graphing calculator uses a modified version of CircuitPython. They’ve included seven modules, mostly related to math and time, but also a suite of TI-specific modules that interact with the calculator hardware. The Python version of the calculator doesn’t seem to be for sale in the US yet, although the UK site does have a few “where to buy” entries listed. It’ll be interesting to see the hacks that come from this when these are readily available.

Did you know that PCBWay, the prolific producer of cheap PCBs, also offers 3D-printing services too? We admit that we did not know that, and were therefore doubly surprised to learn that they also offer SLA resin printing. But what’s really surprising is the quality of their clear resin prints, at least the ones shown on this Twitter thread. As one commenter noted, these look more like machined acrylic than resin prints. Digging deeper into PCBWay’s offerings, which not only includes all kinds of 3D printing but CNC machining, sheet metal fabrication, and even injection molding services, it’s becoming harder and harder to justify keeping those capabilities in-house, even for the home gamer. Although with what we’ve learned about supply chain fragility over the last year, we don’t want to give up the ability to make parts locally just yet.

And finally, how well-calibrated are your fingers? If they’re just right, perhaps you can put them to use for quick and dirty RF power measurements. And this is really quick and really dirty, as well as potentially really painful. It comes by way of amateur radio operator VK3YE, who simply uses a resistive dummy load connected to a transmitter and his fingers to monitor the heat generated while keying up the radio. He times how long it takes to not be able to tolerate the pain anymore, plots that against the power used, and comes up with a rough calibration curve that lets him measure the output of an unknown signal. It’s brilliantly janky, but given some of the burns we’ve suffered accidentally while pursuing this hobby, we’d just as soon find another way to measure RF power.

Looks Like A Pi Zero, Is Actually An ESP32 Development Board

ATMegaZero ESP32- S2, showing optional color-coded 40-pin header (top)

The ATMegaZero ESP32-S2 is currently being funded with a campaign on GroupGets, and it’s a microcontroller board modeled after the Raspberry Pi Zero’s form factor. That means instead of the embedded Linux system most of us know and love, it’s an ESP32-based development board with the same shape and 40-pin GPIO header as the Pi Zero. As a bonus, it has some neat features like a connector for inexpensive SSD1306 and SH1106-based OLED displays.

Being able to use existing accessories can go a long way towards easing a project’s creation, and leveraging that is one of the reasons for sharing the Pi Zero form factor. Ease of use is also one of the goals, so the boards will ship with CircuitPython (derived from MicroPython), and can also be used with the Arduino IDE.

If a microcontroller board using the Pi Zero form factor looks a bit familiar, you might be remembering the original ATMegaZero which was based on the Atmel ATMega32U4, but to get wireless communications one needed to attach a separate ESP8266 module. This newer board keeps the ATMegaZero name and footprint, but now uses the Espressif ESP32-S2 to provide all the necessary functions.

CircuitPython has been a feature in a wide variety of projects and hacks we’ve seen here at Hackaday, and it’s a fine way to make a microcontroller board easy to use right out of the box.

Restored Dreamcast Is A SEGA Fan’s Dream Come True

[Bren Sutton] has been a long time fan of SEGA’s Dreamcast, eagerly snapping one up right around its October 1999 European release. But after years of neglect and a somewhat questionable paint job a decade or so back, he decided it was time to spruce his old friend up. He could have just cleaned the machine and been done with it, but he took the opportunity to revamp the console’s internals with both practical and cosmetic trickery.

The first step was getting the system looking a bit fresher. Removing the silver metallic paint he applied in his youth with a rattle can wasn’t going so well, so he ended up buying a broken donor console on eBay so he’d have a new shell to work with. The donor was yellowed with age, but a coating of peroxide cream and a few hours under a cheap UV light got it whitened up nicely. Now that he had a fresh new case, [Bren] turned his attention to the internal components.

Those who might be plugged into the active Dreamcast homebrew scene may already know that several upgrade modules exist for SEGA’s last home game console. One of the most popular replaces the optical drive with an SD card filled with your favorite game ISOs. You can also get a modern high efficiency power supply, as well as a board that replaces the original soldered-on clock battery with a slot that fits a CR2032. [Bren] threw them all in, ensuring several more years of gaming bliss.

But he wasn’t done yet. He also wanted to add some visual flair to his new and improved console. After some consideration, he gingerly cut the logo out of the Dreamcast’s lid, and installed an Adafruit CLUE board underneath it. With a few carefully crafted GIFs installed onto the CircuitPython-powered board, the console now has a gorgeous fully animated logo that you can see in the video after the break.

[Bren] could have really taken his console to the next level by doubling its available RAM to an eye-watering 32 MB, but considering the limited software support for that particularly bodacious modification, we’ll let it slide. Continue reading “Restored Dreamcast Is A SEGA Fan’s Dream Come True”

Open Source CubeSats Ease The Pain Of Building Your Own

Space is hard, especially if you haven’t done it before. A growing number of CubeSats are launched by small, inexperienced teams every year, and a number of them fail due to missing some small but critical hardware or software problem. Researchers from the Robotic Exploration Lab (REx) at Carnegie Melon University have learned some of these lessons the hard way and created PyCubed, an open-source hardware and software framework for future CubeSats.

Most satellites, including CubeSats, require the same basic building blocks. These include ADCS (Attitude Determination and Control System), TT&C (telemetry, track, and command), C&DH (command and data handling), and an EPS (electrical power system). Each of these building blocks is integrated into a single PC/104 size PCB. The main microcontroller is an ATSAMD51, also used on a couple of Adafruit dev boards, and runs Circuit Python. Communications are handled by a LoRa radio module, and there is also an unpopulated footprint for a second radio. An LSM9DS1 IMU and an optional GPS handle navigation and attitude determination, and a flash chip and micro SD card provide RAM and data storage. The EPS consists of an energy harvester and battery charger, power monitor, and regular, that can connect to external Li-Ion batteries and solar panels. Two power relays and a series of MOSFETs connected to burn wires are used to deploy the CubeSat and its antennas.

On the PCB there are standardized footprints for up to four unique payloads for the specific missions. The hardware and software are documented on GitHub, including testing and a complete document on all the design decisions and their justifications. The PyCubed was also presented at the 2019 AIAA/USU Conference on Small Satellites. The platform has already been flight-tested as part of the Kicksat-2 mission, and will also be used in the upcoming V-R3X, Pandasat, and Pycubed-1 projects.

This is not the first open-source CubeSat we’ve seen, and we expect these platforms to become more common. Tracking a CubeSat is a lot less expensive than sending one to space, and can be done for as little as $25.