Hackaday Links Column Banner

Hackaday Links: May 23, 2021

The epicenter of the Chinese electronics scene drew a lot of attention this week as a 70-story skyscraper started wobbling in exactly the way skyscrapers shouldn’t. The 1,000-ft (305-m) SEG Plaza tower in Shenzhen began its unexpected movements on Tuesday morning, causing a bit of a panic as people ran for their lives. With no earthquakes or severe weather events in the area, there’s no clear cause for the shaking, which was clearly visible from the outside of the building in some of the videos shot by brave souls on the sidewalks below. The preliminary investigation declared the building safe and blamed the shaking on a combination of wind, vibration from a subway line under the building, and a rapid change in outside temperature, all of which we’d suspect would have occurred at some point in the 21-year history of the building. Others are speculating that a Kármán vortex Street, an aerodynamic phenomenon that has been known to catastrophically impact structures before, could be to blame; this seems a bit more likely to us. Regardless, since the first ten floors of SEG Plaza are home to one of the larger electronics markets in Shenzhen, we hope this is resolved quickly and that all our friends there remain safe.

In other architectural news, perched atop Building 54 at the Massachusetts Institute of Technology campus in Cambridge for the last 55 years has been a large, fiberglass geodesic sphere, known simply as The Radome. It’s visible from all over campus, and beyond; we used to work in Kendall Square, and the golf-ball-like structure was an important landmark for navigating the complex streets of Cambridge. The Radome was originally used for experiments with weather radar, but fell out of use as the technology it helped invent moved on. That led to plans to remove the iconic structure, which consequently kicked off a “Save the Radome” campaign. The effort is being led by the students and faculty members of the MIT Radio Society, who have put the radome to good use over the years — it currently houses an amateur radio repeater, and the Radio Society uses the dish within it to conduct Earth-Moon-Earth (EME) microwave communications experiments. The students are serious — they applied for and received a $1.6-million grant from Amateur Radio Digital Communications (ARDC) to finance their efforts. The funds will be used to renovate the deteriorating structure.

Well, this looks like fun: Python on a graphing calculator. Texas Instruments has announced that their TI-84 Plus CE Python graphing calculator uses a modified version of CircuitPython. They’ve included seven modules, mostly related to math and time, but also a suite of TI-specific modules that interact with the calculator hardware. The Python version of the calculator doesn’t seem to be for sale in the US yet, although the UK site does have a few “where to buy” entries listed. It’ll be interesting to see the hacks that come from this when these are readily available.

Did you know that PCBWay, the prolific producer of cheap PCBs, also offers 3D-printing services too? We admit that we did not know that, and were therefore doubly surprised to learn that they also offer SLA resin printing. But what’s really surprising is the quality of their clear resin prints, at least the ones shown on this Twitter thread. As one commenter noted, these look more like machined acrylic than resin prints. Digging deeper into PCBWay’s offerings, which not only includes all kinds of 3D printing but CNC machining, sheet metal fabrication, and even injection molding services, it’s becoming harder and harder to justify keeping those capabilities in-house, even for the home gamer. Although with what we’ve learned about supply chain fragility over the last year, we don’t want to give up the ability to make parts locally just yet.

And finally, how well-calibrated are your fingers? If they’re just right, perhaps you can put them to use for quick and dirty RF power measurements. And this is really quick and really dirty, as well as potentially really painful. It comes by way of amateur radio operator VK3YE, who simply uses a resistive dummy load connected to a transmitter and his fingers to monitor the heat generated while keying up the radio. He times how long it takes to not be able to tolerate the pain anymore, plots that against the power used, and comes up with a rough calibration curve that lets him measure the output of an unknown signal. It’s brilliantly janky, but given some of the burns we’ve suffered accidentally while pursuing this hobby, we’d just as soon find another way to measure RF power.

Looks Like A Pi Zero, Is Actually An ESP32 Development Board

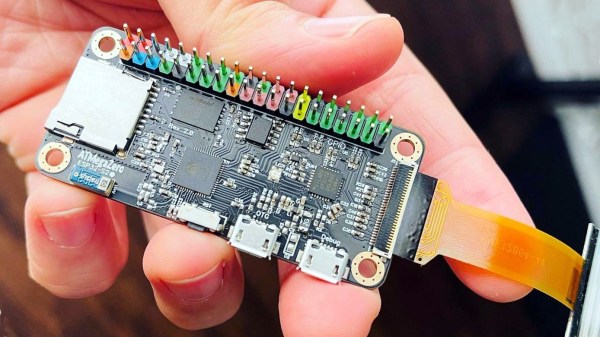
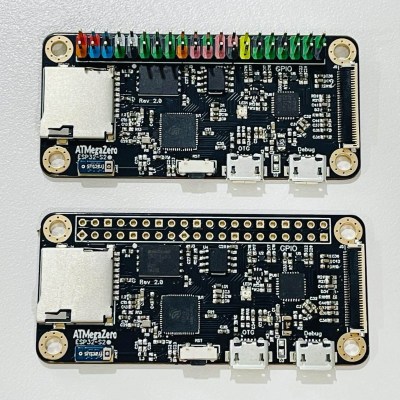
ATMegaZero ESP32- S2, showing optional color-coded 40-pin header (top)

The ATMegaZero ESP32-S2 is currently being funded with a campaign on GroupGets, and it’s a microcontroller board modeled after the Raspberry Pi Zero’s form factor. That means instead of the embedded Linux system most of us know and love, it’s an ESP32-based development board with the same shape and 40-pin GPIO header as the Pi Zero. As a bonus, it has some neat features like a connector for inexpensive SSD1306 and SH1106-based OLED displays.

Being able to use existing accessories can go a long way towards easing a project’s creation, and leveraging that is one of the reasons for sharing the Pi Zero form factor. Ease of use is also one of the goals, so the boards will ship with CircuitPython (derived from MicroPython), and can also be used with the Arduino IDE.

If a microcontroller board using the Pi Zero form factor looks a bit familiar, you might be remembering the original ATMegaZero which was based on the Atmel ATMega32U4, but to get wireless communications one needed to attach a separate ESP8266 module. This newer board keeps the ATMegaZero name and footprint, but now uses the Espressif ESP32-S2 to provide all the necessary functions.

CircuitPython has been a feature in a wide variety of projects and hacks we’ve seen here at Hackaday, and it’s a fine way to make a microcontroller board easy to use right out of the box.

Restored Dreamcast Is A SEGA Fan’s Dream Come True

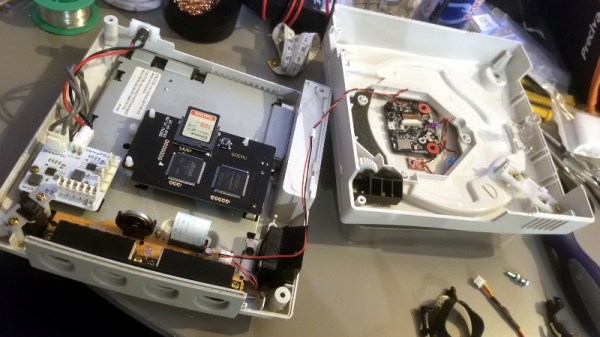
[Bren Sutton] has been a long time fan of SEGA’s Dreamcast, eagerly snapping one up right around its October 1999 European release. But after years of neglect and a somewhat questionable paint job a decade or so back, he decided it was time to spruce his old friend up. He could have just cleaned the machine and been done with it, but he took the opportunity to revamp the console’s internals with both practical and cosmetic trickery.

The first step was getting the system looking a bit fresher. Removing the silver metallic paint he applied in his youth with a rattle can wasn’t going so well, so he ended up buying a broken donor console on eBay so he’d have a new shell to work with. The donor was yellowed with age, but a coating of peroxide cream and a few hours under a cheap UV light got it whitened up nicely. Now that he had a fresh new case, [Bren] turned his attention to the internal components.

Those who might be plugged into the active Dreamcast homebrew scene may already know that several upgrade modules exist for SEGA’s last home game console. One of the most popular replaces the optical drive with an SD card filled with your favorite game ISOs. You can also get a modern high efficiency power supply, as well as a board that replaces the original soldered-on clock battery with a slot that fits a CR2032. [Bren] threw them all in, ensuring several more years of gaming bliss.

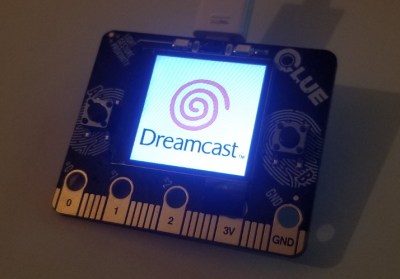
But he wasn’t done yet. He also wanted to add some visual flair to his new and improved console. After some consideration, he gingerly cut the logo out of the Dreamcast’s lid, and installed an Adafruit CLUE board underneath it. With a few carefully crafted GIFs installed onto the CircuitPython-powered board, the console now has a gorgeous fully animated logo that you can see in the video after the break.

[Bren] could have really taken his console to the next level by doubling its available RAM to an eye-watering 32 MB, but considering the limited software support for that particularly bodacious modification, we’ll let it slide. Continue reading “Restored Dreamcast Is A SEGA Fan’s Dream Come True”

Open Source CubeSats Ease The Pain Of Building Your Own

Space is hard, especially if you haven’t done it before. A growing number of CubeSats are launched by small, inexperienced teams every year, and a number of them fail due to missing some small but critical hardware or software problem. Researchers from the Robotic Exploration Lab (REx) at Carnegie Melon University have learned some of these lessons the hard way and created PyCubed, an open-source hardware and software framework for future CubeSats.

Most satellites, including CubeSats, require the same basic building blocks. These include ADCS (Attitude Determination and Control System), TT&C (telemetry, track, and command), C&DH (command and data handling), and an EPS (electrical power system). Each of these building blocks is integrated into a single PC/104 size PCB. The main microcontroller is an ATSAMD51, also used on a couple of Adafruit dev boards, and runs Circuit Python. Communications are handled by a LoRa radio module, and there is also an unpopulated footprint for a second radio. An LSM9DS1 IMU and an optional GPS handle navigation and attitude determination, and a flash chip and micro SD card provide RAM and data storage. The EPS consists of an energy harvester and battery charger, power monitor, and regular, that can connect to external Li-Ion batteries and solar panels. Two power relays and a series of MOSFETs connected to burn wires are used to deploy the CubeSat and its antennas.

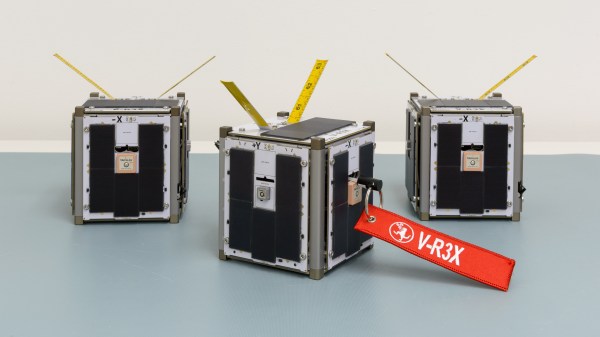
On the PCB there are standardized footprints for up to four unique payloads for the specific missions. The hardware and software are documented on GitHub, including testing and a complete document on all the design decisions and their justifications. The PyCubed was also presented at the 2019 AIAA/USU Conference on Small Satellites. The platform has already been flight-tested as part of the Kicksat-2 mission, and will also be used in the upcoming V-R3X, Pandasat, and Pycubed-1 projects.

This is not the first open-source CubeSat we’ve seen, and we expect these platforms to become more common. Tracking a CubeSat is a lot less expensive than sending one to space, and can be done for as little as $25.

Building A Pocket Sized Python Playground

Like many of us, [Ramin Assadollahi] has a certain fondness for the computers of yesteryear. Finding his itch for nearly instant boot times and bare metal programming weren’t being adequately scratched by any of his modern devices, he decided to build the PortablePy: a pocket-sized device that can drop him directly into a Python prompt wherever and whenever the urge hits him.

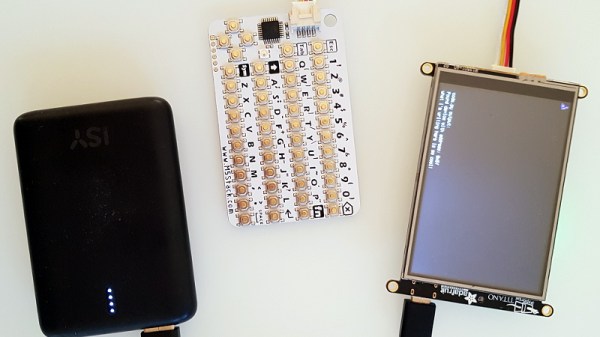
The device is powered by the Adafruit PyPortal Titano, which combines a ATSAMD51J20, ESP32, an array of sensors, and a 3.5″ diagonal 320 x 480 color TFT into one turn-key unit. The PyPortal is designed to run CircuitPython, but the scripts are usually dropped on the device over USB. That’s fine for most applications, but [Ramin] wanted his portable to be usable without the need for a host computer.

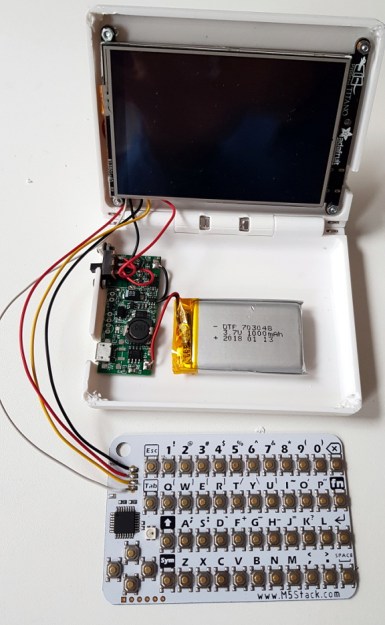
For a truly mobile experience, he had to figure out a way to bang out some Python code on the device itself. The answer ended up being the M5Stack CardKB, a tiny QWERTY board that communicates over I2C. Once he verified the concept was sound, he wrote a simple file management application and minimal Python editor that could run right on the PyPortal.

The final step was packaging the whole thing up into something he could actually take off the bench. He designed a 3D printed clamshell case inspired by the classic Game Boy Advance SP, making sure to leave enough room in the bottom half to pack in a charging board and LiPo pouch battery. He did have to remove some of the connectors from the back of the PyPortal to get everything to fit inside the case, but the compact final result seems worth the effort.

While an overall success, [Ramin] notes there are a few lingering issues. For one thing, the keyboard is literally a pain to type on. He’s considering building a custom keyboard with softer buttons, but it’s a long-term goal. More immediately he’s focusing on improving the software side of things so its easier to write code and manage multiple files.

It sounds like [Ramin] isn’t looking to compromise on his goal of making the PortablePy completely standalone, but if your convictions aren’t as strong, you could always connect a device like this up to your mobile to make things a bit easier.

Continue reading “Building A Pocket Sized Python Playground”

Hands-On: BornHack 2020 Badge Has 9×32 Of Bling Fed By CircuitPython

Despite widespread pandemic cancellations, BornHack still happened this year and they even managed to once again bring an electronic badge to all attendees. If you missed it, I’ve already published an overview of the hacker camp itself. Today let’s dig into the 2020 BornHack badge!

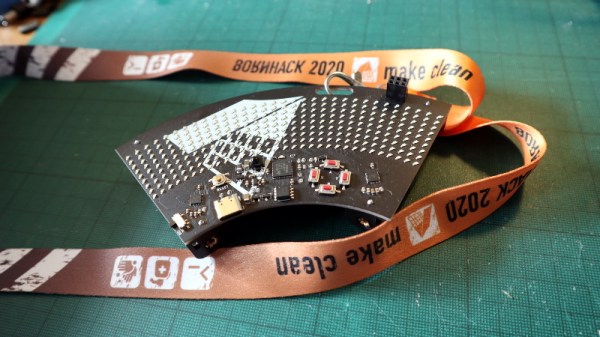
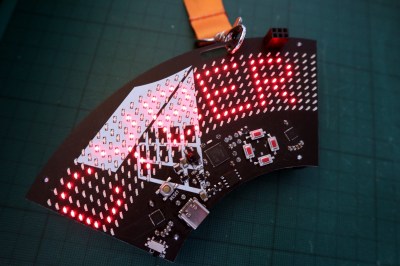
Designed by Thomas Flummer and manufactured in Denmark, it takes the form of a PCB in the shape of a roughly 60 degree circular arc with most of its top side taken up by a 9 by 32 array of SMD LEDs. There is the usual 4-way button array and space for an SAO connector on the rest of the front face, while on the rear are a set of GPIO pads and a pair of AA battery holders for power. Connectivity is via USB-C and infra-red, and usefully there is also a power on/off switch.

At the heart of its hardware is a SAMD21G18A ARM Cortex M0+ microcontroller which is perhaps not the most exciting of chips, but the hardware becomes more interesting with the LED drivers. A pair of the IS31FL3731 chips (you may recognise from Brian Benchoff’s Mr. Robot badge) each drive half of the Charliplexed LED array. These versatile chips take the bother of scanning the LED matrix away from the microcontroller with their own internal frame registers fed from an I2C interface. This choice both makes the best use of the relatively meagre microcontroller in this application, and opens the way for the software choice. This badge runs Adafruit’s CircuitPython, and can thus be programmed over the USB connection in the same way as any other CircuitPython board. To test this I put aside my GNU/Linux laptop, and picked up something considerably less versatile to test its ease of use: a Chromebook.


# configure I2C
i2c = busio.I2C(board.SCL, board.SDA)

# turn on LED drivers
sdb = DigitalInOut(board.SDB)
sdb.direction = Direction.OUTPUT
sdb.value = True

# set up the two LED drivers
display = adafruit_is31fl3731.Matrix(i2c, address=0x74)
display2 = adafruit_is31fl3731.Matrix(i2c, address=0x77)

text_to_show = "BornHack 2020 - make clean"

CircuitPython devices mount as a disk drive in which can be found a Python file that can be edited with the code of your choice. The BornHack badge ships with code to display a BornHack banner text, which serves as a quick introduction to the capabilities of its display. It’s noticeable that the text scrolling performance leaves something to be desired, but this microcontroller is hardly one of the more powerful supported by the CircuitPython platform. The Chromebook was happily able to edit the code, though viewing the Python serial console necessitated diving into its Linux virtual machine.

The BornHack badge then, an attractive design that fulfils the aim of being capable and easy to program through its use of the popular CircuitPython platform, and through its decent sized LED matrix and available GPIOs with the chance of seeing a use beyond the camp as a general purpose display/experimentation platform. It may not be the most powerful of badges, but it does its job well. In particular it has achieved the feat missed by so many others, of arriving at the camp fully assembled and with working hardware and software. You can see more about it in Thomas’ badge presentation at the camp (cut from a stream, talk begins at 5:27) which we’ve placed below the break.

We look forward to seeing its influence upon other similar badges. Meanwhile if you are interested, you can compare it with the 2019 BornHack badge which we reviewed last year.

Continue reading “Hands-On: BornHack 2020 Badge Has 9×32 Of Bling Fed By CircuitPython”

CyberDÛCK Quacks Like A Cyberdeck

Over the last year or so, we’ve seen an explosion in the popularity of cyberdecks — those highly portable and occasionally wearable computers that would make William Gibson proud. A lot of the cyberdecks we see are based on NUCs or the Raspberry Pi and are essentially post-apocalyptic DIY laptops. But what if you want to play with microcontrollers on the go? Do you really need traditional computing power?

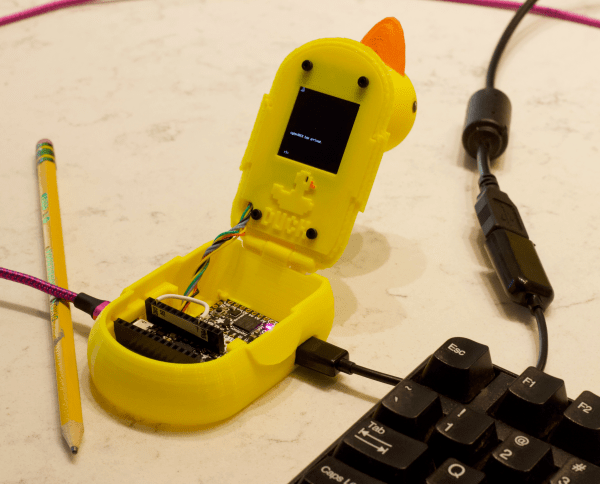
If you build [kmatch98]’s adorable cyberDÛCK, the answer is no. This duck can edit and run CircuitPython files anywhere without a separate computer, as long as you have some kind of USB keyboard. It has a text editor for writing Python scripts the regular way as well as a REPL for running commands on the fly.

One of the biggest hurdles in portable microcontrollering is getting HID access so you can communicate with a keyboard. Flip open cyberDÛCK and you’ll find two ItsyBitsy M4s — one being used as the USB host, and the other controls the display and is meant to be programmed. To get the keyboard input across, [kmatch98] adapted a MicroPython editor to take input from UART. Waddle past the break to check out the sprite demo, and stick around to see [kmatch98] discuss the duck in detail.

We understand if you can’t wait to make one of these yourself. In the meantime, did you know you can code CircuitPython directly from your phone?

Continue reading “CyberDÛCK Quacks Like A Cyberdeck”