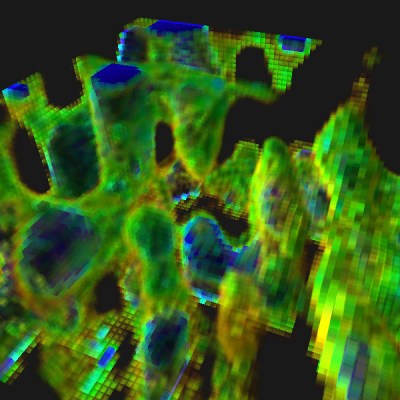
Mapping WiFi Signals In 3 Dimensions

[Charles] is on a quest to complete ever more jaw-dropping hacks with the popular low-cost ESP8266 WiFi modules. This week’s project is plotting WiFi received signal strength in 3D space. While the ESP8266 is capable of providing a Received Signal Strength Indication (RSSI), [Charles] didn’t directly use it. He wrote a simple C program on his laptop to ping the ESP8266 at around 500Hz. The laptop would then translate the RSSI from the ping replies to a color value, which it would then send to the ESP8266. Since the ESP8266 was running [Charles’] custom firmware (as seen in his WiFi cup project), it could directly display the color on a WS2812 RGB LED.

The colors seemed random at first, but [Charles] noticed that there was a pattern. He just needed a way to visualize the LED over time. A single frame long exposure would work, but so would video. [Charles] went the video route, creating SuperLongExposure, an FFMPEG-based tool which extracts every video frame and composites them into a single frame. What he saw was pretty cool – there were definite stripes of good and bad signal.

wifiPOVThumbArmed with this information, [Charles] went for broke and mounted his ESP8266 on a large gantry style mill. He took several long exposure videos of a 360x360x180mm area. The videos were extracted into layers. The whole data set could then be visualized with Voxeltastic, [Charles’] own HTML5/WEBGL based render engine. The results were nothing short of amazing. The signal strength increases and decreases in nodes and anti-nodes which correspond to the 12.4 cm wavelength of a WiFi signal. The final render looks incredibly organic, which isn’t completely surprising. We’ve seen the same kind of image from commercial antenna simulation characterization systems.

Once again [Charles] has blown us away, we can’t wait to see what he does next!

Continue reading “Mapping WiFi Signals In 3 Dimensions”

Hackaday Links Column Banner

Hackaday Links: February 8, 2015

[CNLohr] is famous for his extremely strange projects, including something that does something with Minecraft that even he can’t describe. Over the years, he’s built up a vast collection of projects that have been both incredible fails and successes. Here’s a video tour of all those projects.

For this week’s edition “Kickstarter is going insane”, you only need to look at the title of the campaign: Tesla Coils for North Korea.

Last week, a few slow scan TV signals were received from the International Space Station. Here’s the reddit thread.

The worst thing about using an Arduino in a semi-professional environment is the IDE. Here’s cuwire, a better IDE.

Wanna see something insane? How about an SSH library written in x64 assembly?

Radio Shack is in its death throes, and since you haven’t gone in the last few years, you might as well head out one last time and pick up some items on clearance. Here’s the list of store closings (PDF) and all 1,784 stores slated to be closed plotted on Google Maps.

Compiling Your Own Programs For The ESP8266

When the ESP8266 was first announced to the world, we were shocked that someone was able to make a cheap, accessible UART to WiFi bridge. Until we get some spectrum opened up and better hardware, this is the part you need to build an Internet of Things thing.

It didn’t stop there, though. Some extremely clever people figured out the ESP8266 had a reasonably high-power microcontroller on board, a lot of Flash, and a good amount of RAM. It looked like you could just use the ESP8266 as a controller unto itself; with this chip, all you need to do is write some code for the ESP, and you have a complete solution for your Internet connected blinking lights or WiFi enabled toaster. Whatever the hip things the cool kids are doing these days, I guess.

But how do you set up your toolchain for the ESP8266? How do you build projects? How do you even upload the thing? Yes, it’s complicated, but never fear; [CNLohr] is here to make things easy for you. He’s put together a video that goes through all the steps to getting the toolchain running, setting up the build environment, and putting some code on the ESP8266. It’s all in a git, with some video annotations.

The tutorial covers setting up the Xtensa toolchain and a patched version of GCC, GDB, and binutils. This will take a long, long time to build, but once it’s done you have a build environment for the ESP8266.

With the build environment put together, [CNLohr] then grabs the Espressif SDK from the official site, and puts together the example image. Uploading to the module requires pulling some of the pins high and some low, plugging in a USB to serial module to send the code to the module, standing well back, and pressing upload.

For his example image, [CNLohr] has a few WS2812 RGB LEDs connected to the ESP8266 WiFi module. Uploading the image turns the LEDs into something controllable with UDP packets on port 7777. It’s exactly what you want in a programmable, WiFi chip, and just the beginning of what can be done with this very cool module.

If you’re looking around for some sort of dev board with an ESP8266 on it, [Mathieu] has been playing around with some cool boards, and we’ve been looking into making a Hackaday version to sell in the store. The Hackaday version probably won’t happen because FCC.

Continue reading “Compiling Your Own Programs For The ESP8266”

Color NTSC Video Directly From An AVR Chip

color-ntsc-from-avr-chip

We’ve seen composite video out from AVR chips many times before. But we can’t remember coming across one that managed to produce a color signal. This project does just that, producing a color video signal from an ATmega168 without using external integrated circuits.

[CNLohr] is seen here showing off his accomplishment. You’ll remember him from the glass-slide PCB server project he’s been working on recently. This time around it’s a small piece of gaming hardware which he’s working on. But using four pins from the microcontroller, connected via resistors in parallel, he is able to generate a color NTSC signal without using a chip like the AD723.

After the break you can see the two minute demo in which he shows the game running for just an moment, then gives a general overview of how the signals are being built. There isn’t a ton of explanation, but he did post his code as well as a resource for you to teach yourself more about the NTSC standard. Maybe you can make a color version of that AVR tetris game?

Continue reading “Color NTSC Video Directly From An AVR Chip”