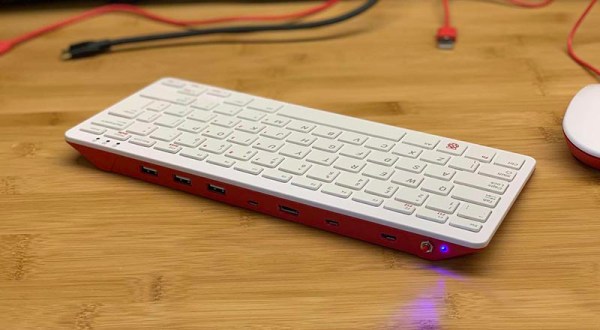
Forth System-On-Chip Takes Us Back To The 80s

For anyone who has dealt with the programming language Forth, odds are good that you picked it up back in the 80s. Since the language is still in use for many applications, though, you might not have this sort of nostalgic feeling for the language that some might have. For that, though, you might want to try out [Richard]’s implementation which simulates the microcomputers of the 80s using this unique language.

The system has an FPGA-based CPU written in Verilog. It runs on a Nexys-3 board and features PS/2 Keyboard input, a VGA output with a VHDL VT100 terminal emulation module, access to the Flash and onboard SRAM, and a UART. With all of that put together it’s virtually a Forth-based time machine. It’s also extremely well documented even if you’re just curious how it works and aren’t planning on building your own.

The project also includes a CPU simulator written in C which can model the entire computer if you don’t have the hardware for building the actual computer. [Richard] also released everything that you’d need to roll out your own Forth computer on the GitHub page. There are other ways of heading way back to the 1980s, though, like using the quirky Parralax Propeller.

Knitting ALUs (and Flipdots)

[Irene Posch] is big into knitted fabric circuits. And while most of the textile circuits that we’ve seen are content with simply conducting enough juice to light an LED, [Irene]’s sights are set on knittable crafted arithmetic logic units (ALUs). While we usually think of transistors as the fundamental building-blocks of logic circuits, [Irene] has developed what is essentially a knit crochet relay. Be sure to watch the video after the break to see it in construction and in action.

The basic construction is a coil of conductive thread that forms an electromagnet, and a magnetic bead suspended on an axle so that it can turn in response to the field. To create a relay, a flap of knit conductive thread is attached to the bead, which serves as the pole for what’s essentially a fabric-based SPDT switch. If you’ve been following any of our relay-logic posts, you’ll know that once you’ve got a relay, the next step to a functioning computer is a lot of repetition.

How does [Irene] plan to display the results of a computation? On knit-and-bead flipdot displays, naturally. Combining the same electromagnet and bead arrangement with beads that are painted white on one side and black on the other yields a human-readable one-bit display. We have an unnatural affinity for flipdot displays, and making the whole thing out of fabric-store components definitely flips our bits.

Anyway, [Irene Posch] is a textile-tech artist who you should definitely be following if you have any interest in knittable computers. Have you seen anything else like this? Thanks [Melissa] for the awesome tip!

Continue reading “Knitting ALUs (and Flipdots)”

Relay Computer: You Can Hear It Think

Modern digital computers have complex instruction sets that runs on state-of-the-art ALUs which in turn are a consequence of miniaturized logic gates that are built with tiny transistors. These tiny transistors are essentially switches. You could imagine replacing with electromagnetic relays, and get what is called a relay computer. If you can imagine it, someone’s done it. In this case, [jhallenworld].

The Z3 was the first working programmable, fully automatic digital computer designed by Konrad Zuse. The board employs modern semiconductor devices such as memory and microcontrollers, however, the CPU is all relays. A hexadecimal keyboard allows for program entry and a segment display allows tracking the address and data. The program is piped into serial to the parallel decoder and fed to the CPU where the magic happens. Since the core is electromechanical it is possible to connect the output to peripherals such as a bell as demonstrated near the end of the video.

This project is a good balance of retro and modern to be useful to anyone interested in mechanical computers and should be a lot of fun for the geek kind. Hacking this computer to modify the instruction set should be equally rewarding and a good exercise for students of computing theory.

There is a SourceForge page dedicated to the project with the details on the project including the instruction set and architecture. Check out the video below and if you are inspired by the project, be sure to check out the [Clickity Clack]’a Videos on designing a relay computer bit by bit.

Hackaday Prize Entry: IO, The Cardboard Computer

[Dr. Cockroach]’s goal was to build a four-bit computer out of recycled and repurposed junk. The resulting computer, called IO, consists of a single 555, around 230 PNP and NPN transistors, 230 diodes, and 460 resistors. It employs RISC architecture and operates at a speed of around 3 Hz.

He built IO out of cardboard for a good reason: he didn’t have a big budget for the project and he could get the material for free from his workplace. And because it was built so cheaply, he could also build it really big, allowing him to be able to really see each circuit close up and repair it if it wasn’t working right. You can really see the architecture very well when it’s this big—no tangle of wires for [Dr. Cockroach]. He uses over sixty blue LEDs to help monitor the system, and it doesn’t hurt that they look cool too. One of our favorite parts of the project is how he used copper fasteners to both manage the cardboard and serve as wiring points.

Continue reading “Hackaday Prize Entry: IO, The Cardboard Computer”

Cryptocurrency Mining Post-Bitcoin

While the age of using your own computer to mine Bitcoin during spare CPU cycles has long passed, average folks aren’t entirely shut out of the cryptocurrency game yet. Luckily, Bitcoin isn’t the only game in town anymore, and with GPUs coming down in price it’s possible to build a mining rig for other currencies like Etherium.

[Chris]’s build starts with some extruded aluminum and a handful of GPUs. He wanted to build something that didn’t take up too much space in the small apartment. Once the main computer was installed, each GPU was installed upwards in the rack, with each set having its own dedicated fan. After installing a fan controller and some plexiglass the rig was up and running, although [Chris] did have to finagle the software a little bit to get all of the GPUs to work properly.

While this build did use some tools that might only be available at a makerspace, like a mill and a 3D printer, the hardware is still within reason with someone with a little cash burning a hole in their pockets. And, if Etherium keeps going up in value like it has been since the summer, it might pay for itself eventually, providing that your electric utility doesn’t charge too much for power.

And if you missed it, we just ran a feature on Etherium.  Check it out.

Starter Guide To Linux Forensics

The old saying is if your data isn’t backed up at least twice, it’s not backed up at all. For those not wise enough to heed this adage, there are a number of options available to you if you wish your data to be recovered. Assuming the drive itself is just corrupted somehow (maybe a malicious attack, maybe a user error) and not damaged beyond physical repair, the first step is to connect the drive to another computer. If that fails, it might be time to break out the computer forensics skills.

[Luis]’s guide is focused on Linux-specific drives and recovery tools, so this isn’t necessarily a general-purpose how-to. That being said, there is a lot of information in this guide such as how to mount the target drive’s partitions, how to set up various timelines, and which of the Linux system’s logs are important for the forensic analysis. This specific example in the guide also goes into detail about noticing which of the recent files had been accessed, what they might have done, and different approaches to piecing the mystery of this corrupted drive together.

[Luis] points out that the world of Linux forensics is much different from that of Windows, but for anyone looking to get started he suggests starting with a clean Linux install and going from there. There are many other avenues of digital forensics, as well; the field has as many avenues of exploration as there are different types of computers.

Wooden Laptop Enclosure: New Life For Old Thinkpad

Technology is designed to serve us and make our lives better. When a device gets outdated, it is either disposed of or is buried in a pile of junk never to be seen again. However, some individuals tend to develop a certain respect for their mechanical servants and make an effort to preserve them long after they have become redundant.

My relationship with my first laptop is a shining example of how to hold onto beloved hardware way too long. I converted that laptop into a desktop with a number of serious modifications which helped me learn about woodworking along the way. Maybe it’s more pragmatic to just buy new equipment. But you spend so much time each day using your devices. It is incredibly satisfying to have a personal connection that comes from pouring your own craftsmanship into them.

Why the Effort?

IBM Thinkpad R60 via Notebook Review

The laptop in question is an IBM R60 which I lugged around during the first three years after I graduated. It was my companion during some tough times and naturally, I developed a certain attachment to it. With time its peripherals failed including the keyboard which housed the power switch and it was decided that the cost of repair would outweigh its usefulness.

Then came the faithful day when I was inspired to make something with the scrap wood that had accumulated in my workshop. This would be my second woodworking project ever and I did not have the professional heavy machinery advertised in most YouTube videos. Yet I had two targets in mind with this project.

  1. Make the R60 useful again.
  2. Learn about woodworking for creating enclosures for future projects.

Armed with mostly hand tools, a drill and a grinder that was fitted with a saw blade, I started with the IBM R60 to all-in-one PC mod. Following is a log of things I did and those I regret not doing a.k.a. lessons learned. Read on.

Continue reading “Wooden Laptop Enclosure: New Life For Old Thinkpad”