Gamecube Dock For Switch Mods Nintendo With More Nintendo

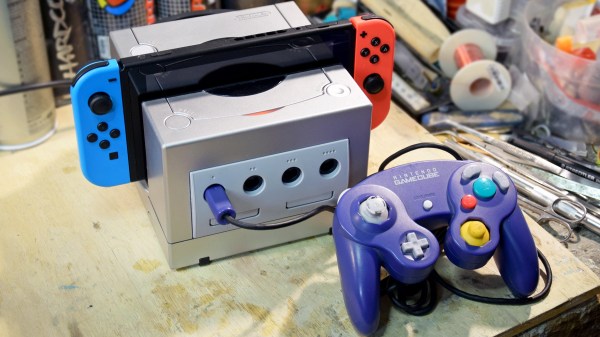
[Dorison Hugo] let us know about a project he just completed that not only mods Nintendo with more Nintendo, but highlights some of the challenges that come from having to work with and around existing hardware. The project is a Gamecube Dock for the Nintendo Switch, complete with working Gamecube controller ports. It looks like a Gamecube with a big slice out of it, into which the Nintendo Switch docks seamlessly. Not only that, but thanks to an embedded adapter, original Gamecube controllers can plug into the ports and work with the Switch. The original orange LED on the top of the Gamecube even lights up when the Switch is docked. It was made mostly with parts left over from other mods.

The interesting parts of this project are not just the attention to detail in the whole build, but the process [Dorison] used to get everything just right. Integrating existing hardware means accepting design constraints that are out of one’s control, such as the size and shape of circuit boards, length of wires, and often inconvenient locations of plugs and connectors. On top of it all, [Dorison] wanted this mod to be non-destructive and reversible with regards to the Nintendo Switch dock itself.

To accomplish that, the dock was modeled in CAD and 3D printed. The rest of the mods were all done using the 3D printed dock as a stand-in for the real unit. Since the finished unit won’t be painted or post-processed in any way, any scratches on both the expensive dock and the Gamecube case must be avoided. There’s a lot of under-cutting and patient sanding to get the cuts right as a result. The video (embedded below) steps through every part of the process. The final screws holding everything together had to go in at an odd angle, but in the end everything fit.

Continue reading “Gamecube Dock For Switch Mods Nintendo With More Nintendo”

Microgamer Is A Micro:Bit Handheld Console

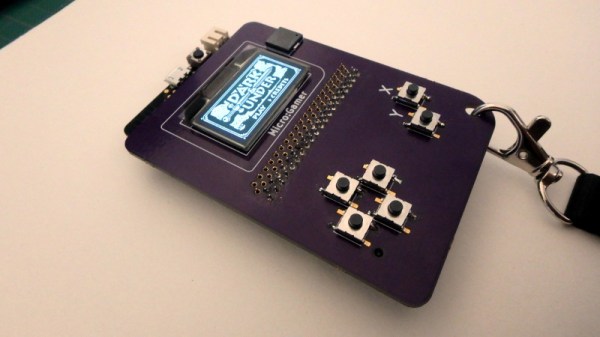
The BBC micro:bit single board ARM computer aimed at education does not feature as often as many of its competitors  in these pages. It’s not the cheapest of boards, and interfacing to it in all but the most basic of ways calls for a slightly esoteric edge connector. We’re then very pleased to see that edge connector turned from a liability into a feature by [Fabien Chouteau] with his handheld console, he uses micro:bits preprogrammed with different games in the manner of game cartridges in commercial consoles.

The micro:bit sits in its edge connector on the underside of a handheld PCB above a pair of AAA batteries, while on the other side are an OLED display and the usual set of pushbuttons. It’s a particularly simple board as the micro:bit contains all the circuitry required to support its peripherals.

He’s coded the games using the Arduino IDE with a modified version of the Arduboy2 library that allows him to easily port Arduboy games written for Arduino hardware. It’s a work in progress as there are a few more features to incorporate, but the idea of using micro:bits as cartridges is rather special. There is a video of the console in action, which we’ve placed below the break.

Continue reading “Microgamer Is A Micro:Bit Handheld Console”

Resurrecting An Amiga CD32

As an editor on Amiga magazines in a previous life, this is kind of bittersweet. [RetroManCave] was donated an Amiga CD32 games system, and it is trying to resurrect it. If you’ve not heard of it, the CD32 was a 1993 games console based on the Amiga home computer system. It was the last gasp for Commodore, the beleaguered company behind the Amiga. In this first video of a series, they take the system apart, take you through what’s inside and boot it up. The system boots, but there is some sort of problem with the video sync, and they will be taking a closer look at fixing that next. We have featured a couple of similar projects from [RetroManCave] before, such as their brain transplant on a Big Trak toy and Commodore 64 fix. This video (after the break) is worth a watch if you are curious about old systems like this, want some tips on resurrecting old hardware or just want to shed a tear as your misspent youth is torn apart before your eyes.

Continue reading “Resurrecting An Amiga CD32”

Xbox Needs No TV

If you want a custom video game system, you could grab a used computer, throw an emulator on it, and build yourself a custom arcade cabinet. On the other hand, if you’d rather not deal with emulators, you can always use a console and modify it into your own tiny arcade cabinet using the original hardware. That’s what the latest project from [Element18592] does, using an Xbox 360 Slim and a small LCD screen to make a mini-arcade of sorts.

The build uses a 7″ TFT LCD and a Flexible Printed Circuit (FPC) extension board. The screen gets 12V power from the Xbox and another set of leads are soldered directly to the composite output on the motherboard. The project also makes use of a special switch which can enable or disable the built-in monitor and allow the Xbox to function with a normal TV or monitor.

Admittedly, he does point out that this project isn’t the most practical to use. But it is still a deceptively simple modification to make to the Xbox compared to some of the more complicated mods we’ve seen before. The fact that almost anyone could accomplish this with little more than some soldering is an impressive feat in the world of console mods.

Continue reading “Xbox Needs No TV”

More Than Just An Atari Look-Alike

The Raspberry Pi has been a boon for hackers with a penchant for retro gaming. Redditor [KaptinBadkruk] Wanted to get on board the game train and so built himself an Atari 2600-inspired Raspberry Pi 3 console!

A key goal was the option to play Nintendo 64 titles, so [KaptinBadkruk] had to overclock the Pi and then implement a cooling system. A heatsink, some copper pads, and a fan from an old 3D printer — all secured by a 3D printed mount — worked perfectly after giving the heatsink a quick trim. An old speaker and a mono amp from Adafruit — and a few snags later — had the sound set up, with the official RPi touchscreen as a display.

After settling on an Atari 2600-inspired look, [KaptinBadkruk] laboured through a few more obstacles in finishing it off — namely, power. He originally intended for this  project to be portable, but power issues meant that idea had to be sidelined until the next version. However — that is arguably offset by [KaptinBadkruk]’s favourite part: a slick 3D Printed item box from Mario Kart front and center completes the visual styling in an appropriately old-meets-new way.

That item block isn’t the first time a lightshow has accompanied an Atari console, but don’t let that stop you from sticking one in your pocket.

[Via /r/DIY]

Play A Few Games Of Smash Brothers On The Go With A Portable Wii

How would you approach a build that required you to hack apart a perfectly good console motherboard? With aplomb and a strong finish. [jefflongo] from [BitBuilt.net] — a forum dedicated to making consoles portable — has finished just such a task, unveiling his version of a portable Wii to the world.

While this bears the general appearance of a portable GameCube, it’s what inside that counts. A heavily modified   Wii motherboard — to reduce size — forms this portable’s backbone, and it includes two infrared LEDs on its faceplate for Wii Remotes.  A single player can use the built-in controller, but [jefflongo] has included four GameCube controller ports for maximum multiplayer mayhem. Although he’ll likely plan on taking advantage of the built-in AV Out port to play on a TV and charge port for those extended gaming sessions, four 3400mAh batteries — with an estimated four hour battery life — should keep him satisfied on the go until he can recharge.

While the electronics display an impressive amount of work, but the final piece is a sight to behold. Check out the demo video after the break!

Continue reading “Play A Few Games Of Smash Brothers On The Go With A Portable Wii”

Finally – A Big-Screen Vectrex

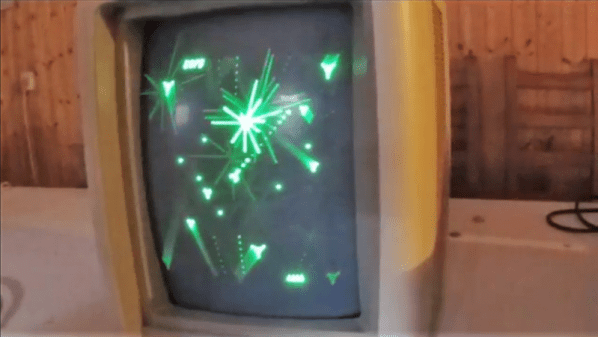
The Vectrex is in no way the most popular console of all time, but it is one of the more unique. Eschewing typical raster-based rendering, it instead relies on a vector-based display. Since the average home television of the era would be completely unable to display such signals, the Vectrex had its screen built in. This got [Arcade Jason] wondering – would it be possible to hook the Vectrex up to a bigger screen?

First, a suitable monitor had to be found. The 19V2000 turned out to be a good candidate – much larger at 19 inches, and found in a variety of arcade cabinets from years past. From there, the project became a matter of identifying the signal outputs of the Vectrex. [Arcade Jason] took the liberty of modifying the levels of the signals on the Vectrex board itself, and then fixing the now-overscanned image on the original screen by adjusting the onboard trimpots. With the Vectrex’s X and Y signals now boosted somewhat, they were wired up to the inputs of the larger arcade screen. For the Z signal, things got even hackier – a Walmart “Computer Amplifier”, typically used for speakers, was instead pressed in to service to amplify the signal.

There are plenty of wires running all over the carpet in this video, but the fact is, it works brilliantly. Future plans involve upgrading to an even larger 23 inch monitor, and possibly even experiments with color vector displays. It just goes to show that the Vectrex, even today, maintains a die-hard following.

Perhaps you’d like to try this, but need to fix your original Vectrex screen first? Never fear – that’s possible, too.