E-ink Typewriter Is Refreshingly Slow

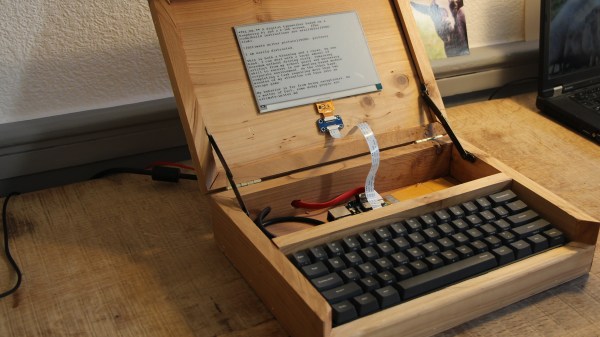
It’s pretty hard to use the internet to complete a task without being frequently distracted. For better or worse, there are rabbit holes at every turn and whilst exploring them can be a delight, sometimes you just need to focus on a task at hand. The solution could be in the form of distraction-blocking software, razor-sharp willpower, or a beautifully crafted modern “typewriter”. The constraint and restriction of a traditional typewriter appealed to [NinjaTrappeur], but the inability to correct typos and share content online was a dealbreaker. A hybrid was the answer, with a mechanical keyboard commanding an E-ink display driven by a Raspberry Pi.

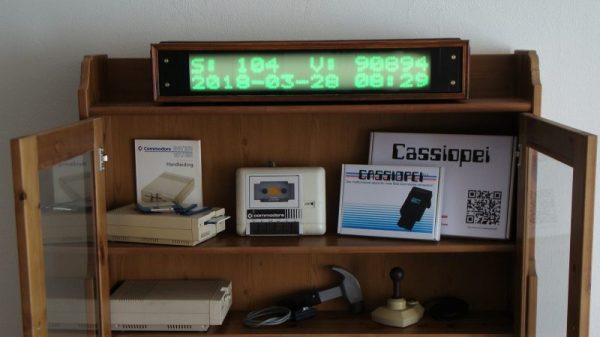
The main point of interest in this build is the E-ink screen. Though it’s easy to acquire theses displays in small sizes, obtaining a screen greater than four inches proved to be a challenge. Once acquired, driving the screen over SPI was easy, but the refresh rate was horrific. The display takes three seconds to redraw, and whilst [NinjaTrappeur] was hoping to implement a faster “partial refresh”, he was unable to read the appropriate values from the onboard flash to enable manual control of the drawing stages. Needless to say, [NinjaTrappeur] asks if people have had success driving these displays at a more usable rate, and would love to hear from you if so.

Some auxiliary hacks come in the form of terminal emulator adaptation, porting the E-ink screen library from C++ to C, and capturing the keyboard input. A handmade wooden case finishes it off.

If it’s old-school typewriters that float your boat, we’ve got you covered: this solenoid-actuated typewriter printer eventually became a musical instrument, and this daisy wheel machine produces ASCII art from a live camera.

[Via Boing Boing]

Faded Beauty DMM Gets An OLED Makeover

When a fine piece of lab instrumentation crosses your bench, you’ve got to do your best to put it to work. But even in the highest quality devices no component lasts forever, especially vacuum tubes. For some vintage instruments with vacuum fluorescent displays, that means putting up with less-than-perfect digits in order to get that sweet, sweet precision. Or not – you can always reverse engineer the thing and add a spanking new OLED display.

The Hewlett-Packard 34401A digital multimeter that fell into [qu1ck]’s lap was a beauty, but it had clearly seen better days. The display was full of spuriously illuminated dots and segments, making it hard to use the 6.5 digit DMM. After a futile bit of probing to see if a relatively easy driver fix would help, and with a replacement display being made of solid unobtanium, [qu1ck] settled in for the long process of reverse engineering the front panel protocol. As luck would have it, H-P used the SPI protocol to talk to the display, and it wasn’t long before [qu1ck] had a decent prototype working. The final version is much more polished, with a display sized to fit inside the original space occupied by the VFD. The original digits and annunciator icons are recreated, and he added a USB port and the bargraph display show in the clip below.

We think it looks fabulous, and both the firmware and hardware are on Github if you’d like to rescue a similar meter. You may want to check our guide to buying old test gear first, though, to get the most bang for your buck.

Continue reading “Faded Beauty DMM Gets An OLED Makeover”

Beats An Extension Cord

What does your benchtop power supply have that [Pete Marchetto]’s does not? Answer: an extension cord draped across the floor. How often have you said to yourself, “I just need to energize this doodad for a couple seconds,” then you start daisy chaining every battery in the junk drawer to reach the necessary voltage? It is not uncommon to see battery packs with a single voltage output, but [Pete] could not find an adjustable one, so he built his own and put it on Tindie.

Presumably, the internals are not going to surprise anyone: an 18650 battery, charging circuit, a voltage converter, display, adjustment knob, and a dedicated USB charging port. The complexity is not what intrigues us, it is the fact that we do not see more of them and still wind up taping nine-volt batteries together. [Editor’s note: we use one made from an old laptop battery.]

This should not replace your benchtop power supply, it does not have the bells and whistles, like current regulation, but a mobile source of arbitrary voltage does most of the job most of the time. And it’s what this build hasn’t got (a cord) that makes it most useful.

Raytheon’s Analog Read-Only Memory Is Tube-Based

There are many ways of storing data in a computer’s memory, and not all of them allow the computer to write to it. For older equipment, this was often a physical limitation to the hardware itself. It’s easier and cheaper for some memory to be read-only, but if you go back really far you reach a time before even ROMs were widespread. One fascinating memory scheme is this example using a vacuum tube that stores the characters needed for a display.

[eric] over at TubeTime recently came across a Raytheon monoscope from days of yore and started figuring out how it works. The device is essentially a character display in an oscilloscope-like CRT package, but the way that it displays the characters is an interesting walk through history. The monoscope has two circuits, one which selects the character and the other determines the position on the screen. Each circuit is fed a delightfully analog sine wave, which allows the device to create essentially a scanning pattern on the screen for refreshing the display.

[eric] goes into a lot of detail on how this c.1967 device works, and it’s interesting to see how engineers were able to get working memory with their relatively limited toolset. One of the nice things about working in the analog world, though, is that it’s relatively easy to figure out how things work and start using them for all kinds of other purposes, like old analog UHF TV tuners.

Roll Up Your Sleeve, Watch A Video With This Smart Watch Forearm Projector

We’re all slowly getting used to the idea of wearable technology, fabulous flops like the creepy Google Glass notwithstanding. But the big problem with tiny tech is in finding the real estate for user interfaces. Sure, we can make it tiny, but human fingers aren’t getting any smaller, and eyeballs can only resolve so much fine detail.

So how do we make wearables more usable? According to Carnegie-Mellon researcher [Chris Harrison], one way is to turn the wearer into the display and the input device (PDF link). More specifically, his LumiWatch projects a touch-responsive display onto the forearm of the wearer. The video below is pretty slick with some obvious CGI “artist’s rendition” displays up front. But even the somewhat limited displays shown later in the video are pretty impressive. The watch can claim up to 40-cm² of the user’s forearm for display, even at the shallow projection angle offered by a watch bezel only slightly above the arm — quite a feat given the irregular surface of the skin. It accomplishes this with a “pico-projector” consisting of red, blue, and green lasers and a pair of MEMS mirrors. The projector can adjust the linearity and brightness of the display to provide a consistent image across the uneven surface. An array of 10 time-of-flight sensors takes care of watching the display area for touch input gestures. It’s a fascinating project with a lot of potential, but we wonder how the variability of the human body might confound the display. Not to mention the need for short sleeves year round.

Need some basics on the micro-electrical mechanic systems (MEMS) behind the pico-projector in this watch? We’ve got a great primer on these microscopic machines.

Continue reading “Roll Up Your Sleeve, Watch A Video With This Smart Watch Forearm Projector”

Persistence Of Phosphorescence Clock Displays YouTube Stats Too

Looking for an eye-catching and unique way to display the time and date? Want the flexibility to add other critical information, like the number of YouTube subs you’ve got? Care to be able to read it from half a block away, at least at night? Then this scrolling glow-in-the-dark dot-matrix display could be right up your alley.

Building on his previous Morse code transcriber using a similar display, [Jan Derogee] took the concept and went big. The idea is to cover a PVC pipe with phosphorescent tape and rotate it past a row of 100 UV LEDs. The LEDs are turned on as the glow-in-the-dark surface passes over them, charging up a row of spots. The display is built up to two rows of 16 characters by the time it rotates into view, and the effect seems to last for quite a while. An ESP8266 takes care of driving the display and fetching NTP time and YouTube stats.

We’ve seen “persistence of phosphorescence” clocks before, but not as good looking and legible as this one. We like the approach, and we can’t help but think of other uses for glow-in-the-dark displays.

Continue reading “Persistence Of Phosphorescence Clock Displays YouTube Stats Too”

Eavesdropping On A VGA Monitor’s Conversations

Did you ever wonder what your monitor and your computer are talking about behind your back? As it turns out, there’s quite a conversation going on while the monitor and the computer decide how to get along, and sniffing out VGA communications can reveal some pretty fascinating stuff about the I²C protocol.

To reverse engineer the configuration information exchanged between a VGA monitor and a video card, [Ken Shirriff] began by lopping a VGA cable in two. The inside of such cables is surprisingly complex, with separate shielding wires for each color and sync channel and a host of control wires, all bundled in multiple layers of shielding foil and braid to reduce EMI. [Ken] identified the clock and data lines used for the I²C interface and broke those out into a PocketBeagle for analysis using the tiny Linux machine’s I²C tools.

With a Python script to help decode the monitor’s Extended Display Identification Data (EDID) data, [Ken] was able to see everything the monitor knows about itself — manufacturer, serial number, all the supported resolution modes, and even deprecated timing and signal information left over from the days when CRTs ruled the desktop. Particularly interesting are the surprisingly limited capabilities of a VGA display in terms of color reproduction, as well as [Ken]’s detailed discussion on the I²C bus in general and how it works.

We always enjoy these looks under the hood that [Ken] is so good at, and we look forward to his reverse engineering write-ups. His recent efforts include a look at core memory from a 50-year old mainframe and reverse engineering at the silicon level.