Make Some Noise With The Typewriter Keyboard

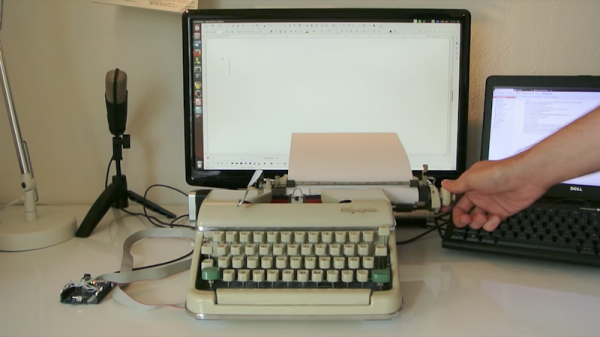
Are you an angry programmer? Do you get the frequent urge to smash the return key or space bar after finishing every single line of code? Well then [Konstantin Schauwecker]’s typewriter keyboard is just the thing for you. In his project, [Konstantin] hacked a German Olympia Monica typewriter into a USB keyboard.

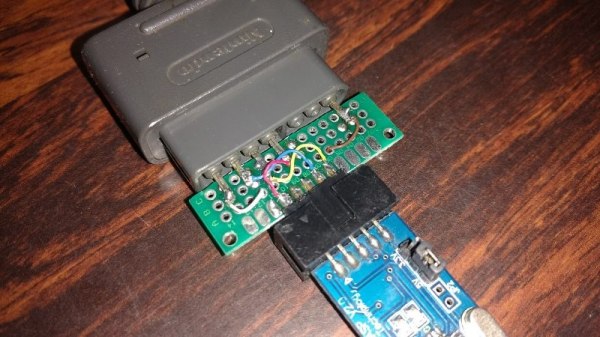
The project uses no less than 50 photo interrupters mounted on a custom PCB that mounts directly under the typewriter itself. The circuit board is so designed that the hammer arms take a position in obstructing the opto-interrupters. Every time a key is pressed, the corresponding device sends a signal to an Arduino.

In order to enable the wiring of 50 signals to an Arduino Leonardo, multiplexers and decoders are employed. CD4515, 4×16 line decoders work to activate the optical signals and the CD4067, 16×4 multiplexers are used to return the scans. This forms the traditional scanning keyboard matrix and the whole thing is managed in the Arduino code (available as a zip file).

This project can be a great starting point for anyone who wants to hack their grandpa’s old typewriter or make one in order to annoy the guy sitting next to them. Check out the video below for a demo and teardown and if you prefer Raspberry Pis then check out this mechanical typewriter hack.

Improved Game Tokens With Laser Cutting And Clever Design

[Martin Raynsford] is a prolific project maker, especially when it comes to using a laser cutter. These laser-cut token counters for the board game Tigris & Euphrates demonstrate some clever design, and show that some simple touches can make a big difference.

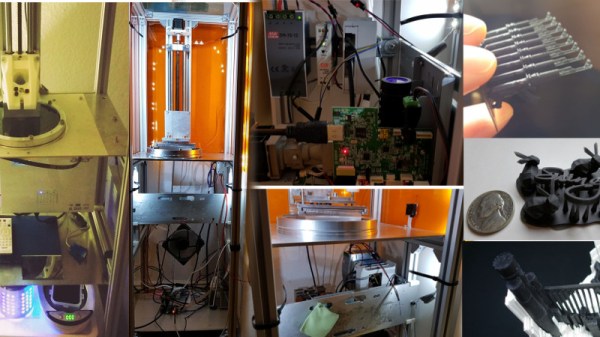
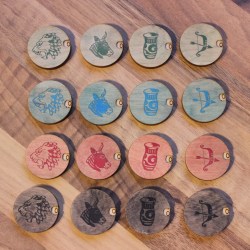
In the digital version of the game, the tokens conveniently display a number representing their total power value. [Martin] liked this feature, and set out to design a replacement token for the tabletop version that could display a number while still keeping the aesthetic of the originals. The tokens were designed as a dial with a small cutout window to show a number, but the surface of the token showing color and icon is still mostly unchanged.

Magnets hold the top and bottom together, and because of the small size of the assembly, no detents are needed. Friction is enough to keep things from moving unintentionally. The second noteworthy design feature is the material for the top layer of the token. This layer is made from 0.8 mm birch plywood; a nice and thin top layer means a wider viewing angle because the number is nearer to the surface. If the top layer were thicker, the number would be recessed and harder to see.

[Martin] made the design file available should anyone wish to try it out. No stranger to games, he even once game-ified the laser itself, turning it into a physical version of Space Invaders. Be sure to check it out!


Hackaday Prize Entry: DIY DLP

The 3D printing revolution is upon us and the technologies associated with these machines is evolving every day. Stereolithography or SLA printers are becoming the go-to printer for high-resolution prints that just can’t be fabricated on a filament-based machine. ADAM DLP 3D printer project is [adambrx]’s entry into the Hackaday Prize and the first step in his quest for higher quality prints on a DIY budget.

[adambrx]’s current iteration employs a Raspberry Pi 3 and a UV DLP Projector, all enclosed in a custom frame assembly. The logs show the evolution of the printer from an Acer DLP to the current UV DLP Light Engine. The results are quite impressive for a DIY project, and [adambrx] has put up images of 50-micrometer pillars and some nifty other prints which show the amount of work that has been put into the project.

It is safe to say that [adambrax] has outspent the average entry to the Hackaday Prize with over €5000 spent in around 3 years. Can [adambrx] can keep this one true to its DIY roots is yet to be seen, however, it is clear that this project has potential. We would love to see a high-resolution SLA printer that does not cost and arm and a leg.

Wooden Laptop Enclosure: New Life For Old Thinkpad

Technology is designed to serve us and make our lives better. When a device gets outdated, it is either disposed of or is buried in a pile of junk never to be seen again. However, some individuals tend to develop a certain respect for their mechanical servants and make an effort to preserve them long after they have become redundant.

My relationship with my first laptop is a shining example of how to hold onto beloved hardware way too long. I converted that laptop into a desktop with a number of serious modifications which helped me learn about woodworking along the way. Maybe it’s more pragmatic to just buy new equipment. But you spend so much time each day using your devices. It is incredibly satisfying to have a personal connection that comes from pouring your own craftsmanship into them.

Why the Effort?

IBM Thinkpad R60 via Notebook Review

The laptop in question is an IBM R60 which I lugged around during the first three years after I graduated. It was my companion during some tough times and naturally, I developed a certain attachment to it. With time its peripherals failed including the keyboard which housed the power switch and it was decided that the cost of repair would outweigh its usefulness.

Then came the faithful day when I was inspired to make something with the scrap wood that had accumulated in my workshop. This would be my second woodworking project ever and I did not have the professional heavy machinery advertised in most YouTube videos. Yet I had two targets in mind with this project.

  1. Make the R60 useful again.
  2. Learn about woodworking for creating enclosures for future projects.

Armed with mostly hand tools, a drill and a grinder that was fitted with a saw blade, I started with the IBM R60 to all-in-one PC mod. Following is a log of things I did and those I regret not doing a.k.a. lessons learned. Read on.

Continue reading “Wooden Laptop Enclosure: New Life For Old Thinkpad”

Interfacing A Retro Controller Using The USBASP

An ISP dongle is a very common piece of equipment on a maker’s bench. However, its potential as a hackable device is generally overlooked. The USBASP has an ATmeg8L at its heart and [Robson] decided that this humble USB device could be used as an interface between his PC and a SNES Joypad.

A SNES controller required three pins to communicate with a host: clock, data and latch. In his hack, [Robson]  connects the controller to the ISP interface using a small DIY adaptor and programs the AVR using the V-USB library. V-USB is a software USB library for small microcontrollers and comes in pretty handy in this instance.

[Robson] does a pretty good job of documenting the entire process of creating the interface which includes the USB HID code as well as the SNES joypad serial protocol. His hack works on both Windows and Linux alike and the code is available on GitHub for download.

Simple implementation like this project are a great starting point for anyone looking to dip their toes in the DIY USB device pool. Veterans may find a complete DIY joystick more up their alley and will be inspired by some plastic techniques as well.

Hackaday Prize Entry: 3D Printed Linear Actuator Does 2kg+

The rabbit hole of features and clever hacks in [chiprobot]’s NEMA17 3D Printed Linear Actuator is pretty deep. Not only can it lift 2kg+ of mass easily, it is mostly 3D printed, and uses commonplace hardware like a NEMA 17 stepper motor and a RAMPS board for motion control.

The main 3D printed leadscrew uses a plug-and-socket design so that the assembly can be extended easily to any length desired without needing to print the leadscrew as a single piece. The tip of the actuator even integrates a force sensor made from conductive foam, which changes resistance as it is compressed, allowing the actuator some degree of feedback. The force sensor is made from a 3M foam earplug which has been saturated with a conductive ink. [chiprobot] doesn’t go into many details about his specific method, but using conductive foam as a force sensor is a fairly well-known and effective hack. To top it all off, [chiprobot] added a web GUI served over WiFi with an ESP32. Watch the whole thing in action in the video embedded below.

Continue reading “Hackaday Prize Entry: 3D Printed Linear Actuator Does 2kg+”

DIY Shortcut Keyboard

Working with CAD programs involves focusing on the task at hand and keyboard shortcuts can be very handy. Most software packages allow the user to customize these shortcuts but eventually, certain complex key combination can become a distraction.

[awende] over at Sparkfun has created a Cherry MX Keyboard which incorporates all of the Autodesk Eagle Shortcuts to a single 4×4 matrix. The project exploits the Arduino Pro Mini’s ability to mimic an HID device over USB thereby enabling the DIY keyboard. Pushbuttons connected to the GPIOs are read by the Arduino and corresponding shortcut key presses are sent to the host machine.

Additional functionality is implemented using two rotary encoders and the Teensy encoder library. The first knob functions as a volume control with the push-button working as a mute button. The encoder is used to control the grid spacing and the embedded button is used to switch between imperial and metric units. The entire code, as well as the schematic, is available on GitHub for your hacking pleasure. It’s a polished project just ready for you to adapt.

The project can be extended to be used with other computer software such as Gimp and the keys may be replaced by capacitive touch sensors making it more sturdy. Bluetooth can be added to make things wireless and you can check out the Double Action Keyboard to extend functionality further. Continue reading “DIY Shortcut Keyboard”