Laser PCBs With LDGraphy

There are many, many ways to get a PCB design onto a board for etching. Even with practice however, the quality of the result varies with the process and equipment used. With QFN parts becoming the norm, the days of etch-resist transfers and a permanent marker are all but gone. Luckily, new and improved methods of Gerber transfer have be devised in recent years thanks to hackers across the world.

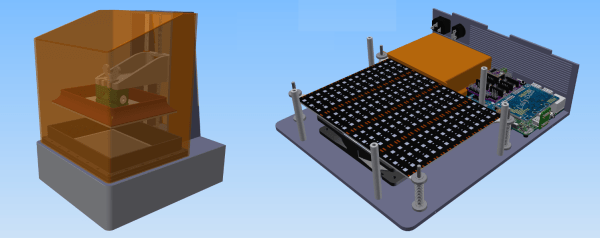
One such hacker, [Henner] is working on a project called LDGraphy in an attempt to bring high-resolution etching to the masses. LDGraphy is a laser lithography device that makes use of a laser and a Beaglebone green to etch the layout onto the board. The best part is that the entire BOM is claimed to cost under a $100 which makes it affordable to people on a budget.

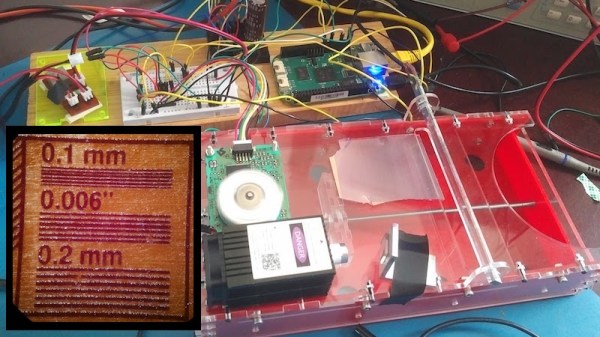
The system is designed around a 500 mW laser and a polygon mirror scanner meant for a laser printer. The board with photoresist is linearly actuated in the X-axis using a stepper motor and the laser beam which is bounced off the rotating hexagonal mirror is responsible for the Y-axis. The time critical code for the Programmable Realtime Unit (PRU) of the AM335X processor is written in assembly for the fast laser switching. The enclosure is, naturally, a laser cut acrylic case and is made at [Henner]’s local hackerspace.

[Henner] has been hard at work calibrating his design and compensating for the inaccuracies of the components used. In the demo video below he presents a working version with a resolution of 6 mils which is wonderful considering the cost of the machine. He also shares his code on GitHub if you want to help out and you can track his updates on Google+. Continue reading “Laser PCBs With LDGraphy”

Cardboard And Paper Gun Shows Off Clever Construction

This project by [blackfish] shows off a cardboard lookalike of an MP5 that loads from a working magazine, has a functional charging handle, and flings paper projectiles with at least enough accuracy to plink some red party cups. It was made entirely from corrugated cardboard, paper, rubber bands, and toothpicks.

In the video (embedded below) you can see some clever construction techniques. For example, using a cyanoacrylate adhesive to saturate areas of wood, cardboard, or paper to give them added strength and rigidity. The video is well-edited and worth a watch to see the whole process; [blackfish] even uses a peeled piece of cardboard — exposing the corrugated part — as a set of detents (6:56) to retain the magazine.

Continue reading “Cardboard And Paper Gun Shows Off Clever Construction”

Gas Heater Gets A Battery Backup

With the availability of cheap modules, it has become easy to hack/make stuff at home and home appliances see the most creative hacks of all. In one such hack, [Vadim] takes the DIY route to adding battery backup to his gas heater.

His existing unit operates on two D-type batteries which need to be replaced once they are depleted. [Vadim] wanted to implement a reversible method since he lives in a rented place. He replaced the original cells with battery adaptors and brought out the connections using two wires. He then proceeded to add two cellphone batteries with a TPS54233 regulator so as to supply the desired voltage to the gas heater. This is interesting since the module used is an official Texas Instruments EVM instead of the traditional eBay purchase.

The batteries in question are charged using modules based on the TP4056 which in turn are fed 5V from power supply modules. The DC voltage is coupled with a LM1117 to provide power to the heater from the mains and the switch over is accomplished using an SPDT relay. The enclosure is a humble box which resembles a plastic food container and is fitted with PG9 cable glands along with a fuse holder to boot. Take a look at the original post for a plethora of images and details of construction.

This an excellent example of a project that came together using available parts to solve a problem without the frills. The DIY fish feeder is another example of a project with functional design and is a great example of DIY.

Hackaday Prize Entry: DIY LCD Based SLA 3D Printer

Resin-based SLA 3D printers are seen more and more nowadays but remain relatively uncommon. This Low Cost, Open Source, LCD based SLA 3D Printer design by [Dylan Reynolds] is a concept that aims to make DIY SLA 3D printing more accessible. The idea is to use hardware and manufacturing methods that are more readily available to hobbyists to create a reliable and consistent DIY platform.

[Dylan]’s goal isn’t really to compete with any of the hobbyist or prosumer options on the market; it’s more a test bed for himself and others, to show that a low-cost design that takes full advantage of modern hardware like the Raspberry Pi can be made. The result would be a hackable platform to let people more easily develop, experiment, or simply tamper with whatever part or parts they wish.

How To Build Your Own Google AIY Without The Kit

Google’s voice assistant has been around for a while now and when Amazon released its Alexa API and ported the PaaS Cloud code to the Raspberry Pi 2 it was just a matter of time before everyone else jumped on the fast train to maker kingdom. Google just did it in style.

Few know that the Google Assistant API for the Raspberry Pi 3 has been out there for some time now but when they decided to give away a free kit with the May 2017 issues of MagPi magazine, they made an impression on everyone. Unfortunately the world has more makers and hackers and the number of copies of the magazine are limited.

In this writeup, I layout the DIY version of the AIY kit for everyone else who wants to talk to a cardboard box. I take a closer look at the free kit, take it apart, put it together and replace it with DIY magic. To make things more convenient, I also designed an enclosure that you can 3D print to complete the kit. Lets get started.

Continue reading “How To Build Your Own Google AIY Without The Kit”

Practical Enclosure Design, Optimized For 3D Printing

[3D Hubs] have shared a handy guide on designing practical and 3D printing-friendly enclosures. The guide walks through the design of a two shell, two button remote control enclosure. It allows for a PCB mounted inside, exposes a USB port, and is optimized for 3D printing without painting itself into a corner in the process. [3D Hubs] uses Fusion 360 (free to hobbyists and startups) in their examples, but the design principles are easily implemented with any tool.

One of the tips is to design parts with wall thicknesses that are a multiple of the printer’s nozzle diameter. For example, a 2.4 mm wall thickness may sound a bit arbitrary at first, but it divides easily by the typical FDM nozzle diameter of 0.4 mm which makes slicing results more consistent and reliable. Most of us have at some point encountered a model where the slicer can’t quite decide how to handle a thin feature, delivering either a void between perimeters or an awkward attempt at infill, and this practice helps reduce that. Another tip is to minimize the number of sharp edges in the design, because rounded corners print more efficiently and with smoother motions from the print head.

The road to enclosures has many paths, including enclosures made from FR4 (aka PCB material) all the way down to scrap wood with toner transfer labeling, and certainly desktop 3D printing has been a boon to anyone who’s had to joylessly drill and saw away at a featureless plastic box.

Multipurpose ESP8266 Keychain

One of the best feature of the ESP8266 is its ability to self-host a web server, allowing for fairly complicated user interactions. The dEEbugger by [S-March] is a nifty little ESP8266 based device with a plethora of features in a small package.

The USB-powered device has a web user interface that enables it to be used as a low-bandwidth oscilloscope, I2C terminal, or UART terminal. As a scope, you may connect to it via your tablet and then use it as a remote voltage monitor. There is a peak detection feature which is a nice touch and gives the entire project a premium feel.

The serial terminal on an ESP8266 is not something new yet it is helpful in disconnecting the console window from the bench. The I2C terminal is where the device really shines as it can scan for connected devices on the connected bus. This Bus-Pirate like feature is useful for beginners as the software can scan the registers addresses of the devices as well.

[S-March] has made the schematic in PDF format as well as the entire code for the project available on GitHub so go right ahead and make it your own. We have had an ESP8266 based VT Terminal device in the past and merging the two would make for an excellent maker tool.

Thanks for the tip [René Arts]