IoT Device Pulls Its Weight In Home Brewing

floating-square
The iSpindel floating in a test solution.

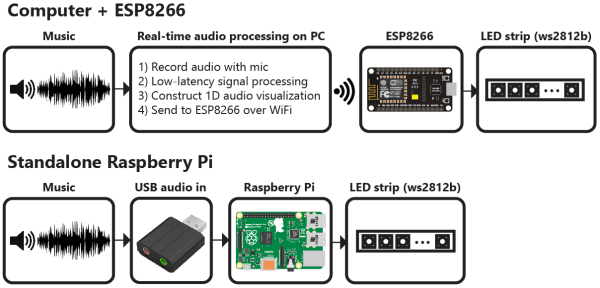
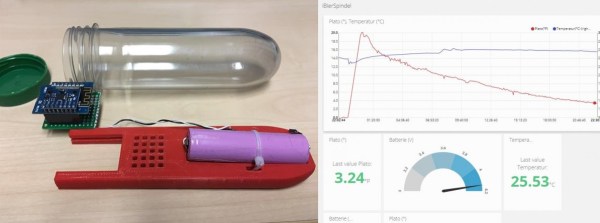
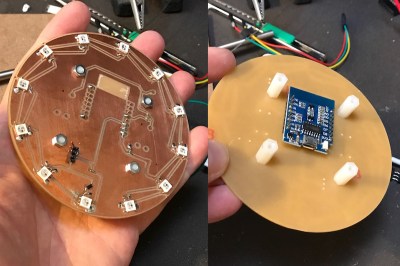
Brewing beer or making wine at home isn’t complicated but it does require an attention to detail and a willingness to measure and sanitize things multiple times, particularly when tracking the progress of fermentation. This job has gotten easier thanks to the iSpindel project; an ESP8266 based IoT device intended as a DIY alternative to a costly commercial solution.

Hydrometer [Source: grapestompers.com]

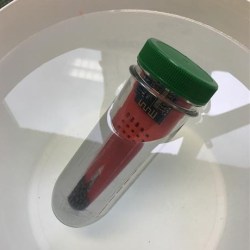
Tracking fermentation normally involves a simple yet critical piece of equipment called a hydrometer (shown left), which measures the specific gravity or relative density of a liquid. A hydrometer is used by winemakers and brewers to determine how much sugar remains in a solution, therefore indicating the progress of the fermentation process. Using a hydrometer involves first sanitizing all equipment. Then a sample is taken from the fermenting liquid, put into a tall receptacle, the hydrometer inserted and the result recorded. Then the sample is returned and everything is cleaned. [Editor (and brewer)’s note: The sample is not returned. It’s got all manner of bacteria on/in it. Throw those 20 ml away!] This process is repeated multiple times, sometimes daily. Every time the batch is opened also increases the risk of contamination. Continue reading “IoT Device Pulls Its Weight In Home Brewing”

ESP8266 BASIC Sets Up A Web Remote In No Time

One of the sticking points for us with our own Internet of Things is, ironically, the Internet part. We build hardware happily, but when it comes time to code up web frontends to drive it all, the thrill is gone and the project is only half-done.

Including some simple web-based scripting functionality along with the microcontroller basics is one of the cleverest tricks up ESP8266 BASIC’s sleeves. BASIC author [mmiscool] puts it to good use in this short demo: a complete learning IR remote control that’s driven through a web interface, written in just a few lines of BASIC.

Note that everything happens inside the ESP8266 here, from hosting the web page to interpreting and then blinking back out the IR LED codes to control the remote. This is a sophisticated “hello world”, the bare minimum to get you started. The interface could look slicker and the IR remote could increase its range with more current to the LED, but that would involve adding a transistor and some resistors, doubling the parts count.

For something like $10 in parts, though, this is a fun introduction to the ESP and BASIC. Other examples are simpler, but we think that this project has an awesome/effort ratio that’s hard to beat.

Hacking On The Weirdest ESP Module

Sometimes I see a component that’s bizarre enough that I buy it just to see if I can actually do something with it. That’s the case with today’s example, the ESP-14. At first glance, you’d ask yourself what AI Thinker, the maker of many of the more popular ESP8266 modules, was thinking.

The ESP-14 takes the phenomenally powerful ESP8266 chip and buries it underneath one of the cheapest microcontrollers around: the 8-bit STM8S003 “value line” chip. Almost all of the pins of the ESP chip are locked inside the RF cage’s metal tomb — only the power, bootloader, and serial TX/RX pins see the light of day, and the TX/RX pins are shared with the STM8S. The rest of the module’s pins are dedicated to the STM8S. Slaving the ESP8266 to an STM8S is like taking a Ferrari and wrapping it inside a VW Beetle.

I had never touched an STM8 chip before, and just wanted to see what I could do with this strange beast. In the end, ironically, I ended up doing something that wouldn’t be too far out of place on Alibaba, but with a few very Hackaday twists: a monitor for our washer and dryer that reports power usage over MQTT, programmed in Forth with a transparent WiFi serial bridge into the chip for interactive debugging without schlepping down into the basement. Everything’s open, tweakable, and the Forth implementation for the STM8S was even developed here on Hackaday.io.

It’s a weird project for the weirdest of ESP modules. I thought I’d walk you through it and see if it sparks you to come up with any alternative uses for the ESP8266-and-STM8S odd couple that is the ESP-14.

Continue reading “Hacking On The Weirdest ESP Module”

Increase The Range Of An ESP8266 With Duct Tape

For the longest time now, I’ve wanted to build a real, proper radio telescope. To me, this means a large parabolic reflector, a feed horn made of brass sheet, coat hanger wire, and at least for the initial experiments, an RTL-SDR dongle. I’ve done the calculations, looked at old C-band antennas on Craigslist, and even designed a mount or two that would make pointing the dish possible. I’ve done enough planning to know the results wouldn’t be great. After months of work, the best I could ever hope for is a very low-resolution image of the galactic plane. If I get lucky, there might be a bright spot corresponding to Sagittarius A.

There are better ways to build a radio telescope in your back yard, but the thought of having a gigantic parabolic dish out back, peering into the heavens, has stuck with me. I’ve even designed a dish that can be taken apart easily and transported because building your own dish is far cooler than buying a West Virginia state flower from a guy on Craigslist.

Recently, I was asked to come up with a futuristic, space-ey prop for an upcoming video. My custom-built, easily transportable parabolic antenna immediately sprang to mind. The idea of a three-meter diameter parabolic dish was rejected for something a little more practical and a little less expensive, but I did go so far as to do a few more calculations, open up a CAD program, and start work on the actual design. As a test, I decided to 3D print a small model of this dish. In creating this model, I inadvertently created the perfect WiFi antenna for an ESP8266 module using nothing but 3D printed parts, a bit of epoxy, and duct tape.

Continue reading “Increase The Range Of An ESP8266 With Duct Tape”

Schematic of Diode Level Shifter for WS2812

Cheating At 5V WS2812 Control To Use 3.3V Data

If you’re looking to control WS2812 (or Neopixel) LEDs using a microcontroller running at 3.3 volts, you might run into some issues. The datasheet tells us that a logic high input will be detected at a minimum voltage of 0.7 * Vcc. If you’re running the LED at 5V, this means 5 V * 0.7 = 3.5 V will be needed for the WS2812 to detect a ‘1’ on the data line. While you might get away with using 3.3 V, after all the specification in the data sheet is meant to be a worst case, it’s possible that you’ll run into reliability issues.

So usually we’d say “add a level shifter to convert 3.3V to 5V” and this post would be over. We even have a whole post on building level shifters which would work fine for this application. However [todbot] at CrashSpace came up with a nifty hack that requires fewer components yet ensures reliability.

bigbutton-front-backFor the Big Button project at CrashSpace, [todbot] used an ESP8266 running at 3.3 volts and WS2812 LEDs running at 5 V. To perform the level shift, a signal diode is placed in series with the power supply of the first LED. This drops the first LED to 4.3 V, which means a 4.3 V * 0.7 = 3.01 V signal can be used to control it. The logic out of this LED will be at 4.3 V, which is enough to power the rest of the LEDs running at 5 V.

This little hack means a single diode is all that’s needed to control 5 V LEDs with a 3.3 V microcontroller. The first LED might be a little less bright, since it’s operating at a lower voltage, but that’s a trade off [todbot] made to simplify this design. It’s a small part of a well-executed project so be sure to click-through and enjoy all the thought [todbot] put into a great build.

LED Strip Display Gives You Two Ways To See The Music

What to call this LED strip music visualizer is a puzzler. It lights up and pulsates in time with music similar to the light organs of 1970s psychedelia fame, but it’s more than that. Is it more like the Larson Scanner that graced the front of [David Hasselhoff]’s ride on Knight Rider? A little, but not quite.

description-croppedWhatever you decide to call this thing, it looks pretty cool, and [Scott Lawson] provides not one but two ways to build it. The business end is a simple strip of WS2812b addressable LEDs. It looks like the first incarnation of the project had an ESP8266 driving the LEDs in response to commands sent to it from a PC running the visualization code, written in Python. That setup keeps the computationally intensive visualization code separate from the display, but limits the display to 256 pixels and probably has to deal with network latency. The Raspberry Pi version both crunches the numbers and drives the display, but the Pi doesn’t have the oomph to run both the LEDs and the GUI, which is pretty interesting to look at by itself. The video below shows the different visualization modes available — we’re partial to the “energy effect” at the end.

Take your pick of hardware and throw a couple of these things together for your next rave. And if you need a little more background on the aforementioned Larson Scanner, we’ve got you covered.

Continue reading “LED Strip Display Gives You Two Ways To See The Music”

Servo-Controlled IoT Light Switches

The Internet of Things is fun to play with; there’s all manner of devices to automate and control remotely. It can be sketchy, though — make a mistake when coding your automatic plant watering system and you could flood your house. Make a mistake with a space heater and you could burn it down. Combine these risks with the fact that many people live in rental properties, and it can be a difficult proposition to bring the Internet of Things to your home.

[Suyash] came up with a way around this by building 3D printed light switch covers that add servo control. It’s a great solution that it doesn’t require the modification of any mains wiring, and interfaces with the standard switches in the normal way. It makes it a lot safer this way — there are municipal wiring codes for a reason. This is a great example of what you can do with a 3D printer, above and beyond printing out Yoda heads and keychains.

The backend of things is handled by the venerable ESP8266, with [Suyash]’s custom IoT library known as conduit doing the heavy lifting. The library is a way to quickly build IoT devices with web interfaces, and [Suyash] claims it’s possible to be blinking an LED from the cloud within 5 minutes using the tool.

For another take on an IoT light switch, check out this Hackaday Prize entry from 2016.