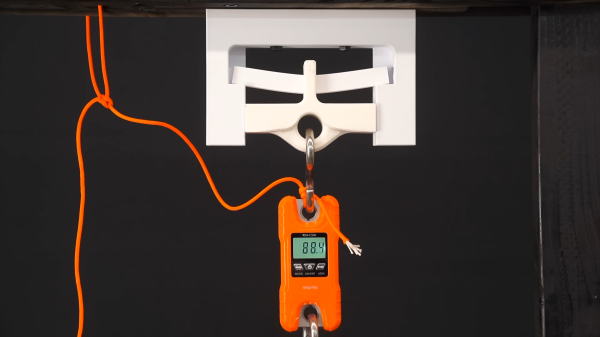
3D printed test jig to determine the yield point of a centrally loaded 3D printed beam.

One Object To Print, But So Many Settings!

When working with an FDM 3D printer your first prints are likely trinkets where strength is less relevant than surface quality. Later on when attempting more structural prints, the settings become very important, and quite frankly rather bewildering. A few attempts have been made over the years to determine in quantifiable terms, how these settings affect results and here is another such experiment, this time from Youtuber 3DPrinterAcademy looking specifically at the effect of wall count, infill density and the infill pattern upon the strength of a simple beam when subjected to a midpoint load.

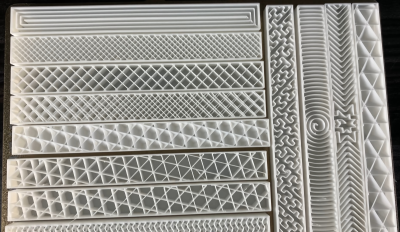
A tray of 3D printing infill patterns available in mainstream slicers
Modern slicers can produce many infill patterns, but the effect on real world results are not obvious

When setting up a print, many people will stick to the same few profiles, with a little variety in wall count and infill density, but generally keep things consistent. This works well, up to a point, and that point is when you want to print something significantly different in size, structure or function. The slicer software is usually very helpful in explaining the effect of tweaking the numbers upon how the print is formed, but not too great at explaining the result of this in real life, since it can’t know your application. As far as the slicer is concerned your object is a shape that will be turned into slices, internal spaces, outlines and support structures. It doesn’t know whether you’re making a keyfob or a bearing holder, and cannot help you get the settings right for each application. Perhaps upcoming AI applications will be trained upon all these experimental results and be fed back into the slicing software, but for now, we’ll just have to go with experience and experiment. Continue reading “One Object To Print, But So Many Settings!”

The Freedom To Fail

When you think of NASA, you think of high-stakes, high-cost, high-pressure engineering, and maybe the accompanying red tape. In comparison, the hobby hacker has a tremendous latitude to mess up, dream big, and generally follow one’s bliss. Hopefully you’ll take some notes. And as always with polar extremes, the really fertile ground lies in the middle.

[Dan Maloney] and I were thinking about this yesterday while discussing the 50th flight of Ingenuity, the Mars helicopter. Ingenuity is a tech demo, carrying nothing mission critical, but just trying to figure out if you could fly around on Mars. It was planned to run for five flights, and now it’s done 50.

The last big tech demo was the Sojourner Rover. It was a small robotic vehicle the size of a microwave oven that they hoped would last seven days. It went for 85, and it gave NASA the first taste of success it needed to follow on with 20 years of Martian rovers.

Both of these projects were cheap, by NASA standards, and because they were technical demonstrators, the development teams were allowed significantly more design freedom, again by NASA standards.

None of this compares to the “heck I’ll just hot-air an op-amp off an old project” of weekend hacking around here, but I absolutely believe that a part of the tremendous success of both Sojourner and Ingenuity were due to the risks that the development teams were allowed to take. Creativity and successful design thrives on the right blend of constraint and freedom.

Will Ingenuity give birth to a long series of flying planetary rovers as Sojourner did for her rocker-bogie based descendants? Too early to tell. But I certainly hope that someone within NASA is noticing the high impact that these technical demonstrator projects have, and also noting why. The addition of a little bit of hacker spirit to match NASA’s professionalism probably goes a long way.

Building A Glowing Demon Core Lamp

The so-called Demon Core was a cursed object, a 6.2 kilogram mass of plutonium intended to be installed in a nuclear weapon. Instead, slapdash experimental techniques saw it feature in several tragic nuclear accidents and cause multiple fatalities. Now, you can build yourself a lamp themed after this evil dense sphere.

A later recreation of the infamous “Slotin Accident” that occurred with the Demon Core. Credit: Public Domain, Los Alamos National Laboratory

Creator [skelly] has designed the lamp to replicate the Slotin incident, where the spherical Demon Core was placed inside two half-spheres of beryllium which acted as neutron reflectors to allow it to approach criticality. Thus, the core is printed as a small sphere which is thin enough to let light escape, mimicking the release of radiation that doomed Louis Slotin. The outer spheres are then printed in silvery PLA to replicate the beryllium half-spheres. It’s all assembled atop a stand mimicking those used in the Los Alamos National Laboratory in the 1940s.

To mimic the Core’s deadly blue glow, the build uses cheap LED modules sourced from Dollar Tree lights. With the addition of a current limiting resistor, they can easily be run off USB power in a safe manner.

The Demon Core has become a meme in recent times, perhaps as a new generation believes themselves smart enough not to tinker with 6.2 kilograms of plutonium and a screwdriver. That’s not to say there aren’t still dangerous nuclear experiments going on, even the DIY kind. Be careful out there!

Metal Detector Gets Help From Smartphone

[mircemk] is quite a wizard when it comes to using coils of wires in projects, especially when their application is within easy-to-build metal detectors. There are all kinds of ways to send signals through coiled wire to detect metal objects in the ground, and today [mircemk] is demonstrating a new method he is experimenting with which uses a smartphone to detect the frequency changes generated by the metal detector.

Like other metal detectors, this one uses two coils of wire with an oscillator circuit and some transistors. The unique part of this build, though, is how the detector alerts the user to a piece of metal. Normally there would be an audible alert as the frequencies of the circuit change when in the presence of metal, but this one uses a smartphone to analyze the frequency information instead. The circuit is fed directly into the headphone jack on the smartphone and can be calibrated and used from within an Android app.

Not only can this build detect metal, but it can discriminate between different types of metal. [mircemk] notes that since this was just for experimentation, it needs to be calibrated often and isn’t as sensitive as others he’s built in the past. Of course this build also presumes that your phone still has a headphone jack, but we won’t dig up that can of worms for this feature. Instead, we’ll point out that [mircemk] has shown off other builds that don’t require any external hardware to uncover buried treasure.

Continue reading “Metal Detector Gets Help From Smartphone”

Helium Recovery System Saves Costs

Helium is the most common element in the universe besides hydrogen, but despite this universal abundance it is surprisingly difficult to come across on Earth. Part of the problem is that it is non-renewable, so unless it is specifically captured during mining its low density means that it simply escapes the atmosphere. For that reason [Meow] maintains a helium recovery system for a lab which is detailed in this build.

The purpose of the system is to supply a refrigerant to other projects in the lab. Liquid helium is around 4 Kelvin and is useful across a wide variety of lab tests, but it is extremely expensive to come across. [Meow]’s recovery system is given gaseous helium recovered from these tests, and the equipment turns it back into extremely cold liquid helium in a closed-cycle process. The post outlines the system as a whole plus goes over some troubleshooting that they recently had to do, and shows off a lot of the specialized tools needed as well.

Low-weight gasses like these can be particularly difficult to deal with as well because their small atomic size means they can escape fittings, plumbing, and equipment quite easily compared to other gasses. As a result, this equipment is very specialized and worth a look. For a less lab-based helium project, though, head on over to this helium-filled guitar instead.

Bringing Some Coulter To The Bench: Measuring Tiny Particles With Nanopore Sensing

We’ve all been there: you’re sitting at your bench, with a beaker full of some conductive fluid with a bunch of tiny particles suspended in it, and you want to measure the sizes of each particle.

Okay, maybe this isn’t a shared experience we’ve all had, but It’s at least an ordeal Hackaday alum [Nava Whiteford] has been through, and he was able to carry out the measurements in question using a neat apparatus known as a Coulter counter.

Imagine a container full of a conductive fluid. If you place an electrode at each end, the fluid will carry a current. Now, drop an insulating divider in the middle of the container, and the current will stop flowing. Finally, poke a small hole (or nanopore) in the divider. Huzzah! The current is flowing again… but how does this let us measure particle sizes? Well, now think about a tiny particle moving through the hole in the divider. As the particle passes through, the hole will be partially blocked, and the current flow will be partially interrupted. It turns out, the resulting dip in current is proportional to the volume of the particle — a fun property known as the Coulter principle.

[Nava] built a great demo of the system with a macropore in place of the nanopore. The pore in question was a hole melted into a bottle cap, which was suspended in a beaker by two toothpicks. [Nava] used small chips of Acrylic as the particles to be measured, which they pipetted into the solution of KCl. They then passed a current through the solution and used an oscilloscope to sense the interruptions. Be sure to check out their write up for a video of the system in action!

Of course, this technique has a much wider range of applications than measuring little bits of plastic — obtaining blood cell counts, for one. We’ve seen particle counters for use in the air before, but it’s great to see that there’s a way to measure particles in an aqueous solution —  you know, in case we ever find ourselves in such a situation.

Is It A Toy? A Prototype? It’s A Hack!

Some of the coolest hacks do a lot with a little. I was just re-watching a video from [Homo Faciens], who after building a surprisingly capable CNC machine out of junk-bin parts and a ton of ingenuity, was accidentally challenged by Hackaday’s own [Dan Maloney] to take it a step further. [Dan] was only joking when he asked “Can anyone build a CNC machine out of cardboard and paperclips?”, but then [Homo Faciens] replied: cardboard and paperclip CNC plotter. Bam!

My favorite part of the cardboard project is not just the clever “encoder wheel” made of a bolt dipped in epoxy, with enough scraped off that it contacts a paperclip once per rotation. Nor was it the fairly sophisticated adjustable slides and ways that he built to mimic the functionality of the real deal. Nope.

My favorite part of this project is [Norbert] explaining that the machine has backlash here, and it’s got play there, due to frame flex. It is a positive feature of the machine. The same flaws that a full-metal machine would have are all present here, but due to the cheesy construction materials, you can see them with the naked eye instead of requiring a dial indicator. Because it wiggles visible tenths of an inch where a professional mill would wiggle invisible thousandths, that helps you build up intuition for the system.

This device isn’t a “prototype” because there’s no way [Norbert] intends it for serious use. But it surely isn’t just a “toy” either. “Instructional model” makes it sound like a teaching aid, created by a know-it-all master, intended to be consumed by students. If anything, there’s a real sense of exploration, improvisation, and straight-up hacking in this project. I’m sure [Norbert] learned as much from the challenge as we did from watching him tackle it. And it also captures the essence of hacking: doing something unexpected with tech.

Surprise us!

This article is part of the Hackaday.com newsletter, delivered every seven days for each of the last 200+ weeks. It also includes our favorite articles from the last seven days that you can see on the web version of the newsletter.

Want this type of article to hit your inbox every Friday morning? You should sign up!