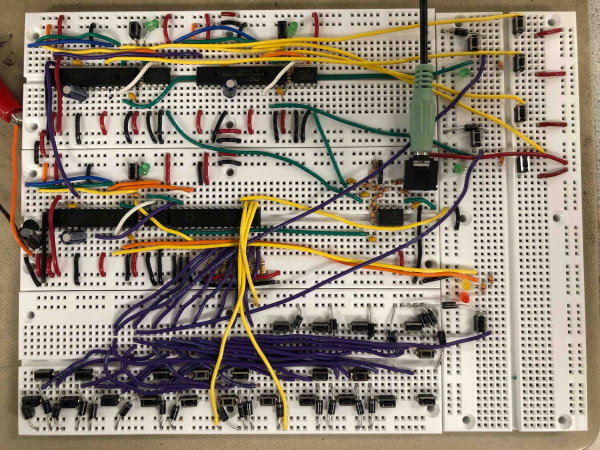
Numpy Comes To Micro Python

[Zoltán] sends in his very interesting implementation of a NumPy-like library for micropython called ulab.

He had a project in MicroPython that needed a very fast FFT on a micro controller, and was looking at all of the options when it occurred to him that a more structured approach like the one we all know and love in CPython would be possible on a micro controller too. He thus ended up with a python library that could do the FFT 50 times faster than the the pure Python implementation while providing all the readability and ease of use benefits that NumPy and Python together provide.

As cool as this is, what’s even cooler is that [Zoltan] wrote excellent documentation on the use of the library. Not only can this documentation be used for his library, but it provides many excellent examples of how to use MicroPython itself.

We really recommend that fans of Python and NumPy give this one a look over!

Probe The Galaxy On A Shoestring With This DIY Hydrogen-Line Telescope

Foil-lined foam insulation board, scraps of lumber, and a paint-thinner can hardly sound like the tools of a radio astronomer. But when coupled with an SDR, a couple of amplifiers, and a fair amount of trial-and-error tweaking, it’s possible to build your own hydrogen-line radio telescope and use it to image the galaxy.

As the wonderfully named [ArtichokeHeartAttack] explains in the remarkably thorough project documentation, the characteristic 1420.4-MHz signal emitted when the spins of a hydrogen atom’s proton and electron flip relative to each other is a vital tool for exploring the universe. It lets you see not only where the hydrogen is, but which way it’s moving if you analyze the Doppler shift of the signal.

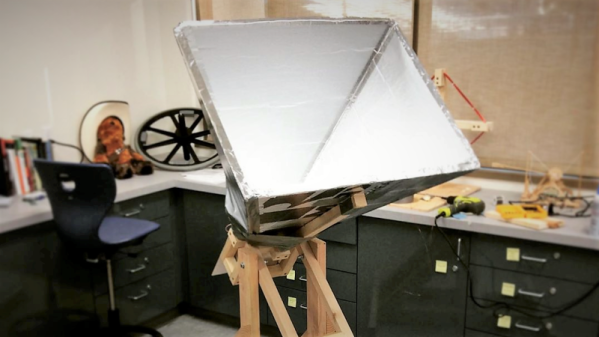
But to do any of this, you need a receiver, and that starts with a horn antenna to collect the weak signal. In collaboration with a former student, high school teacher [ArtichokeHeartAttack] built a pyramidal horn antenna of insulation board and foil tape. This collects RF signals and directs them to the waveguide, built from a rectangular paint thinner can with a quarter-wavelength stub antenna protruding into it. The signal from the antenna is then piped into an inexpensive low-noise amplifier (LNA) specifically designed for the hydrogen line, some preamps, a bandpass filter, and finally into an AirSpy SDR. GNURadio was used to build the spectrometer needed to determine the galactic rotation curve, or the speed of rotation of the Milky Way galaxy relative to distance from its center.

We’ve seen other budget H-line SDR receiver builds before, but this one sets itself apart by the quality of the documentation alone, not to mention the infectious spirit that it captures. Here’s hoping that it finds its way into a STEM lesson plan and shows some students what’s possible on a limited budget.

Bike-Mounted Synthetic-Aperture Radar Makes Detailed Images

Synthetic-aperture radar, in which a moving radar is used to simulate a very large antenna and obtain high-resolution images, is typically not the stuff of hobbyists. Nobody told that to [Henrik Forstén], though, and so we’ve got this bicycle-mounted synthetic-aperture radar project to marvel over as a result.

Neither the electronics nor the math involved in making SAR work is trivial, so [Henrik]’s comprehensive write-up is invaluable to understanding what’s going on. First step: build a 6-GHz frequency modulated-continuous wave (FMCW) radar, a project that [Henrik] undertook some time back that really knocked our socks off. His FMCW set is good enough to resolve human-scale objects at about 100 meters.

Moving the radar and capturing data along a path are the next steps and are pretty simple, but figuring out what to do with the data is anything but. [Henrik] goes into great detail about the SAR algorithm he used, called Omega-K, a routine that makes use of the Fast Fourier Transform which he implemented for a GPU using Tensor Flow. We usually see that for neural net applications, but the code turned out remarkably detailed 2D scans of a parking lot he rode through with the bike-mounted radar. [Henrik] added an auto-focus routine as well, and you can clearly see each parked car, light pole, and distant building within range of the radar.

We find it pretty amazing what [Henrik] was able to accomplish with relatively low-budget equipment. Synthetic-aperture radar has a lot of applications, and we’d love to see this refined and developed further.

[via r/electronics]

Fourier Explained: [3Blue1Brown] Style!

If you ask most people to explain the Fourier series they will tell you how you can decompose any particular wave into a sum of sine waves. We’ve used that explanation before ourselves, and it is not incorrect. In fact, it is how Fourier first worked out his famous series. However, it is only part of the story and master video maker [3Blue1Brown] explains the story in his usual entertaining and informative way. You can see the video below.

Paradoxically, [3Blue1Brown] asserts that it is easier to understand the series by thinking of functions with complex number outputs producing rotating vectors in a two-dimensional space. If you watch the video, you’ll see it is an easier way to work it out and it also lets you draw very cool pictures.

Continue reading “Fourier Explained: [3Blue1Brown] Style!”

A DIY EMC Probe From Semi-Rigid Coax And An SDR

Do you have an EMC probe in your toolkit? Probably not, unless you’re in the business of electromagnetic compatibility testing or getting a product ready for the regulatory compliance process. Usually such probes are used in anechoic chambers and connected to sophisticated gear like spectrum analyzers – expensive stuff. But there are ways to probe the electromagnetic mysteries of your projects on the cheap, as this DIY EMC testing setup proves.

As with many projects, [dimtass]’ build was inspired by a video over on EEVblog, where [Dave] made a simple EMC probe from a length of semi-rigid coax cable. At $10, it’s a cheap solution, but lacking a spectrum analyzer like the one that [Dave] plugged his cheap probe into, [dimtass] went a different way. With the homemade probe plugged into an RTL-SDR dongle and SDR# running on a PC, [dimtass] was able to get a decent approximation of a spectrum analyzer, at least when tested against a 10-MHz oven-controlled crystal oscillator. It’s not the same thing as a dedicated spectrum analyzer – limited bandwidth, higher noise, and not calibrated – but it works well enough, and as [dimtass] points out, infinitely hackable through the SDR# API. The probe even works decently when plugged right into a DSO with the FFT function running.

Again, neither of these setups is a substitute for proper EMC testing, but it’ll probably do for the home gamer. If you want to check out the lengths the pros go through to make sure their products don’t spew signals, check out [Jenny]’s overview of the EMC testing process.

[via RTL-SDR.com]

Peering Into A Running Brain: SDRAM Refresh Analyzed From Userspace

Over on the Cloudflare blog, [Marek] found himself wondering about computer memory, as we all sometimes do. Specifically, he pondered if he could detect the refresh of his SDRAM from within a running program. We’re probably not ruining the surprise by telling you that the answer is yes — with a little more than 100 lines of C and help from our old friend the Fast Fourier Transform (FFT), [Marek] was able to detect SDRAM refresh cycles every 7818.6 ns, lining right up with the expected result.

The “D” in SDRAM stands for dynamic, meaning that unless periodically refreshed by reading and writing, data in the memory will decay. In this kind of memory, each bit is stored as a charge on a tiny capacitor. Given enough time (which varies with ambient temperature), this charge can leak away to neighboring silicon, turning all the 1s to 0s, and destroying the data. To combat this process, the memory controller periodically issues a refresh command which reads the data before it decays, then writes the data back to fully charge the capacitors again. Done often enough, this will preserve the memory contents indefinitely. SDRAM is relatively inexpensive and available in large capacity compared to the alternatives, but the drawback is that the CPU can’t access the portion of memory being refreshed, so execution gets delayed a little whenever a memory access and refresh cycle collide.

Chasing the Correct Hiccup

[Marek] figured that he could detect this “hiccup,” as he calls it, by running some memory accesses and recording the current time in a tight loop. Of course, the cache on modern CPUs would mean that for a small amount of data, the SDRAM would never be accessed, so he flushes the cache each time. The source code, which is available on GitHub, outputs the time taken by each iteration of the inner loop. In his case, the loop typically takes around 140 ns.

Hurray! The first frequency spike is indeed what we were looking for, and indeed does correlate with the refresh times.

The other spikes at 256kHz, 384kHz, 512kHz and so on, are multiplies of our base frequency of 128kHz called harmonics. These are a side effect of performing FFT on something like a square wave and totally expected.

As [Marek] notes, the raw data doesn’t reveal too much. After all, there are a lot of things that can cause little delays in a modern multitasking operating system, resulting in very noisy data. Even thresholding and resampling the data doesn’t bring refresh hiccups to the fore. To detect the SDRAM refresh cycles, he turned to the FFT, an efficient algorithm for computing the discrete Fourier transform, which excels at revealing periodicity. A few lines of python produced the desired result: a plot of the frequency spectrum of the lengthened loop iterations. Zooming in, he found the first frequency spike at 127.9 kHz, corresponding to the SDRAMs refresh period of 7.81 us, along with a number of other spikes representing harmonics of this fundamental frequency. To facilitate others’ experiments, [Marek] has created a command line version of the tool you can run on your own machine.

If this technique seems familiar, it may be because it’s similar the the Rowhammer attack we covered back in 2015, which can actually change data in SDRAM on vulnerable machines by rapidly accessing adjacent rows. As [Marek] points out, the fact that you can make these kinds of measurements from a userspace program can have profound security implications, as we saw with the meltdown and spectre attacks. We have to wonder what other vulnerabilities are lying inside our machines waiting to be discovered.

Thanks to [anfractuosity] for the tip!

SDR Is At The Heart Of This Soup-Can Doppler Radar Set

Want to explore the world of radar but feel daunted by the mysteries of radio frequency electronics? Be daunted no more and abstract the RF complexities away with this tutorial on software-defined radar by [Luigi Cruz].

Taking inspiration from our own [Gregory L. Charvat], whose many radar projects have graced our pages before, this plunge into radar is spare on the budgetary side but rich in learning opportunities. The front end of the radar set is almost entirely contained in a LimeSDR Mini, a software-defined radio that can both transmit and receive. The only additional components are a pair of soup can antennas and a cheap LNA for the receive side. The rest of the system runs on GNU Radio Companion running on a Raspberry Pi; the whole thing is powered by a USB battery pack and lives in a plastic tote. [Luigi] has the radar set up for the 2.4-GHz ISM band, and the video below shows it being calibrated with vehicles passing by at known speeds.

True, the LimeSDR isn’t exactly cheap, but it does a lot for the price and lowers a major barrier to getting into the radar field. And [Luigi] did a great job of documenting his work and making his code available, which will help too. Continue reading “SDR Is At The Heart Of This Soup-Can Doppler Radar Set”