Two-Part Primer In A Can Is A DIY Dream Come True

When putting together a home workshop, available floor space is often the deciding factor when it comes time to pick tools and equipment. This ultimately leads to some very difficult decisions, and we’d wager there isn’t a hacker or maker reading this that hasn’t had to pass on a new piece of gear because they didn’t have anywhere to put it.

For example, the average home gamer isn’t going to have a paint booth and spraying equipment, so they have to settle for a rattle can in the backyard. Traditionally this has limited the kinds of products you can realistically apply, but as [Eric Strebel] shows off in his latest video, it seems like spray can technology is starting to catch up.
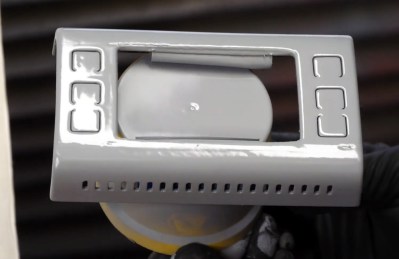
3D printed part with two coats of spray primer applied
The finish after two coats of primer.

Specifically, he’s been working with a canned two-part primer that doesn’t require any complicated mixing or special equipment to apply. After hitting a plunger on the bottom, a small compartment containing the activator is ruptured and the reaction begins. From that point, you’ve only got 24 hours to use the contents of the can before it cures. But since you only need to wait about 10 minutes between coats, that should give you plenty of time to complete the project.

In the video, [Eric] demonstrates how quickly this high-build primer can smooth out the layer lines on a 3D print. While you’ll still need to sand and potentially break out the spot filler to achieve that perfect finish, it’s clear that the primer works much better than anything we’re used to seeing come out of a can. Even after just two coats, the results are truly remarkable.

If there’s a downside, it’s that a can of this primer will run you about $25 USD. That’s about five times the cost of the Rust-Oleum Filler Primer that usually gets recommended in DIY circles, but the results really do seem to speak for themselves. We wouldn’t necessarily use this on every project, but if you’ve got something that needs an especially fine finish, you’ve at least got an option that doesn’t involve borrowing somebody’s compressor and spray gun.

If you need help shaking your paint before spraying – definitely give this 3D printed paint shaker a look!

Continue reading “Two-Part Primer In A Can Is A DIY Dream Come True”

Homemade electric fan showing a small camera peeking up above the central hub.

Keep Cool With This Face-Following Fan

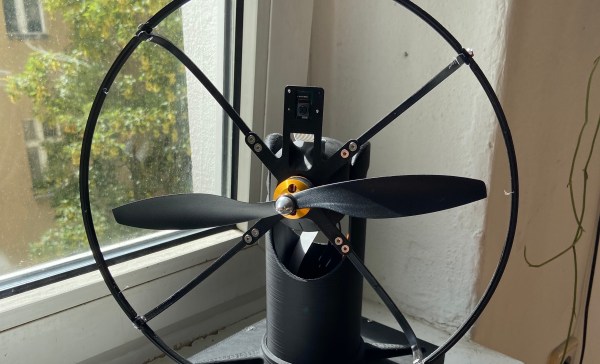
[AchillesVM] decided to build a tabletop electric fan so it would track him as he moves around the room. Pan and tilt control is provided by a pair of servos controlled by a Raspberry Pi 3b+. How does it know where [AchillesVM} is? It captures the scene using a Raspberry Pi v2 Camera and uses OpenCV’s default face-tracking algorithm to find him. Well, strictly speaking, it tracks anyone’s face around the room. If multiple faces are detected, it follows the largest — which is usually the person closest to the fan.

The whole processing loop runs at 60 ms, so the speed of the servo mechanism is probably the limiting factor when it comes to following fast-moving house guests. At first glance it might look like an old fan from the 1920s, in fact [AchillesVM] built the whole thing by himself, 3D-printing case and using a few off-the-shelf parts (like the 25 cm R/C plane propeller).

It’s a work in progress, so follow his GitHub repository (above) for updates. Hopefully, there will be a front-mounted finger guard coming soon. If you like gadgets that interact with you as you move about, we’ve covered the face-tracking confectionery cannon back in 2014, and the head-tracking water blaster last year. In the “don’t try this” file goes the build that started a career — the eye-tracking laser robot.

Tiny ball magnets implanted in muscles could provide much better control over prosthetics.

Magnets Could Give Prosthetic Control A Leg Up

Today, prostheses and exoskeletons are controlled using electromyography. In other words, by recording the electrical activity in muscles as they contract. It’s neither intuitive nor human-like, and it really only shows the brain’s intent, not the reality of what the muscle is doing.

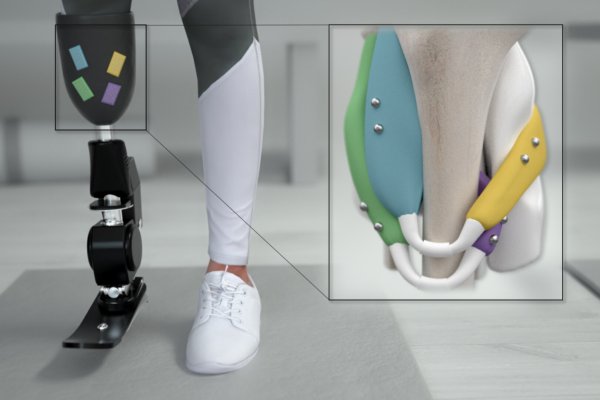
Researchers at MIT’s Media Lab have figured out a way to use magnets for much more precise control, and they’re calling it magnetomicrometry (MM). By implanting pairs of tiny ball magnets and tracking their movement with magnetic sensors, each muscle can be measured individually and far more accurately than with electromyography.

After embedding pairs of 3mm diameter ball magnets into the calves of turkeys, the researchers were able to detect muscle movement in three milliseconds, and to the precision of thirty-seven microns, which is about the width of a human hair. They hope to try MM on humans within the next couple of years. It would be a great solution overall if it works out, because compared with the electromyography method, MM is cheaper, less invasive, and potentially permanent. Couple MM with a new type of amputation surgery called AMI that provides a fuller range of motion, less pain overall, and finer control of prosthetics, and the future of prostheses and rehabilitation looks really exciting. Be sure to check out the video after the break.

There’s more than one way to control prostheses, such as deep learning and somatosensory stimulation.

Continue reading “Magnets Could Give Prosthetic Control A Leg Up”

Modern Tape Echo Made Easy

Modern popular music increasingly relies on more and more complicated and intricate equipment and algorithms to generate catchy tunes, but even decades ago this was still the case. The only difference between then and now was that most of the equipment in the past was analog instead of digital. For example, the humble tape echo was originally made by running a loop of magnetic tape over a recording head and then immediately playing it back. Old analog machines from that era are getting harder and harder to find, so [Adam Paul] decided to make his own.

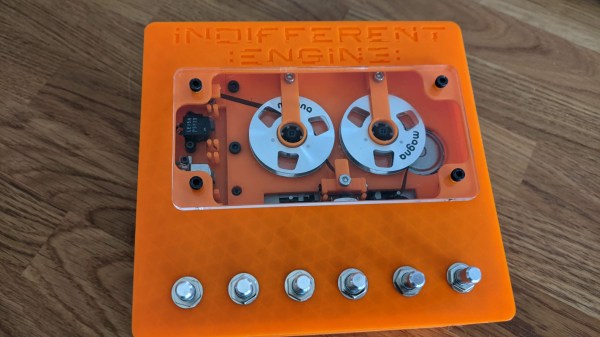
At first, [Adam] planned to use standard cassette tapes in various configurations in order to achieve the desired effect, but this proved to be too cumbersome and he eventually switched his design to using the cassette internals in a custom tape deck. The final design includes a small loop of tape inside of the enclosure with a motor driving a spindle. The tape is passed over a record head, then a read head, and then an erase head in order to achieve the echo sound. All of this is done from inside of the device itself, with 1/4″ jacks provided so that the musician can plug in their instrument of choice just like a standard effects pedal would be configured.

The entire build is designed to be buildable and repairable using readily-available parts as well, which solves the problem of maintaining (or even finding) parts from dedicated tape echo machines from decades ago. We like the sound from the analog device, as well as the fact that it’s still an analog device in a world of otherwise digital substitutes. Much like this magnetic tape-based synthesizer we featured about a year ago.

Continue reading “Modern Tape Echo Made Easy”

Interactive Musical Art Installation Mixes Vintage, Modern, Lasers, And…Bubbles? Bubbles.

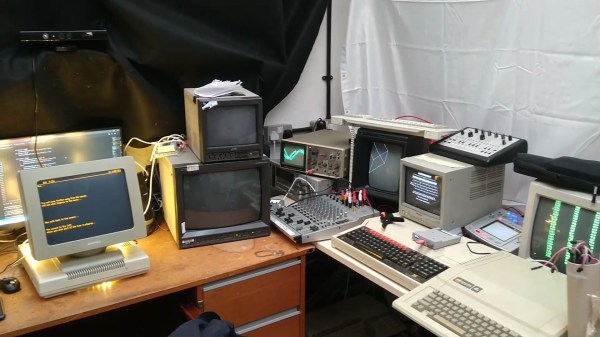
Acorn BBC Master. Apple IIe. Ampex 270 Terminal. Vectrex game console. You’d be hard pressed to find a more diverse hardware collection in the average hacker’s lab. When you add seven Raspberry Pi’s, five CRT monitors, an analog oscilloscope and an LED wall to the mix, one starts to wonder at the menagerie of current and retro hardware. What kind of connoisseur would have such a miscellaneous collection? That’s when you spot smoke and fog machines sitting next to an RGB Laser.

Finally, you learn that all of this disparate paraphernalia is networked together. It is then that you realize that you’re not just dealing with a multi-talented hacker- you’re dealing with a meticulous maestro who’s spent lockdown finishing a project he started nearly twenty years ago!

AUVERN comes alive in a show of light and sound whenever someone enters its view.

The machine is called AUVERN and it’s the product of the creative mind of [Owen]. Taking advantage of advances in technology (and copious amounts of free time), [Owen] laboriously put his collection of older rigs to work.

A Python script uses a Kinect sensor’s input to control a Mac Mini running Digital Audio Workstation software. The operator’s location, poses and movements are used to alter the music, lights, and multimedia experience as a whole. MIDI, Ethernet, and serial communications tie the hardware together through Raspberry Pi’s, vintage MIDI interfaces, and more. Watch the video below the break for the technical explanation, but don’t miss the videos on [Owen]’s website for a mesmerizing demonstration of AUVERN in full swing.

AUVERN makes use of the Vectrex32 upgrade which we have previously covered, and we are unavoidably reminded of another pandemic inspired bubble machine. Don’t forget to send us your hacks, projects, and creations through the Tip Line!

Continue reading “Interactive Musical Art Installation Mixes Vintage, Modern, Lasers, And…Bubbles? Bubbles.”

Keep Scraps Around

When I’m building something, I like to have a decent-sized scrap pile on hand. Because when I’ve got to test something out — does this glue adhere to this fabric, how much force will this hold if I tap it and put a screw in, will it snap if reinforced with carbon fiber and epoxy — it’s nice to have some of the material in question on hand just for experimentation. So I pull a chunk out of the scrap pile!

But scrap piles can’t expand forever, and we all know that “too much of a good thing” is a thing, right? Scrap piles require constant pruning. You don’t really need more than a few aluminum extrusion cutoffs, so when you start building up excess inventory, it’s time to scrap it. I mean, throw it away.

A corollary of this, that I’ve only recently started to appreciate, is that if I limit the number of materials that I’m working with, it’s a lot more manageable to keep the scrap pile(s) under control. It’s simple math. If I’m working with twenty different materials, that’s twenty different heaps of scrap. But if I can get by with one weight of fiberglass for everything, that one pile of scraps can do double or triple duty. There is also the added benefit that I already know how the material works, and maybe even have old test samples on hand.

Indeed, I’m such a scrapaholic that it’s almost painful to start working with a new material and not have a scrap pile built up yet. I’m always loathe to cut into a nice square piece of stock just to test something out. But this too is part of the Great Circle of Life. By not testing things out beforehand, I’m almost guaranteed to screw up and create scrap out of what I had hoped was going to be a finished piece. See? No problem! Next version.

What do you think? Are scrap, offcuts, and their close cousins — test pieces and samples — worth keeping around in your shop? Do you have a disciplined approach, or do you just throw them in the corner? Purge per project, or only when the mountain of XPS foam gets as high as your head?

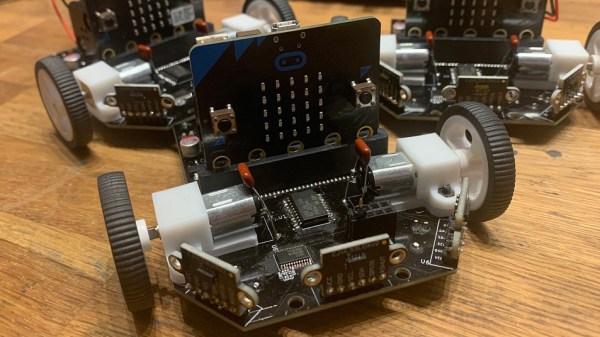
A tiny robot with two wheels for sumo tournaments

Pint-sized Sumo Robot Is Adorable, Accessible And Totally Awesome

We’ve seen plenty of impressive robots of all sizes here at Hackaday, but recently we were particularly inspired by [Hans Jørgen Grimstad] and his thrifty mini sumo build.

Using the BBC micro:bit platform as a starting point, Hans seized the opportunity to build a competitive mini sumo bot without breaking the bank. According to his blog, the enchanting little machine uses commonly available parts and cost around $30 when built in 2020 (or $50 according to the more recent video, perhaps taking into account the cost of hardware in these trying times).

The results can be seen in the video below. Some sacrifices were made – Hans admits that the 3.3 V linear regulator gets a little toasty, but the design is kept much simpler by doing away with a switching regulator. The 700 RPM N20 motors are wired directly up to the 6 V battery pack, giving this plucky wrestler plenty of sumo-smashing power.

Hans hopes that the build can lower barriers to entry for new builders in robot tournaments, being something that can easily be put together in a garage or local makerspace for a low, low price. The mini sumo form factor is a great beginner or amateur project, made even easier when makers like Hans put all the nitty-gritty details up on GitHub. This is certainly not the first accessible sumo robotics project that we have covered, and it won’t be the last. We hope we see loads more of these endearing robotic gladiators at future events.

Continue reading “Pint-sized Sumo Robot Is Adorable, Accessible And Totally Awesome”