Painting With Light And A Little G-Code

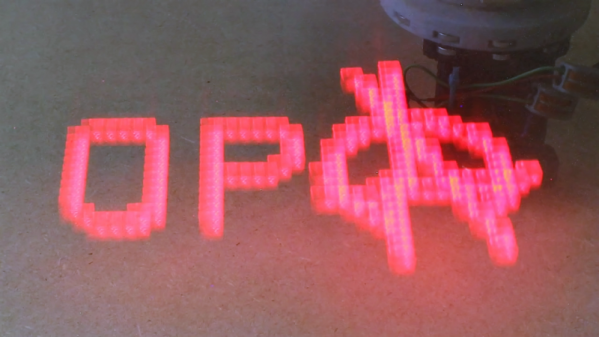
Most photographs are made in the fraction of a second that the camera’s shutter is gathering reflected light from the scene. But there’s fun to be had by leaving the shutter open and directing light into the camera. Called light painting, it can be as simple as a camera on a tripod in a dark room and a penlight spelling out dirty words – not like we’d know – or as complicated as this CNC dot-matrix light printer.

The first idea that [Jeremy S. Cook] had for this build didn’t go so well. He fitted an LED to the gantry of his 3D-printer, intending to send it G-code representing bitmaps. The idea would be to set it up in a dark place, open the shutter, and let the machine build up the image by rastering through the X- and Y- axes while blinking the LED on and off at the right time. But since the gantry only moves in one axis, he abandoned the printer in favor of his CNC router. He printed a collar to fit the dust collector shroud we previously featured, added a battery-powered LED, and affixed a pushbutton switch to the let the Z-axis turn on the light. It took some tweaking such as adding a translucent PLA diffuser, to get decent images, but in the end it worked. We like the soft look of the floating voxels, which were really helped by the later addition of a Nano and a Neopixel. Check out the build in the video below.

One thing we’d suggest is better reflection control. [Jeremy] used a black platen as a background, but it wasn’t quite enough. We suggest going none more black next time.

Continue reading “Painting With Light And A Little G-Code”

Polar Platform Spins Out Intricate String Art Portraits

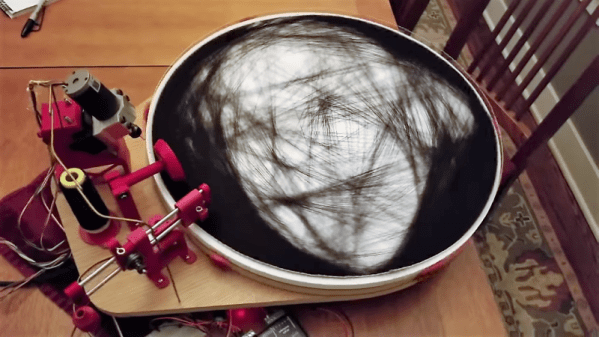
We have semi-fond memories of string art from our grade school art class days. We recall liking the part where we all banged nails into a board, but that bit with wrapping the thread around the nails got a bit tedious. This CNC string art machine elevates the art form far above the grammar school level without all the tedium.

Inspired by a string art maker we recently feature, [Bart Dring] decided to tackle the problem without using an industrial robot to dispense the thread. Using design elements from his recent coaster-creating polar plotter, he built a large, rotating platform flanked by a thread handling mechanism. The platform rotates the circular “canvas” for the portrait, ringed with closely spaced nails, following G-code generated offline. A combination of in and out motion of the arm and slight rotation of the platform wraps the thread around each nail, while rotating the platform pays the thread out to the next nail. Angled nails cause the thread to find its own level naturally, so no Z-axis is needed. The video below shows a brief glimpse of an additional tool that seems to coax the threads down, too. Mercifully, [Bart] included a second fixture to drill the hundreds of angled holes needed; the nails appear to be inserted manually, but we can think of a few fixes for that.

We really like this machine, both in terms of [Bart]’s usual high build-quality standards and for the unique art it creates. He mentions several upgrades before he releases the build files, but we think it’s pretty amazing as is.

Continue reading “Polar Platform Spins Out Intricate String Art Portraits”

CNC Tellurion Lets You See The Earth And Moon Dance

Kids – they’re such a treasure. One minute you’re having a nice chat, the next minutes they’re testing your knowledge of the natural world with a question like, “Why can we see the Moon during the day?” And before you know it, you’re building a CNC Earth-Moon orbital model.

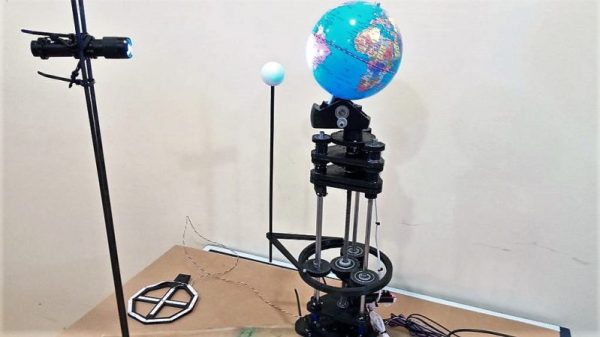
We’ve got to applaud [sniderj]’s commitment to answering his grandson’s innocent question. What could perhaps have been demonstrated adequately with a couple of balls and a flashlight instead became an intricate tellurion that can be easily driven to show the relative position of the Earth and Moon at any date; kudos for anticipating the inevitable, “Where was the moon when I was born, Grampa?” question. The mechanism is based on the guts of a defunct 3D-printer, with the X-, Y-, and Z-axis steppers now controlling the Earth’s rotation and tilt and the Moon’s orbit respectively, with the former extruder drive controlling the tilt of the Moon’s orbital plane. A complex planetary gear train with herringbone gears, as well as a crossed-shaft helical gear set, were 3D-printed from PLA. The Earth model is a simple globe and the Moon is a ping-pong ball; [sniderj] is thinking about replacing the Moon with a 3D-printed bump-map model, a move which we strongly endorse. The video below shows the tellurion going through a couple of hundred years of the saros at warp speed.

There’s just something about machines that show the music of the spheres, whether they be ancient or more modern. And this one would be a great entry into our 3D-Printed Gears, Pulleys, and Cams contest too.

Continue reading “CNC Tellurion Lets You See The Earth And Moon Dance”

Replace Legacy CNC PCs With A Gerbil

There are lots of laser cutters and other CNC machines available for a decent price online, but the major hurdle to getting these machines running won’t be the price or the parts. It’s usually the controller PC, which might be running Windows XP or NT if you’re lucky, but some of them are still using IBM XT computers from the ’80s. Even if the hardware in these machines is working, it might be impossible to get the software, and even then it will be dated and lacking features of modern computers. Enter the Super Gerbil.

[Paul] was able to find a laser cutter with one of these obsolete controllers, but figured there was a better way to getting it running again. As the name suggests, it uses GRBL, a G-Code parser and CNC controller software package that was originally made to run on an 8-bit AVR microcontroller, but [Paul] designed the Super Gerbil to run on a 32 bit ARM platform. He also added Z-axis control to it, so it now sports more degrees of freedom than the original software.

By way of a proof of concept, once he was finished building the Super Gerbil he ordered a CNC machine from China with an obsolete controller and was able to get it running within a day. As an added bonus, he made everything open so there are no license fees or cloud storage requirements if you want to use his controller. [Paul] also has a Kickstarter page for this project as well. Hopefully controllers haven’t been the only thing stopping you from getting a CNC machine for your lab, though, but if they have you now have a great solution for a 3040 or 3020 CNC machine’s controller, or any other CNC machine you might want to have. Continue reading “Replace Legacy CNC PCs With A Gerbil”

SauceBot Uses G-Code To Apply Condiments With Precision

You just can’t please some people. Take a 3D-printer disguised as a condiment dispenser to a public event and next thing you know people actually expect you to build a 3D-condiment dispenser for the next time. How can you help but oblige?

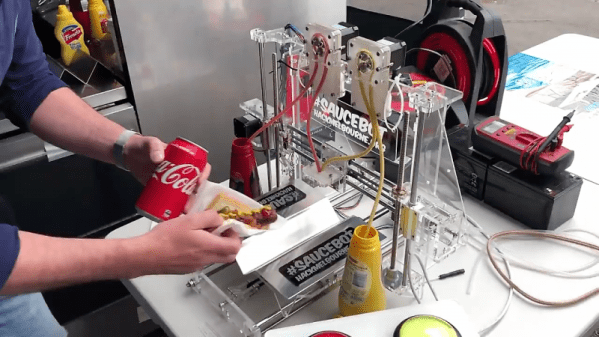
We have to admit to more than a little alarm when [ShaneR] sent us this tip, as on first reading it seemed to endorse the culinary sin of putting ketchup on barbecue. But then we watched the video below and realized this dispenser is only applying ketchup and mustard to hot dogs, and while some purists would quibble with the ketchup, we’ll let that slide. The applicator, dubbed SauceBot by the crew at Connected Community HackerSpace in Melbourne, appears to be purpose-built entirely from laser-cut acrylic, including the twin peristaltic pumps for extruding the ketchup and mustard. We’re not sure the Z-axis is entirely necessary for dispensing onto hot dogs, but since this was a community outreach event, it makes sense to go all in. The video below shows it in use at a fundraiser, and while the novelty of it probably sold quite a few dogs, it’s safe to say the food service industry won’t be alarmed that this particular robot will be stealing jobs anytime soon.

Seriously, if your hackerspace is going to have public events with food, something like this could really get the conversation started. Then again, so might a CD execution chamber.

CNC Embroidery Machine Punches Out Designs A Stitch At A Time

It’s doubtful that the early pioneers of CNC would have been able to imagine the range of the applications the technology would be used for. Once limited to cutting metal, CNC machines can now lance through materials using lasers and high-pressure jets of water, squirt molten plastic to build up 3D objects, and apparently even use needle and thread to create embroidered designs.

It may not seem like a typical CNC application, but [James Kolme]’s CNC embroidery machine sure looks familiar. Sitting in front of one of the prettiest sewing machines we’ve ever seen is a fairly typical X-Y gantry system. The stepper-controlled gantry moves an embroidery hoop under the needle of the sewing machine, which is actually the Z-axis of the machine. With the material properly positioned, a NEMA 23 stepper attached to the sewing machine through a sprocket and drive chain makes a stitch, slowly building up a design. Translating an embroidery pattern to G-code is done through Inkstitch, and extension to Inkscape. [James]’ write-up is great, and the video below shows it in action.

We’ve seen a CNC embroidery machine or two before, but our conspicuously non-embroidered hat is off to [James] on this one for its build quality and documentation. And the embroidered Jolly Wrencher doesn’t hurt either.

Continue reading “CNC Embroidery Machine Punches Out Designs A Stitch At A Time”

Stepper Motor Mods Improve CNC Flat Coil Winder

Finding just the right off-the-shelf part to complete a project is a satisfying experience – buy it, bolt it on, get on with business. Things don’t always work out so easily, though, which often requires the even more satisfying experience of modifying an existing part to do the job. Modifying a stepper motor by drilling a hole down its shaft probably qualifies for the satisfying mod of the year award.

That’s what [Russ] did to make needed improvements to his CNC flat-coil winder, which uses a modified delta-style 3D-printer to roll fine magnet wire out onto adhesive paper to form beautiful coils of various sizes and shapes. [Russ] has been tweaking his design since we featured it and coming up with better and better coils. While experimenting, the passive roller at the business end proved to be a liability. The problem was that the contact point lagged behind the center axis of the delta, leading to problems with the G-code. [Russ] figured that a new tool with the contact point at the dead center would help. The downside would be having to actively swivel the tool in concert with the X- and Y-axis movements. The video below shows his mods, which include disassembling the NEMA-17 stepper and drilling out the shaft to pass the coil wire. [Russ] also spent some time reversing the rotor in the frame and provided a small preload spring to keep the coil roller in contact with the paper.

A real-time coil winding session starts at the 21:18 mark, and we’ve got to admit it’s oddly soothing to watch. We’re not sure exactly what [Russ] intends to do with these coils, and by his own admission, neither is he. But it’s still pretty cool to see, and the stepper motor mods are a neat trick to keep in mind.

Continue reading “Stepper Motor Mods Improve CNC Flat Coil Winder”