Howto: Docker, Databases, And Dashboards To Deal With Your Data

So you just got something like an Arduino or Raspberry Pi kit with a few sensors. Setting up temperature or motion sensors is easy enough. But what are you going to do with all that data? It’s going to need storage, analysis, and summarization before it’s actually useful to anyone. You need a dashboard!

But even before displaying the data, you’re going to need to store it somewhere, and that means a database. You could just send all of your data off into the cloud and hope that the company that provides you the service has a good business model behind it, but frankly the track records of even the companies with the deepest pockets and best intentions don’t look so good. And you won’t learn anything useful by taking the easiest way out anyway.

Instead, let’s take the second-easiest way out. Here’s a short tutorial to get you up and running with a database backend on a Raspberry Pi and a slick dashboard on your laptop or cellphone. We’ll be using scripts and Docker to automate as many things as possible. Even so, along the way you’ll learn a little bit about Python and Docker, but more importantly you’ll have a system of your own for expansion, customization, or simply experimenting with at home. After all, if the “cloud” won’t let you play around with their database, how much fun can it be, really?

Continue reading “Howto: Docker, Databases, And Dashboards To Deal With Your Data”

State Machine Controls Garage Door Over The Internet

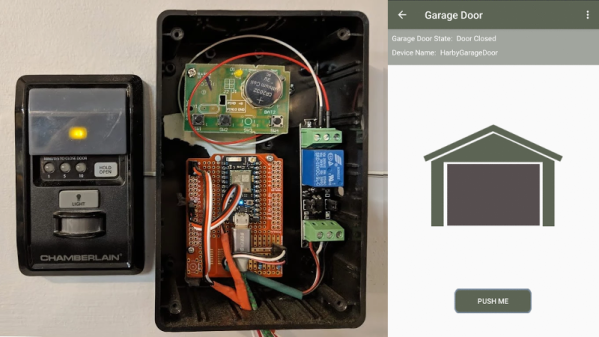
Home automation has been a hot-button topic time and again since the dawn of the personal computer age. These days, thanks to modern communications technology, it’s possible to do some pretty cool stuff. [Brad Harbert] decided to automate his garage door, controlling it over the Internet.

The build relies on a Particle Photon to do the heavy lifting of connecting the door to the Internet. Particle offer a cloud service that makes setting up such a project easy for the first timer, and [Brad] was able to get things working quickly. A relay is used to activate the garage door remote button, as it was desired to leave the main control board of the garage door opener untouched. Reed switches are used to sense the position of the door, and [Brad] coded a state machine to ensure the door’s current state is always known.

It’s a simple project, but [Brad]’s use of state machine techniques and position sensing mean it’s less likely he’ll get home to find his garage open and his possessions missing. If you’re new to programming simple physical devices, you could take a page out of his logbook. Of course we’ve seen similar builds before, like this one from parts from the scrapbin.

The Umbrella That Tells You The Weather

Most people can tell you the various uses of the umbrella — it keeps the rain off, pokes sleeping train passengers awake, and can be used as an improvised defensive weapon when tension in the hot dog line reaches boiling point. A true Englishman would never deign to employ their brolly so imprudently, of course, but they might just give it an upgrade by packing in a full weather station.

Please do not message us to complain about the redundancy of a rain sensor on an umbrella.

The build uses the Particle Photon as the brains of the operation, interfacing it with several sensors. There’s a DHT11 to handle temperature and humidity measurement, an Adafruit barometric pressure sensor, along with a custom-built anemometer using a brushed motor with 3D printed wind cups. Finally, a breadboard is turned into a rain detector, based on the same principles as those used in automotive applications.


The Particle Photon uses WiFi to tether to a smartphone, deliver the collected data to the cloud via Adafruit IO. This enables the data to be collated and processed further on a PC. Yes, it’s 2018, and they have the internet on umbrellas now.

As we reach further into the depths of winter, it’s one project that could very much come in handy, and [The Gentlemen Maker] has been kind enough to share the code on Particle.io. If that’s not good enough, perhaps you could use your umbrella as a WiFi antenna. Video after the break.

Continue reading “The Umbrella That Tells You The Weather”

An IoT Christmas Tree You’re Invited To Control

We love IoT gadgets, but are occasionally concerned that they might allow access to the wrong kind of hacker. In this case, [Kevin] has created an IoT tree that allows anyone to control the pattern of lights, and he’s invited you to do so!

We played with the tree a bit, and the web interface is fairly powerful. For each LED, you can select either a random color or a keyframe-defined pattern. For the keyframe LEDs, you can create a number of “keyframes”, each of which is defined by a color and a transition, which can be either linear, quarter sine wave, or instantaneous (“wall”). Additional keyframes can be added for each LED, and if don’t specify a pattern for all the LEDs, the system repeats those you have defined to fill the entire string. There are also a few preset patterns you can choose if you prefer. If you, too, want to play with the tree, don’t delay: it’s only available through the first week of 2019!

Behind the scenes, an aging Raspberry Pi provides the local brains driving the LED controller and streaming the video, while a cloud server running a Redis instance allows communication with the web. The interface to the string of WS2811 LEDs uses [Kevin]’s Kinetis LK26 breakout board, which he managed to get working despite the state of tools and documentation for the Kinetis ARM family. You can read a good discussion of the system on his blog; there are a surprisingly large number of pieces that need to work together. As usual, he provides all the source code for this project on GitHub.

We’ve seen [Kevin]’s work before, including his 73-LED wristwatch, and adventures developing on an STM32 from scratch.

But, if it’s IoT Christmas trees that have got you thinking, you can check out this one from last year.

DIY Mini Helical Antennas From Salvaged Co-ax Cable

[Mare] has a visual guide and simple instructions for making DIY mini helical 868 MHz antennas for LoRa applications. 868 MHz is a license-free band in Europe, and this method yields a perfectly serviceable antenna that’s useful where space is constrained.

A metric 5 mm drill bit makes a convenient core.

The process is simple and well-documented, but as usual with antenna design it requires attention to detail. Wire for the antenna is silver-plated copper, salvaged from the core of RG214U coaxial cable. After straightening, the wire is wound tightly around a 5 mm core. 7 turns are each carefully spaced 2 mm apart. After that, it’s just a matter of measuring and bending the end for soldering to the wireless device in question. [Mare] has used this method for wireless LoRa sensors in space-constrained designs, and it also has the benefit of lowering part costs since it can be made and tested in-house.

Antennas have of course been made from far stranger things than salvaged wire; one of our favorites is this Yagi antenna made from segments of measuring tape.

Choosing Cell Modems: The Drama Queen Of Hardware Design

So you went to a tradeshow and heard about this cool new idea called the Internet Of Things; now it’s time to build an IoT product of your own. You know that to be IoT, your Widget D’lux® has to have a network connection but which to choose?

You could use WiFi or Bluetooth but that would be gauche. Maybe LoRaWAN? All the cool kids are using LoRa for medium or long range wireless these days, but that still requires a base station and Widget D’lux® will be a worldwide phenomenon. Or at least a phenomenon past your bedroom walls. And you know how much user’s hate setting things up. So a cell modem it is! But what do you have to do to legally include one in your product? Well that’s a little complicated.

Continue reading “Choosing Cell Modems: The Drama Queen Of Hardware Design”

Speak Your WiFi

When you create a Thing for the Internet of Things, you’ve made a little computer that does a simple job and which probably has a minimal interface. But minimal interfaces leave little room for configuration, such as entering WiFi details. Perhaps if you made the Thing yourself you’ve hard-coded your WiFi credentials in your code, but that hardly translates to multiple instances. So, how to put end-user WiFi credentials easily on more than one Thing? Perhaps [Rob Dobson] has the answer with his technique of sending them as a sequence of audible tones.

There is a piece of Javascript code in a browser into which you enter your WiFi credentials, which are then expressed through the speaker as a set of FSK tones to be picked up by a microphone on the Thing. They can then be decoded into the credentials, and the Thing can connect. All the code is available, on GitHub, should you fancy it yourself.

Of course, this is nothing new, as any owner of an 8-bit machine that had a cassette interface will tell you. And on the face of it it’s much easier than those awkward impromptu hotspots with a web interface to which you connect and pass on your credentials. But while we quite like the convenience, we can’t help wondering whether expressing the credentials in audible free space might be a bit too insecure for many readers. The technique however remains valid, and we’re sure that other less sensitive applications might be found for it. Meanwhile we hope he hasn’t inadvertently shared his WiFi password in the video below the break.

Continue reading “Speak Your WiFi”