Quick Hack: The Phone To Stream Deck Conversion

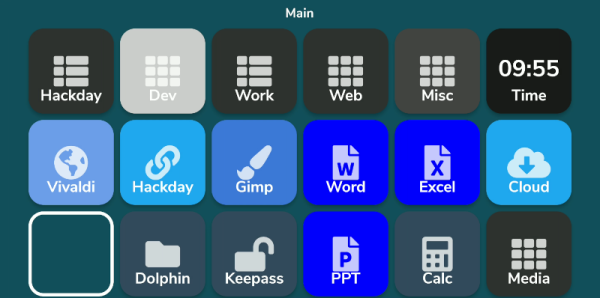
What do you do with those old Android or iPhone phones and tablets? You have plenty of options, but it is pretty easy to build your own stream deck with a little off-the-shelf software. What’s a stream deck, you ask? The name comes from its use as a controller for a live-streaming setup, but essentially, it’s an LCD touchscreen that can trigger things on your computer.

The software I’m using, Deckboard, is a server for Windows or Linux and, of course, an Android app. The app is free with some limitations, but for under $4 you can buy the full version. However, even the free version is pretty capable. You can use an Android phone or tablet and you can connect to the PC with a USB cable or WiFi. I’ve found that even with WiFi, it is handy to keep the phone charged, so realistically you are going to have a cable, but it doesn’t necessarily have to connect to the host computer.

Linux Setup

Setup is very easy. The biggest hurdle is you might need to set up your firewall to allow the server to listen on port 8500 with TCP.  There are a few small issues when installing with Linux that you might want to watch out for.  There are 32-bit and 64-bit versions in deb, tar.gz, and appimage format. There’s also a snap. The problem with the snap is it is sandboxed, so without effort you can’t easily launch programs, which is kinda the entire point. I finally removed it and installed the deb file which was fine.

There were still two other wrinkles. First, while Deckboard offers a way to launch programs, it must be a program from a list it reads from your system. That would be acceptable, but the list wasn’t complete. I never did figure out why some things show up on the list and others don’t. For example, GIMP which shows up on my application menu was absent. Yet other things that were fairly obscure did show up.

I thought this might be a dealbreaker until I found that Deckboard has a well-developed plugin system and one of those plugins lets you run an arbitrary command line. I guess it is a little less convenient, but it is much more flexible since you can launch any program you want and provide options to it as well.

The only other complaint I had is that when you run the program, it shows its configuration interface and puts itself in the system tray. That’s great the first time you run it, but on system startup, it would be nice to just have it quietly start. If there’s an option for that I haven’t found it. I’ll tell you how I solved that later, but, for now, just live with it.

Continue reading “Quick Hack: The Phone To Stream Deck Conversion”

Apple AirTags Hacked And Cloned With Voltage Glitching

Apple AirTags are useful little devices. They essentially use iPhones in the wild as a mesh network to tell the owner where the AirTag is. Now, researchers have shown that it’s possible to clone these devices.

The research paper explains the cloning process, which requires physical access to the hardware. To achieve the hack, the Nordic nRF52832 inside the AirTag must be voltage glitched to enable its debug port. The researchers were able to achieve this with relatively simple tools, using a Pi Pico fitted with a few additional components.

With the debug interface enabled, it’s simple to extract the microcontroller’s firmware. It’s then possible to clone this firmware onto another tag. The team also experimented with other hacks, like having the AirTag regularly rotate its ID to avoid triggering anti-stalking warnings built into Apple’s tracing system.

As the researchers explain, it’s clear that AirTags can’t really be secure as long as they’re based on a microcontroller that is vulnerable to such attacks. It’s not the first AirTag cloning we’ve seen either. They’re an interesting device with some serious privacy and safety implications, so it pays to stay abreast of developments in this area.

[Thanks to Itay for the tip!]

Building A Better 3D Scanner With An IPhone, And Making Art

Apple’s FaceID system uses infrared depth-sensing technology to authenticate people via their faces. It can also be used for simple 3D scanning, and [Scott Yu-Jan] found a better way to do that.

The main problem with using an iPhone as a 3D scanner in this manner is that the sensor is built into the front side of the device. It’s great for scanning your own face, but if you’re trying to scan an object, you can no longer see the iPhone’s screen. [Scott] solved this problem by slapping together a handheld 3D printed device to hold the iPhone along with an external monitor. This allowed Scott to scan while still seeing what was going on.

Having noticed that some of the 3D scanning apps produced strange, glitchy results when scanning faces, [Scott] decided to innovate artistically. He employed [Andrea] to model, took some scans, and Photoshopped the results into some impressive posters.

Overall, [Scott] demonstrates that it’s relatively easy to repurposed the iPhone for improved 3D scanning. With a simple design, he has a handheld scanner that works way better than just the phone on its own. Alternatively, consider getting into photogrammetry instead.

Continue reading “Building A Better 3D Scanner With An IPhone, And Making Art”

Adding USB-C To An IPhone 13 Is Delicate Work

USB-C seeks to rule the roost when it comes to connectors, and even has Big Europe on its side. Apple hasn’t had to abandon Lightning just yet, but [Restore Technique] has put a USB-C port into an iPhone 13 to give us all an idea what it’s going to be like in the brave new future ahead of us.

The idea came about after disassembling the iPhone 13, and the project was locked in after seeing the first iPhone with a USB-C connector sell for $86,001 on eBay. The plan had to support fast charging, cable reversibility, and data transfer, without cutting out any functionality or compromising water resistance.

The concept is simple enough: take the C94 board from a Lightning to USB-C cable, and put it inside the phone along with a USB-C port. Of course, actually achieving that is the real challenge. Techniques from melting apart Lightning connectors to carefully peeling apart 0.5 mm pitch flex cables to fit 0.6 mm pitch pads.

It’s an impressive hack, and explained so well it’s actually tempting to try it at home for the sheer challenge of the thing. If you do pull off a similar hack yourself, drop us a line! Video after the break.

Continue reading “Adding USB-C To An IPhone 13 Is Delicate Work”

iPhone 6 with Linux boot log on its screen

Boot Mainline Linux On Apple A7, A8 And A8X Devices

[Konrad Dybcio] tells about his journey booting Linux on A7/8/8X processors, playing around with an old iPhone 5 he’s got in a drawer. It’s been a two-year “revisit every now and then” journey, motivationally fueled by the things like Linux on M1 Macs announcement. In the end, what we have here is a way to boot mainline Linux on a few less-than-modern but still very usable iPhones, and a fun story about getting there.

[Konrad]’s work is based on the Sandcastle project research, but he couldn’t quite figure out how to make their code work, and had to make sense of it as he went. At some point, he got stuck on enabling the MMU, which was the main roadblock for a while. Joined by another developer intrigued by Apple hardware, they were hacking away at it, developing tools and neat tricks on their way, but to no avail. With the framebuffer accessible and no other decent debugging methods in sight, he tells about a code snippet they wrote that printed register values as valid barcodes Continue reading “Boot Mainline Linux On Apple A7, A8 And A8X Devices”

The Huge Apple Toolkit For Fixing Your IPhone

It’s been a frequent criticism of Apple, that their products are difficult to repair. They’ve hit back with a self-repair program for iPhones, and should you wish to take advantage of it they will hire you a tool kit. Not the iFixit box you might expect, instead they give you two hefty suitcases that contain 36 Kg of tools and equipment. Yes, you can repair an iPhone, but they ensure that it’s not for the faint-hearted.

In the kit is an impressive array of everything you might need for your iDevice, including the proper heat plate and press for the job. None of that messing about with a hot air gun for your $49 rental cost and $1200 if you don’t return the tools, but it remains an impossibly difficult and expensive process for all but the most dedicated of Apple fanboy technicians.

The sense from the Verge article is that Apple have had their arm twisted to the extent that they must provide a repair option, but they’ve gone to extravagant lengths to make it something nobody in their right mind would pursue. There’s an attraction in the idea of playing with a fully-equipped Apple repair kit for a few days, but maybe it’s not worth the cost.

Even without the Apple toolkit, it’s still possible to upgrade your iPhone.

Thanks [Nikolai Ivanov] for the tip.

iPhone pictured with a lock

Make Your Own BLE-Enabled IOS App From Scratch

Even those readers who are most skeptical of Apple products will like this Bluetooth Low Energy (BLE)-enabled iOS app tutorial from [Akio].

With everything being “connected” these days smartphone applications are of course a ubiquitous part of our existence. We’ve seen plenty of examples connecting your Bluetooth-enabled projects to an Android device, but comparatively fewer tutorials for connecting to iOS devices. This mostly has to do with Android’s much larger market share and also Android’s more open-source friendly business model. Nevertheless, if you do much IoT development either as a hobby or professionally, then you probably find yourself interacting with Apple devices more than you like to admit.

[Akio’s] app is essentially updating a chart, in real-time, with data read from an Adafruit nRF52832 Feather board. He then walks you through all the basics of creating a user interface (UI) using Apple’s Storyboard interface, a simple drag-and-drop scheme similar to something you’ve probably used in many other contexts. [Akio] shows readers how to add buttons for allowing users to interact with the app, labels for displaying data to the user, as well as walks you through Apple’s odd methodology of connecting UI elements to code using IBAction and IBOutlets. The highlight of his tutorial is showing readers how to add charts to their iOS apps which seems to take a few more steps than you might imagine.

[Akio] does a really good job detailing all the relevant functions so that readers will hopefully understand what each piece of the code is doing. And we really enjoyed him adding individual video tutorials for some of the trickier programming steps. He also readily admits that some folks may opt to develop their UI exclusively in code as opposed to the Storyboard but he argues that the Storyboard is still important for beginners and is really handy when the UI is fairly simple.

Of course, in true open-source fashion, [Akio] provides all his code on his GitHub repository so you can clone the repo and run the code yourself as well as credit some of the resources he used while making his app. Two things we really love to see. Hopefully, [Akio’s] tutorial will make connecting to iOS devices seem much less onerous than it once was.