Sonic The Self-Balancing Robot: Face-Plants And The Challenges Of Sensor Integration

Watching a child learn to run is a joyous, but sometimes painful experience. It seems the same is true for [James Bruton]’s impressive Sonic the Self-Balancing robot, even with bendable knees and force sensitive legs.

We covered the mechanical side of the project recently, and now [James] has added the electronics to turn it into a truly impressive working robot (videos after the break). Getting it to this point was not without challenges, but fortunately he is sharing the experience with us, wipe-outs and all. The knees of this robot are actuated using a pair of motors with ball screws, which are not back drivable. This means that external sensors are needed to allow the motors to actively respond to inputs, which in this case are load cells in the legs and an MPU6050 IMU for balancing. The main control board is a Teensy 3.6, with an NRF24 module providing remote control.

[James] wanted the robot to be able to lean into turns and handle uneven surfaces (small ramps) without tipping or falling over. The leaning part was fairly simple (for him), but the sensor integration for uneven surfaces turned out to be a real challenge, and required multiple iterations to get working. The first approach was to move the robot in the direction of the tipping motion to absorb it, and then return to level. However, this could cause it to tip over slightly larger ramps. When trying to keep the robot level while going over a ramp with one leg, it would go into wild side-to-side oscillations as it drops back to level ground. This was corrected by using the load cells to dampen the motion.


Continue reading “Sonic The Self-Balancing Robot: Face-Plants And The Challenges Of Sensor Integration”

Supersize DIY R/C Servos From Windscreen Wipers

We’re all familiar with the experience of buying hobby servos. The market is awash with cheap clones which have inflated specs and poor performance. Even branded servos often fail to deliver, and sometimes you just can’t get the required torque or speed from the small form factor of the typical hobby servo.

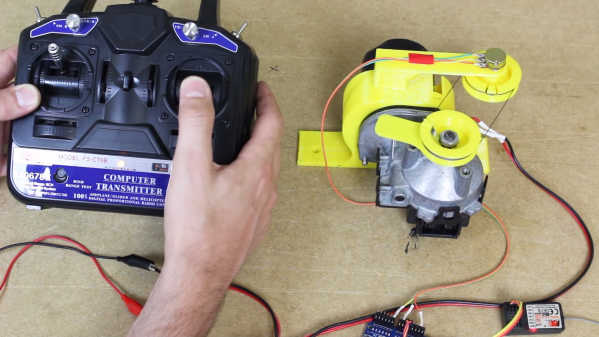
Enter [James Bruton] and his DIY RC servo from a windscreen wiper motor. Windscreen wiper motors are cheap as chips, and a classic salvage. The motor shaft is connected to a potentiometer via a pulley and some string, providing the necessary closed-loop feedback. Instead of using the traditional analog circuitry found inside a servo, an Arduino provides the brains. This means PID control can be implemented on the ‘duino, and tuned to get the best response from different load characteristics. There’s also the choice of different interfacing options: though [James]’ Arduino code accepts PWM signals for a drop-in R/C servo replacement, the addition of a microcontroller means many other input signal types and protocols are available. In fact, we recently wrote about serial bus servos and their numerous advantages.

We particularly love this because of the price barrier of industrial servomotors; sure, this kind of solution doesn’t have the precision or torque that off-the-shelf products provide, but would be sufficient for many hacks. Incidentally, this is what inspired one of our favourite open source projects: ODrive, which focuses on harnessing the power of cheap brushless motors for industrial use.

Continue reading “Supersize DIY R/C Servos From Windscreen Wipers”

James Bruton's mini electric bike

Building A Mini Electric Bike In Between Projects

What do you do when you suddenly find you have some free time because you’re waiting on parts or have run up against other delays for your current project? If you’re [James Bruton], you design and build a mini electric bike.

Being a prolific builder, [James] already had the parts he needed. Some of them were left over from previous projects: a small motor, a 24 volt LiPo battery, an SK8 electronic speed controller, and a twist grip for the handlebars. He cut a wooden frame using his CNC machine and 3D printed various other components. Normally he uses ABS for motor mounts but this time he went with PLA and sure enough, the motor heated up and the mounting screws got hot enough to melt the plastic. But other than that, the bike worked great and looks like a polished, manufactured product. How many of us can say the same for our own unplanned projects using only parts from around the workshop? Check out his build and watch him whizzing around on it in the video below.

As for the former projects from which he had leftover parts, he says that some came from skateboard projects such as his pimped out electric LEGO longboard.

Continue reading “Building A Mini Electric Bike In Between Projects”

James Bruton's openDog inverse kinematics

[James Bruton] Is Making A Dog: OpenDog Project

There was a time when a two-legged walking robot was the thing to make. But after seeing years of Boston Dynamic’s amazing four-legged one’s, more DIYers are switching to quadrupeds. Now we can add master DIY robot builder [James Bruton] to the list with his openDog project. What’s exciting here is that with [James’] extensive robot-building background, this is more like starting the challenge from the middle rather than the beginning and we should see exciting results sooner rather than later.

James' motor and ball screws
James’ motor and ball screws

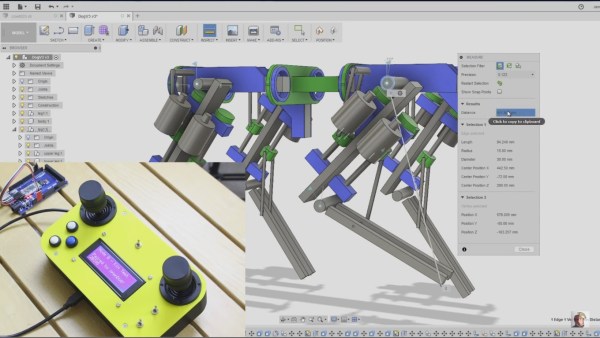
Thus far [James] has gone through the planning stage, having iterated through a few versions using Fusion 360, and he’s now purchased the parts. It’s going to be about the same size as Boston Robotic’s SpotMini and uses three motors for each leg. He considered going with planetary gearboxes on the motors but experienced a certain amount of play, or backlash, with them in his BB-9E project so this time he’s going with ball screws as he did with his exoskeleton. (Did we mention his extensive background?)

Each leg is actually made up of an upper and lower leg, which means his processing is going to have to include some inverse kinematics. That’s where the code decides where it wants the foot to go and then has to compute backwards from there how to angle the legs to achieve that. Again drawing from experience when he’s done it the hard way in the past, this time he’s designed the leg geometry to make those calculations easy. Having written up some code to do the calculations, he’s compared the computed angles with the measurements he gets from positioning the legs in Fusion 360 and found that his code is right on. We’re excited by what we’ve seen so far and bet it’ll be standing and walking in no time. Check out his progress in the video below.

Continue reading “[James Bruton] Is Making A Dog: OpenDog Project”

Colossal Hydraulic Hulkbuster Is Classic Colin Furze

[Colin Furze] is back at it – once again shrugging off the confines of feasibility and laughing in the face of sanity, all whilst sporting the signature tie with unrivalled style.

Teaming up with [James Bruton], the result of their collective talent this time is a hydraulic hulkbuster suit, at a frankly ridiculous scale. This is the third and final episode of the build process, with the first two covering the legs and body

To demonstrate the strength of his latest toy, [Colin] tapes himself to the arm of his creation and promptly gets swung into a wall. We still don’t entirely understand how [Colin] survives his antics, but we’re very glad he does.

The steel frame is a masterclass in welding and fabrication, providing support for three hydraulic pumps, the accompanying rams, some seriously hefty bearings (think 1 m diameter), and one Colin. As if a giant moving steel behemoth wasn’t enough, each arm houses a weapon: a flamethrower and a power-fist. All parts are sourced from eBay.

The control electronics and 3D-printed skin are pretty nifty too – you can see [James]’s first video here.

We’re hard pressed to pick our favourite Furze projects, but we have to mention the flamethrower guitar and hoverbike.

Continue reading “Colossal Hydraulic Hulkbuster Is Classic Colin Furze”

Electric LEGO Longboard Now Complete With Epic Road Test

We recently posted about [James Bruton]’s most excellent oversized LEGO electric longboard. Well, now he has completed the project by tidying a few things and building oversized versions of classic light-up bricks to serve as headlamps and the tail light. Most importantly, he’s hitting the road with it!

He built a LEGO-looking enclosure for the battery as well, based on a 2×6 brick. The battery pack sits behind the motor with the tail light on top and holds the radio control receiver as well the twin LiPos. The head and tail lights pack 24-LED discs and are controlled by [James]’ FS-GT2B 3-channel RC transmitter. Its third channel is just a button, and he can trip that button to activate the lights with the help of a Turnigy receiver-controlled switch.

For an added touch he printed some LEGO flowers and a minifig, suitably oversized, and took the skateboard on the road. The thing has some zip! [James] kept his balance while holding the controller in one hand and a selfie stick with the other. The headlamp housings fell off, and a while later the minifig fell off. Fortunately [James] was able to snap them back into place, in proper LEGO fashion.

[James] runs XRobots and also served as a judge for the 2016 Hackaday Prize. We wrote up his Star Wars builds a while back, as well as his tutorial on mixed reality filming without a green screen.

Continue reading “Electric LEGO Longboard Now Complete With Epic Road Test”

Speed Run [James Bruton’s] Star Wars Builds

We’ve been following [James Bruton]’s builds here on Hackaday for quite a while and he has built some impressive stuff. We love how he often doesn’t cover everything up, leaving enough room to admire the working bits under the hood. Just in time for the release of the new Star Wars movie, Rogue One, [James] put together an overview of his Star Wars robot builds.

The build summary includes his R6 droid, his GNK walking droid and the third revision of his BB-8 droid. [James Bruton]’s videos have tons of detail in them over many, many parts (for example, his BB-8 R3 playlist is 15 parts and his Ultron build currently has 26 episodes and counting!)

There’s a quick overview of each of the three robot builds in this video, and it includes links to the playlists for each build for those who want more detail. This is just what you need to glimpse all of the clever design that went into these wonderfully crafted droids. And if you haven’t seen it yet, you should check out his series elastic actuators that he’s working on for the Ultron build, they give a robot some relief from rigidity.

Continue reading “Speed Run [James Bruton’s] Star Wars Builds”