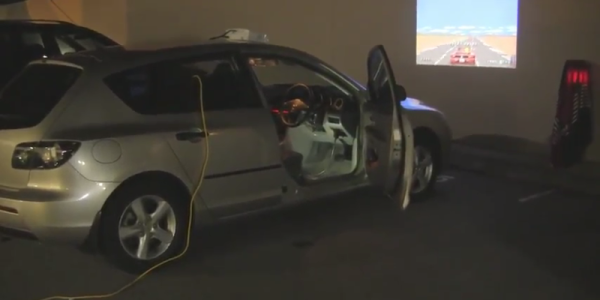
Robot Arm From Recyclables

A robot assistant would make the lives of many much easier. Luckily, it’s possible to make one of your own with few fancy materials. The [circuito.io] team demonstrates this by building a robot arm out of recyclables!

With the exception of the electronics — an Arduino, a trio of servo motors, and a joystick — the arm is made almost completely out of salvaged recyclables: scrap wood, a plastic bottle, bits of plastic string and a spring. Oh, and — demonstrating yet another use for those multi-talented tubers — a potato acts as a counterweight.

Instead of using screws or glue, these hackers used string made from a plastic bottle as a form of heat shrink wrap to bind the parts of the arm together. The gripper has only one pivoting claw for greater strength, and the spring snaps it open once released. Behold: your tea-bag dunking assistant.

Continue reading “Robot Arm From Recyclables”

Hackaday Prize Entry: A CNC Mill Without The C

It’s a staple of home CNC construction, the 3D mill built on the bench from available parts. Be the on a tubular, plywood, or extruded aluminum frame, we’ve seen an astonishing array of mills of varying levels of capability.

The norm for such a mill is to have a computer controlling it. Give it a CAD file, perform the software magic, press button, receive finished object (Or so the theory goes). It’s a surprise then to see a mill in which the input doesn’t come from a CAD file, instead all control is done by hand through the medium of a joystick. [Mark Miller]’s 3D printed freeform carving machine is a joystick-controlled mill with a rotary tool on an arm facing a rotatable bed, and it can perform impressive feats of carving in expanded foam.

You might ask why on earth you should make a machine such as this one when you could simply pick up a rotary tool in your hand and start carving. And you’d be right, from that perspective there’s an air of glorious uselessness to the machine. But to take that view misses the point entirely, it’s a clever build and rather a neat idea. We notice he’s not put up the files yet for other people to have a go, if someone else fancies making CNC software work with it then we’re sure that would be possible.

There is a video showing the basic movements the mill is capable of, which we’ve put below the break. Best to say, though, it’s one on which to enable YouTube’s double speed option.

Continue reading “Hackaday Prize Entry: A CNC Mill Without The C”

4-way or 8-way joystick mod

4-way Or 8-way Joystick Restrictor Mod

Having a restricted 4-way or 8-way digital joystick for an arcade game is fine if the joystick is built into a game cabinet that plays only one game — 4-way for Pacman and 8-way for Super Cobra. But [Tinker_On_Steroids] wanted a joystick that could be restricted as either 4-way or 8-way for a cabinet that could play a multitude of games, and it had to switch from one type of restriction to the other automatically based on the selected game.

His digital joystick already came with a plate that can be mounted for either 4-way or 8-way restriction, but it has to be manually screwed in place for one or the other. He removed it and designed two 3D-printable parts, one that is to be mounted firmly to the bottom of the joystick and the other that rotates within the first one. Rotated in one orientation gives 4-way restriction and in the other orientation gives 8-way. That left only attaching a servo to do the rotation. The first video below shows mounting this all to the joystick and demoing the servo using a Teensy. The STL files for the parts are on his Thingiverse project page.

He also shows a simple circuit board he made that has two buttons and two LEDs on it for connecting to the Teensy and controlling the servo. And as an added option he shows how to talk to the Teensy from his desktop computer through USB and control the servo that way. In the second video below he details all that and also does a walk-through of the code he wrote for the Teensy. On the Thingiverse page he provides only the hex file but it’s likely you’d write your own software for interfacing with a game anyway.

Continue reading “4-way Or 8-way Joystick Restrictor Mod”

An Apple II Joystick Fix For Enjoyable Gameplay

We all remember the video games of our youth fondly, and many of us want to relive those memories and play those games again. When we get this urge, we usually turn first to emulators and ROMs. But, old console and computer games relied heavily on the system’s hardware to control the actual gameplay. Most retro consoles, like the SNES for example, rely on the hardware clock speed to control gameplay speed. This is why you’ll often experience games played on emulators as if someone is holding down the fast forward button.

The solution, of course, is to play the games on their original systems when you want a 100% accurate experience. This is what led [FozzTexx] back to gameplay on an Apple II. However, he quickly discovered that approach had challenges of its own – specifically when it came to the joystick.

The Apple II joystick used a somewhat odd analog potentiometer design – the idea being that when you pushed the joystick far enough, it’d register as a move (probably with an eye towards smooth position-sensitive gameplay in the future). This joystick was tricky, the potentiometers needed to be adjusted, and sometimes your gameplay would be ruined when you randomly turned and ran into a pit in Lode Runner.

The solution [FozzTexx] came up with was to connect a modern USB gamepad to a Raspberry Pi, and then set it to output the necessary signals to the Apple II. This allowed him to tune the output until the Apple II was responding to gameplay inputs consistently. With erratic nature of the original joystick eliminated, he could play games all day without risk of sudden unrequested jumps into pits.

The Apple II joystick is a weird beast, and unlike anything else of the era. This means there’s no Apple II equivalent of plugging a Sega controller into an Atari, or vice versa. If you want to play games on an Apple II the right way, you either need to find an (expensive) original Apple joystick, or build your own from scratch. [FozzTexx] is still working on finalizing his design, but you can follow the gits for the most recent version.

We Declare The Grandmaster Of Pokemon Go GPS Cheats

Since Pokemon Go blew up the world a couple of weeks ago we’ve been trying to catch ’em all. Not the Pokemon; we’ve been trying to collect all the hardware hacks, and in particular the most complete GPS spoofing hack. We are now ready to declare the first Grandmaster GPS spoofing hack for Pokemon Go. It broadcasts fake GPS signals to your phone allowing the player to “walk around” the real world using a gaming joystick.

Just about everything about this looks right to us. They’re transmitting radio signals and are doing the responsible thing by using an RF shield box that includes a GPS antenna. Hardware setup means popping the phone inside and hooking up the signal generator and GPS evaluation hardware. Google Earth then becomes the navigation interface — a joystick allows for live player movements, coordinates are converted to GPS signals which are transmitted inside of the box.

Now, we did say “just about right”. First off, that RF shielding box isn’t going to stop your fake GPS signals when you leave the lid open (done so they can get at the phone’s touchscreen). That can probably be forgiven for the prototype version, but it’s that accelerometer data that is a bigger question mark.

When we looked at the previous SDR-based RF spoofing and the Xcode GPS cheats for Pokemon Go there were a number of people leaving comments that Niantic, the devs responsible for Pokemon Go, will eventually realize you’re cheating because accelerometer data doesn’t match up to the amount of GPS movement going on. What do you think? Is this app sophisticated enough to pick up on this type of RF hacking?

Continue reading “We Declare The Grandmaster Of Pokemon Go GPS Cheats”

A Keypad Joypad For Your Retro Gaming

[TK] is a retro computer enthusiast who’s had some difficulty locating a joystick for his trusty Amiga 500. New ‘sticks are expensive, and battered survivors from the 80s go for more than they should.

Happily these old controllers were simple devices, having only five control lines for the four directions and a fire button which were active low. [TK] therefore cast around the available components and decided to craft his own controller from a numerical keypad.

Numerical joypad schematic

Numerical keypads may be ubiquitous, but they’re not the perfect choice for a joypad. Instead of individual switches, they are wired as a matrix. [TK]’s controller works within that constraint without butchering the keypad PCB, though his layout has the left and right buttons below the up and down buttons. Looking at the schematic we wonder whether the 4-5-6 and 7-8-9 rows could be transposed , though joypad layout is probably a matter of personal choice.

Making the controller was a simple case of wiring the pad to a 9-pin D socket in the correct order, and plugging it into the Commodore. He reports that it’s comfortable to use and better than some of the lower-quality joysticks that were on the market back in the day. Veterans of Amiga gaming will understand that sentiment, there were some truly shocking offerings to be had at the time.

Quite a few home-made game controllers have made it onto these pages over the years. There is this one using tactile switches and a ballpoint pen, and a stick made from the idler wheel from a surplus VCR, but the ultimate crown of junkbox joysticks should go to this joystick made from clothes pins. If we take one thing away from all this home-made controller ingenuity, it is that what really matters is not the hardware but the gameplay.

When Life Gives You An F-15 Throttle Grip Make A Cool Joystick

We’re not certain where [NoPleaseDont] got an F-15 Throttle Grip, but it would certainly be a waste not to make something cool out of one. The F-15 is a twin engine air superiority fighter, and in it’s niche, it is one of the most successful ever made. We imagine this makes it a popular choice in air simulators.

Equipped with his successful scrounge [NoPleaseDont] decided to build a full HOTAS, Hands On Throttle and Stick, joystick. He started by taking apart the throttle grip.  As each layer was pulled a part, we were pleased to see the reassuring infestation of quality control stamps you’d expect to find on the input of a 26million dollar machine. The pinouts were presumably taken and the handle was reassembled. After that, a lot of custom sheet metal parts, 3D prints, and clever bracketry came together to form the frame of the joystick.

Finally came the electronics. Many of the photos were too blurry to decode, but at minimum a Teensy and custom LED control board is involved. The frame got a few additional buttons and control panels added.

The resulting joystick has a great history, and more buttons than we can guess the purpose of.