Atari 65XE In Laptop Form

For better or worse, Atari is no longer a household name in computing, but for a time in the 1980s, it was a huge mover in the industry. They not only produced PCs but also a huge number of video game consoles. Although they were a major contributor to the video game crash of the 1980s, they managed to limp along a few more years afterward and produce some interesting machines in the following years, even though they weren’t ultimately able to compete with Nintendo or Sega. One of those computers from that era was a PC-console hybrid of sorts called the Atari XE, and [Sideburn] was able to turn one into a laptop.

The retro laptop began life as an Arabic PAL version of the 65XE, the PC version of the ubiquitous 65-series computer. A large portion of the computer was reworked, including the removal of the power supply in favor of a rechargeable battery with a 6-hour life. Also among the list of scrapped components was the video and sound connectors as well as the RF modulator, which would have been common for displays at the time, but this laptop is getting a 1920×1080 LCD panel to replace all of that old hardware. A 1MB memory upgrade, new speakers and amp, a WiFi card, and an SD floppy card emulator round out the build.

The final part of the build is assembling it all into a custom 3D printed case, and the resulting laptop that [Sideburn] calls the XE Book is a faithful adaptation of this niche computer into what could have been a laptop we would have seen in the late 80s or early 90s similar to the Toshiba T3200SXC. It matches the original’s footprint and still uses all of the core components, so it’s not too difficult to imagine something like this having existed in the past.

Continue reading “Atari 65XE In Laptop Form”

A Modern Battery For A Classic Laptop

Aside from their ability to operate fairly well in extreme temperatures, lead-acid batteries don’t have many benefits compared to more modern battery technology. They’re heavy, not particularly energy dense, have limited charge cycles, and often can’t be fully discharged without damage or greatly increased wear. With that in mind, one can imagine that a laptop that uses a battery like this would be not only extremely old but also limited by this technology. Of course, in the modern day we can do a lot to bring these retro machines up to modern standards like adding in some lithium batteries to this HP laptop.

Simply swapping the batteries in this computer won’t get the job done though, as lead-acid and lithium batteries need different circuitry in order to be safe while also getting the maximum amount of energy out. [CYUL] is using a cheap UPS module from AliExpress which comes with two 18650 cells to perform this conversion, although with a high likelihood of counterfeiting in this market, the 18650s were swapped out with two that were known to be from Samsung. The USB module also needs to be modified a bit to change the voltage output to match the needs of the HP-110Plus, and of course a modernized rebuild like this wouldn’t be complete without a USB-C port to function as the new power jack.

[CYUL] notes at the end of the build log that even without every hardware upgrade made to this computer (and ignoring its limited usefulness in the modern world) it has a limited shelf life as the BIOS won’t work past 2035. Hopefully with computers like this we’ll start seeing some firmware modifications as well that’ll let them work indefinitely into the future. For modern computers we’ll hope to avoid the similar 2038 problem by switching everything over to 64 bit systems and making other software updates as well.

Ultra-Wide Gaming Handheld Channels The Nintendo DS

“The Nintendo DS isn’t wide enough!” said nobody, ever. Most players found Nintendo’s form factor to be perfectly acceptable for gaming on the go, after all. Still, that doesn’t mean a handheld gaming rig with a more… cinematic aspect ratio couldn’t be fun! [Marcin Plaza] built just that, with great results.

The initial plan was to build a Steam Deck-like device, but using laptop trackpads instead of joysticks. [Marcin] had a broken Lenovo Yoga 730-13 to use as the basis for the build. That caused the plan to diverge, as the only screen [Marcin] could find that was easily compatible with the laptop’s eDP interface was an ultrawide unit. From there, a clamshell enclosure was designed specifically to rehouse all the key components from the Lenovo laptop. The top half of the clamshell would hold the screen, while the base would feature a small custom keyboard, some buttons, and the aforementioned trackpad. This thing reminds us of the Nintendo DS for multiple reasons. It’s not just the clamshell design—it’s the fact it has a touch control on the lower deck, albeit without a screen.

It’s an original concept for a handheld gaming device, and it makes us wish there were more games built for the ultrawide aspect ratio. This is one project that has us browsing the usual websites to see just what other oddball screens are out there… round screens in a makeup compact clamshell, anyone? Video after the break.

Continue reading “Ultra-Wide Gaming Handheld Channels The Nintendo DS”

Portable Pi Palmtop Provides Plenty

We’ve seen many portable laptops using the Raspberry Pi series of boards in the decade-plus since its launch. The appeal of a cheap board that can run a desktop Linux distro without requiring too much battery is hard not to fall for. Over the years, the bar has been raised from a Pi stuck to the back of one of those Motorola netbook accessories, through chunky laptops, to some very svelte and professional-looking machines. A recent example comes from [Michael Mayer], whose Portable Pi 80 is a palmtop design that we’d be happy to take on the road ourselves.

At its heart is a Pi Zero 2, combining as it does a tiny form factor with the useful power of its Pi 3-derived processor. This is mated to a Waveshare 7-inch display, and in the bottom half of the machine sits a 40% mechanical keyboard. Alongside this are a pair of 18650 cells and their associated power modules. The little Arduino, which normally handles the keyboard, has been relocated due to space constraints, which brings us to the case. A project like this one is, in many ways, a task of assembling a set of modules, and it’s in the case that the work here really shines. It’s a 3D-printable case that you can download from Printables, and it’s very nice indeed. As we said, we’d be happy to use one of these.

Portable computing has come a very long way. Often the keyboard can make it or break it.

This Is Not A Laptop, It’s A KVM Combo

A spare monitor and keyboard are handy things to have around, but they’re a bit of a hassle. They are useful for hardware development, plugging in to headless servers, or firing up a Raspberry Pi or similar single-board computer (SBC). If that’s something you do and portability and storage space are important to you, then you may be interested in the CrowView Note.

I got an opportunity to test and provide feedback on an early version of this unusual device, which is functionally a portable spare monitor plus keyboard (and touchpad) without the bulk and extra cables. Heck, it’s even giving me ideas as the guts of a Cyberdeck build. Let’s take a look.

What It Is

It really looks like a laptop, but it’s actually a 14″ 1920 x 1280 monitor and USB keyboard in a laptop form factor.

There is also an integrated trackpad, speakers and mic, and a rechargeable battery. That makes it capable of providing its own power, and it can even function as a power bank in a pinch. There’s an HDMI input on one side, and on the other is a full-featured USB-C port that accepts video input via the DisplayPort altmode.

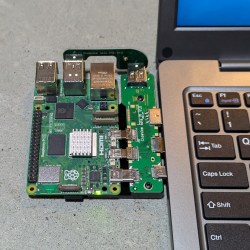
Pictured here is a Raspberry Pi 5 with optional PCB adapter to eliminate cables. The three ports (HDMI in, USB-C 5 V out, and USB-A for peripherals) provide all the board needs.

The CrowView Note is a pretty useful device for a workbench where one is often plugging hardware in for development or testing, because there’s no need to manage a separate monitor, keyboard, and mouse.

It is not a laptop, but attaching an SBC like a Raspberry Pi makes it act like one. The three ports conveniently located on the left-hand side (HDMI in, USB-C out for power to the SBC, and USB-A in for peripherals like keyboard and trackpad) are all that are needed in this case. Elecrow offers a “cable eliminator” PCB adapters to make the process of connecting a Raspberry Pi 5 or a Jetson Nano as simple as possible. The result is something that looks and works just like a laptop.

Well, almost. The SBC will still be a separate piece of hardware, whether connected by cables or by one of Elecrow’s PCB adapters. The result is OK for bench work, but especially in the case of the PCB adapter, not particularly rugged. Still, it’s a nice option and makes working on such boards convenient and cable-free.

Continue reading “This Is Not A Laptop, It’s A KVM Combo”

DIY Gaming Laptop Built Entirely With Desktop Parts

Gaming laptops often tend towards implementing more desktop-like hardware in the pursuit of pure grunt. But what if you were to simply buy desktop hardware yourself, and build your own gaming laptop? That would be very cool, as [Socket Science] demonstrates for us all.

The project began with lofty goals. The plan wasn’t to build something rough and vaguely laptop-like. [Socket Science] wanted to build something of genuine quality, that for all intents and purposes, looked and worked like a proper commercial-grade laptop. Getting to that point took a full 14 months, but the final results are impressive.

Under the hood lies an AMD Ryzen 5 5600X and a XFX Radeon RX6600, hooked into an ITX motherboard with some low-profile RAM sticks. Those components were paired with a thin keyboard, a touchpad, and a portable gaming monitor. Getting all that into a thin laptop case, even a custom one, was no mean feat. Ports had to be cut down to size, weird ribbon cables had to be employed, and heatsinks and coolers had to be rearranged. To say nothing of all the work to 3D print a case that was strong and actually worked!

The full journey is quite the ride. If you want to go right back to the start, you can find part one here.

We’ve seen some builds along these lines before, but seldom few that get anywhere near this level of fit and finish. Oftentimes, it’s that kind of physical polish that is most difficult to achieve. All we can say is “Bravo!” Oh, and… video after the break.

Continue reading “DIY Gaming Laptop Built Entirely With Desktop Parts”

Deep Dive Into A Prison Laptop

The phenomenon of prison electronics is by now relatively well-documented, with striking transparent radios, televisions, and kin easy to recognize. Yet what about prison laptops? As it turns out, these are a thing as well, and [Zephray Wenting] got one from eBay to investigate, as documented over at Twitter (ThreadReader single page). Much like their audiovisual brethren, these laptops lack basic features in the name of prison security, which in the case of this laptop means for example no USB ports. Even the spacebar stabilizer rod is missing. Weaponized keyboards are apparently a thing in corrections facilities.

The Justice Tech Solutions Securebook 5. (Credit: Zephray Wenting)

Called the Justice Tech Solutions Securebook 5, it has been superseded by the Securebook 6. Inside this earlier unit, you’ll find an Intel N3450 with 4 GB LPDDR3, with SATA for storage and a special dock connector. Some laptops come with WiFi hardware installed, others are unpopulated. It appears that these Securebooks by default have a BIOS password that cannot be erased, even by removing it from the NVRAM (‘CMOS’), as it’ll return on the next boot due to an automatic BIOS reset. This was temporarily bypassed through a hacky external SPI Flash adapter, but the reward for all this trouble was a BIOS setup screen with just the ‘Security’ tab.

It’s now been sleuthed out that the default password is N%(dU32p as reported by Hackaday’s own [Adam Fabio] on Twitter. It turns out the password was available on a (now private) YouTube video. [Techknight] on Twitter has delved into EFI BIOS hacking. He has an alternate BIOS image that does provide access to the full BIOS setup utility. With BIOS access not being necessary to boot the system, the question that [Zephray] went ahead with was how to boot it into an OS since the original HDD or SSD had been removed prior to being sold. The bad news here is that it turned out that the system has a HDD whitelist (which [Sark] found a way to bypass). The good news is that someone has probed the system before, with the storage device being reported as ‘China SATA3 240GB SSD’.

Rather than mess with this, it was attempted to boot from USB, by tapping into the USB lines for the touchpad, which turned out to allow booting into a live image of Ubuntu without fuss. As an ongoing project, it’ll be interesting to see what more functionality can be wrung out of this piece of prison kit, all hopefully from the right side of the prison bars.

Thanks to [livelaughliang] for the tip.