Screenshot of the blog post, showing how you can optimize your battery level measurement resistor dividers, among many other things

Making Your Wireless Keyboard Truly Low-Power

The basics of keyboard design are tried and true at this point, but there are still a few aspects yet unconquered. One of them is making your keyboards wireless. You might think it’s easy, but if you just slap a wireless-enabled microcontroller onto your board, you’ll soon be left with a dead battery. Rejoice – [Pete Johanson], creator of ZMK, tells all that you want to know about making your keyboard low-power.

In a lengthy blog post, he goes through everything that a typical keyboard consists of, and points out factor after factor that you never knew could cause a spike in power consumption. Are you using muxes or config options that will force your MCU to always stay alert? Is your voltage regulator’s quiescent current low enough, and can the same be said about other parts you’re using? Does your MCU have to work extra hard transmitting bytes because you’ve put a copper fill under its antenna? Most importantly, is the firmware you’re using designed to optimize power consumption at its core?

If you’ve ever thought about designing low-power keyboards, hell, any low-power device, you seriously should read this post – it will set you at ease by giving you a checklist of things to do, and it also links to quite a few other useful resources, like the ZMK power profiler. Perhaps, if you’re building a wireless keyboard or just creating battery-powered device, you should consider ZMK, as it sure seems to be written with energy efficiency in mind.

Want to learn more about what it takes to build a low-power device? Our 2023 Low-Power Contest attracted a wide range of entrants, and they’ve shared a flurry of methods and tricks you can use to build any sort of battery-juice-sipping gadget.

Altoids Tin Spy Radio Goes Solid State

[Helge Fykse (LA6NCA)] has a type, as they say. At least as far as radios are concerned, he seems to prefer elegant designs that keep the BOM to the minimum needed to get the job done. And Altoids tins — he really seems to like putting radios in Altoids tins.

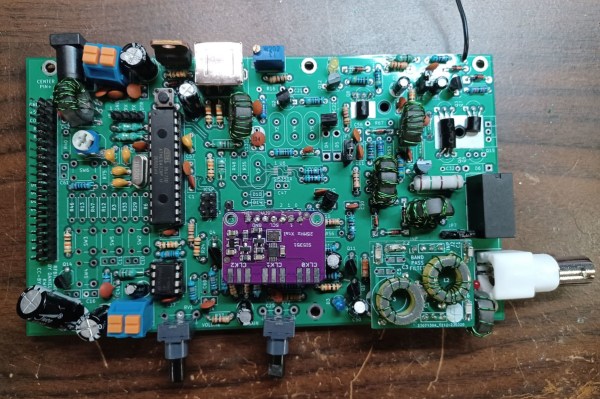
This QRP transceiver for the 60-meter amateur radio band is a perfect example of that ethos. For the unfamiliar, QRP is Morse code shorthand for decreased power, and is generally used when hams are purposely building and operating radios that radiate very little power, typically below a watt. For this transceiver, [Helge] chose to use modern components, a marked but interesting departure from his recent tube-powered spy radios. The design is centered on a custom oscillator board he designed using an Arduino Pro Mini and an Si5351 oscillator chip. Other components include an ADE-1ASK frequency mixer, an antenna tuner module that can be swapped out for operating on different bands, a receiver that’s little more than a couple of op-amps, and a Darlington pair for an RF power amplifier. Everything fits neatly on a piece of copper-clad board inside the tin box.

As is his tradition, [Helge] was on the air in the field with this radio almost before the solder had time to cool. His first contact was a 240-km shot to a friend, who reported a fine signal from this little gem. And that’s with just powering it off a 9-volt battery when it’s designed to the typical 12-volt supplies hams favor; he estimates this resulted in a signal of about 200 mW. Not too shabby.

Honestly, we’d love to learn more about that oscillator board [Helge] used, and maybe get a schematic for it. We found a little bit about it on his web page, but not the juicy details. If you’re out there, [Helge], please share the wealth.

Continue reading “Altoids Tin Spy Radio Goes Solid State”

Off-Grid Radio Also Repairable Off-Grid

Low-power radios, often referred to in the amateur radio community as QRP radios, have experienced a resurgence in popularity lately. Blame it on certain parts of the hobby become more popular, like Parks on the Air (POTA) or Summits on the Air (SOTA). These are events where a radio operator operates off-grid at remote parks or mountaintops. These QRP rigs are a practical and portable way to make contacts. You would think that a five- or ten-watt rig running on batteries would be simple. Surprisingly, they can be enormously complex and expensive. That’s why [Dr. Daniel Marks] built the RFBitBanger, a QRP radio designed to not only be usable off-grid but to be built and maintained off-grid as well.

The radio accomplishes this goal by being built out of as many standard off-the-shelf components as possible. It eschews modern surface-mount components in favor of the much more accessible through-hole parts, including the ATMEGA328P at the center of the build. A PCB design is also available, but it can be built on perf board nearly as easily. The radio supports any mode a QRP operator might use, including CW, SSB, RTTY, and a new mode designed explicitly for this radio called SCAMP which is a low bandwidth, low SNR digital mode built into the Arduino-based firmware. It’s a single-band radio, but any band between 20 and 80 meters can be selected with pluggable filters.

As far as bomb-proof radios go, we can’t imagine a better way to live out an apocalypse than with a radio like this. As long as there’s a well-stocked parts drawer around, this radio could theoretically reach around the world without worrying about warranty claims, expensive parts, or even a company going out of business or not stocking parts for old radios anymore. There’s also more information about this build at the Open Research Institute for those interested. And, if you’re wondering how useful any radio could be using only five watts of transmitter power, take a look at this in-depth look at QRP radio operation.

Thanks to [Stephen Walters] for the tip.

Want Lower Power? Add More Cores!

[Jacob Beningo] over at Embedded.com recently posted his thoughts on how to do a low-power microcontroller design. On the surface, some of his advice seems a little counter-intuitive. Even he admits, “…I’m suggesting adding more cores! I must be crazy!” There are a few tips, but the part he’s talking about is that you can save power by using CPUs with multiple cores and optimizing for speed.

This seems strange since you think of additional cores and speed to consume more power. But the idea is that the faster you get your work done, the faster you can go to sleep. We’ve seen that in our own projects — faster work means more napping, and that’s good for power consumption.

Of course, it isn’t just that simple. Multiple cores don’t help you if you don’t use them. The overarching goal is to get done quickly so you can get back to sleep. You know, kind of like work. The other advice in the post is generally good, too. Measure your power consumption, respond to events, and — maybe slightly surprising — with modern CPUs, variations within the CPU family, according to [Jacob], isn’t very significant. Instead, he reports that the big changes are switching to the least-capable processor family.

Naturally, Hackaday readers are no strangers to low-power design. If you get your power consumption low enough, you can consider a low-tech battery or even a potato.

Exploring The Early Days Of QRP Radio

Morse code might seem obsolete but for situations with extremely limited bandwidth it’s often still the best communications option available. The code requires a fair amount of training to use effectively, though, and even proficient radio operators tend to send only around 20 words per minute. As a result of the reduced throughput, a type of language evolved around Morse code which, like any language, has evolved and changed over time. QRP initially meant something akin to “you are overloading my receiver, please reduce transmitter power” but now means “operating radios at extremely low power levels”. [MIKROWAVE1] explores some of the earlier options for QRP radios in this video.

There’s been some debate in the amateur radio community over the years over what power level constitutes a QRP operation, but it’s almost certainly somewhere below 100 watts, and while the radios in this video have varying power levels, they tend to be far below this upper threshold, with some operating on 1 watt or less. There are a few commercial offerings demonstrated here, produced from the 70s to the mid-80s, but a few are made from kits as well. Kits tended to be both accessible and easily repairable, with Heathkit being the more recognizable option among this category. To operate Morse code (or “continuous wave” as hams would call it) only requires a single transistor which is why kits were so popular, but there are a few other examples in this video with quite a few more transistors than that. In fact, there are all kinds of radios featured here with plenty of features we might even consider modern by today’s standards; at least when Morse code is concerned.

QRP radios in general are attractive because they tend to be smaller, simpler, and more affordable. Making QRP contacts over great distances also increases one’s ham radio street cred, especially when using Morse, although this benefit is more intangible. There’s a large trend going on in the radio world right now surrounding operating from parks and mountain peaks, which means QRP is often the only way to get that done especially when operating on battery power. Modern QRP radios often support digital and voice modes as well and can have surprisingly high prices, but taking some cues from this video about radios built in decades past could get you on the radio for a minimum or parts and cost, provided you can put in the time.

Continue reading “Exploring The Early Days Of QRP Radio”

Tube Amplifier Uses Low Voltage, Sips Battery

Much like vinyl records, tube amplifiers are still prized for their perceived sound qualities, even though both technologies have been largely replaced otherwise. The major drawback to designing around vacuum tubes, if you can find them at all, is often driving them with the large voltages they often require to heat them to the proper temperatures. There are a small handful of old tubes that need an impressively low voltage to work, though, and [J.G.] has put a few of them to work in this battery-powered audio tube amplifier.

The key to the build is the Russian-made 2SH27L battery tubes which are originally designed in Germany for high-frequency applications but can be made to work for audio amplification in a pinch. The power amplifier section also makes use of 2P29L tubes, which have similar characteristics as far as power draw is concerned. Normally, vacuum tubes rely on a resistive heater to eject electrons from a conductive surface, which can involve large amounts of power, but both of these types of tubes are designed to achieve this effect with only 2.2 volts provided to the heaters.

[J.G.] is powering this amplifier with a battery outputting 5V via a USB connection, and driving a fairly standard set of speakers borrowed from a computer. While there aren’t any audio files for us to hear, it certainly looks impressive. And, as it is getting harder and harder to find vacuum tubes nowadays, if you’re determined to build your own amplifier anyway take a look at this one which uses vacuum tubes built from scratch.

An Ultra Low Power Dash Cam

Dash cameras are handy as they provide a video recording of interactions on the road. However, their utility comes from the fact that they are always recording while driving. This always-on means power draw. [Kuzysk] took it upon himself to cut that power draw by a factor of almost 70x.

He found his existing dash cam from MiVue consumed 3.5mA in idle which works out to be a whole amp-hour every 12 days. The custom version takes just 50uA which means it will draw an amp-hour in two years. The brains of the chip are formed by an ATmega328 and an LM2596M, which is a simple step-down regulator. Interestingly, [Kuzysk] purchased clones and original chips and found that the cheaper clones had a lower switching frequency but a much lower power draw. Programming an Arduino bootloader onto the board is fairly straightforward and [Kuzysk] kindly provides his code. It can detect the ACC voltage that’s on when the engine is on and is powered by a permanent 12v connection to the battery.

Overall it’s a straightforward hack that goes through rolling your own Arduino, optimizing for low power, and putting it all together into a polished project. Perhaps for the next version, he can use the ATmega to control a cheaper camera and make it smart.

Thanks to [Microchip makes] and [Abe] for the tip!