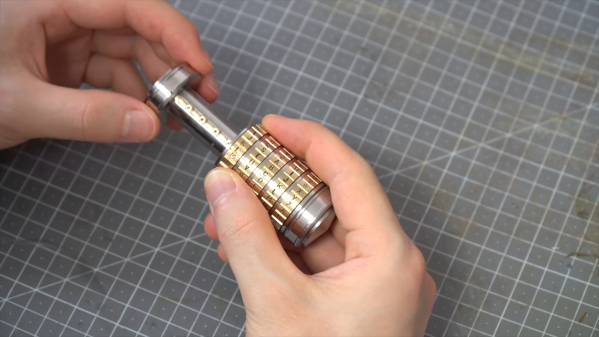
Are You Getting Your Money’s Worth From Threaded Inserts?

Have you ever wondered whether it’s worth the time and expense to install threaded inserts into your 3D-printed projects? [Stefan] from CNC Kitchen did, and decided to answer the question once and for all, with science.

If this sounds familiar, it’s with good reason: we covered [Stefan]’s last stab at assessing threaded inserts back in March. Then, he was primarily interested in determining if threaded inserts are better than threads cut or printed directly into parts. The current work is concerned with the relative value of different designs of threaded inserts. He looked at three different styles of press-in inserts, ranging in price from pennies apiece to a princely 25 cents. The complexity of the outside knurling seems not to be correlated with the price; the inserts with opposed helical knurls seem like they’d be harder to manufacture than the ones with simple barbs on the outside of the barrel, but cost less. And in fact, the mid-price insert outperformed the expensive one in pull-out tests. Surprisingly, the cheapest inserts were actually far worse at pull-out resistance than printing undersized holes and threading an M3 screw directly into the plastic.

[Stefan] also looked at torque resistance, and found no substantial difference between the three insert types. Indeed, none of the inserts proved to be the weak point, as the failure mode of all the torque tests was the M3 bolt itself. This didn’t hold with the bolt threaded directly into the plastic, of course; any insert is better than none for torque resistance.

We enjoyed seeing [Stefan]’s tests, and appreciate the data that can help us be informed consumers. [John] over at Project Farm does similar head-to-head tests, like this test of different epoxy adhesives.

Continue reading “Are You Getting Your Money’s Worth From Threaded Inserts?”

DIY Electrolysis Tank: Removing Rust While You Sleep

Anyone who’s done a bit of metalworking will know how quickly your stockpile will pick up a coating of rust with even just a bit of humidity. While welding requires only a bit of wire brushing at the joint areas, cleaning a large frame for paint is a completely different story. The projects [Make it Extreme] gets himself into tend to involve a lot of steel, so he built his own electrolysis tank for rust removal.

Electrolytic rust removal involves placing the piece of steel to be cleaned into an alkaline electrolyte solution (water and washing soda) with a sacrificial steel anode and connecting a low voltage DC supply over the two pieces. [Make it Extreme] started with an old plastic container, around which he built a very neat trolley frame. He obviously put some thought into how the tank will be cleaned, since it can be removed by unscrewing six bolts and removing the top part of the frame.

The high current, low voltage power supply that is required for the process was built using an old microwave transformer. The secondary coil is removed and replaced with coil of thick insulated wire, to convert it into a step down transformer. After the rewinding the transformer outputs about 13 VAC, which is then run through beefy bridge rectifier modules to get a DC current. A custom machined copper bolt terminal is mounted through the side of the tank to attach the sacrificial anode plate to the positive lead of the power supply, while the negative lead is clamped to the rusty steel to be cleaned.

[Make it Extreme]’s projects never get old, with everything from rideable tank tracks to rotary electric guns. Check out the video after the break to see the build and an impressive demo. Continue reading “DIY Electrolysis Tank: Removing Rust While You Sleep”

Restoring A Rusty Rebar Cutter

We’ve all probably come across hunks of junk that used to be tools, long-neglected and chemically welded into a useless mass of solid rust. Such items are available for a pittance at the local flea market, or more likely found in an old barn or rotting on a junk pile. They appear to be far beyond salvage, but with the proper application of elbow grease and penetrating lubricants, even a nasty old seized-up rebar cutter can live again.

We honestly almost passed up on the video below when it came across our feed. After all, a rebar cutter is a dead-simple device, and half the fun of restoration videos like those made by [my mechanics] is seeing all the parts removed, restored, and replaced. But it ended up being far more interesting than we expected, and far more challenging too.

The cutter was missing its original handle and looked for all the world like it had been cast from a solid piece of iron oxide. [my mechanics] was able to get the main pivot bolts free with a combination of leverage, liberal application of penetrating oil, drilling, and the gentle persuasion of a hydraulic press.

These efforts proved destructive to both bolts, so new ones were made on the lathe, as were a number of other parts beyond saving. New cutters were fabricated from tool steel and a new handle was built; before anyone comments on anyone’s welding skills, please read [Jenny]’s recent article on the subject.

The finished product is strikingly dissimilar to the starting lump of oxidized junk, so there’s going to to be some debate in calling this a “restoration” in the classical sense. The end result of a [my mechanics] video is invariably a tool or piece of gear that looks far better than it did the day it was made, and any one of them would get a place of honor on our shelf. That said, he’d probably be swiftly shown the door if he worked at the Smithsonian.

Whatever you want to call these sort of videos, there are tons of them out there. We’ve featured a few examples of the genre, from the loving rehabilitation of classic Matchbox cars to rebuilding an antique saw set. They’re enough to make us start trolling garage sales. Or scrap yards.

Continue reading “Restoring A Rusty Rebar Cutter”

How To Make An Electric Scooter Chain Sprocket With Nothing But Hand Tools

Sometimes, mechanical parts can be supremely expensive, or totally unavailable. In those cases, there’s just one option — make it yourself. It was this very situation in which I found myself. My electric scooter had been ever so slightly bested by a faster competitor, and I needed redemption. A gearing change would do the trick, but alas, the chain sprocket I needed simply did not exist from the usual online classifieds.

Thus, I grabbed the only tools I had, busied myself with my task. This is a build that should be replicable by anyone comfortable using a printer, power drill, and rotary tool. Let’s get to work!

Continue reading “How To Make An Electric Scooter Chain Sprocket With Nothing But Hand Tools”

DIY Tiny Dovetail Cube Needs DIY Dovetail Cutter

Dovetail cutter, made from a 5 mm drill rod.

There’s a trinket called a dovetail cube, and [mitxela] thought it would make a fine birthday present. As you can see from the image, he was successful in creating a tiny version out of aluminum and brass. That’s not to say there weren’t challenges in the process, and doing it [mitxela] style means:

  • Make it tiny! 15 mm sides ought to do it.
  • Don’t have a tiny dovetail bit on hand, so make that as well.
  • Of course, do it all without CNC in free-machining style.
  • Whoops the brass stock is smaller than expected, so find a clever solution.
  • That birthday? It’s tomorrow, by the way.

The project was a success, and a few small learning experiences presented themselves. One is that the shape of a dovetail plays tricks on the human eye. Geometrically speaking, the two halves are even but it seems as though one side is slightly larger than the other. [mitxela] says that if he were to do it again, he’d make the aluminum side slightly larger to compensate for this visual effect. Also, deburring with a knife edge on such a small piece flattened the edges ever so slightly, causing the fit to appear less precise than it actually is.

Still, it was a success and a learning experience. Need more evidence that [mitxela] thrives on challenge? Take a look at his incredible vector game console project.

Hackaday Links Column Banner

Hackaday Links: September 22, 2019

Of all the stories we’d expect to hit our little corner of the world, we never thought that the seedy doings of a now-deceased accused pedophile billionaire would have impacted the intellectual home of the open-source software movement. But it did, and this week Richard Stallman resigned from the Computer Science and Artificial Intelligence Lab at MIT, as well as from the Free Software Foundation, which he founded and served as president. The resignations, which Stallman claims were “due to pressure on MIT and me over a series of misunderstandings and mischaracterizations”, followed the disclosure of a string of emails where he perhaps unwisely discussed what does and does not constitute sexual assault. The emails were written as a response to protests by MIT faculty and students outraged over the university’s long and deep relationship with Jeffrey Epstein, the late alleged pedophile-financier. This may be one of those stories where the less said, the better. If only Stallman had heeded that advice.

They may be the radio stations with the worst programming ever, but then again, the world’s atomic clock broadcasting stations can really keep a beat. One of the oldest of these stations, WWV, is turning 100 this year, and will be adding special messages to its usual fare of beeps and BCD-encoded time signals on a 100-Hz subcarrier. If you tune to WWV at 10 past the hour (or 50 minutes past the hour for WWVH, the time station located in Hawaii) you’ll hear a special announcement. There was also talk of an open house at the National Institute of Standards and Technology complete with a WWV birthday cake, but that has since been limited to 100 attendees who pre-registered.

For the machinists and wannabes out there, the Internet’s machine shop channels all pitched in this week on something called #tipblitz19, where everyone with a lathe or mill posted a short video of their favorite shop tip. There’s a ton of great tip out there now, with the likes of This Old Tony, Abom79, Stefan Gotteswinter, and even our own Quinn Dunki contributing timesaving – and finger saving – tips. Don’t stop there though – there’s a playlist with 77 videos at last count, many of them by smaller channels that should be getting more love. Check them out and then start making chips.

Most of us know that DLP chips, which lie behind the lens of the projectors that lull us to sleep in conference rooms with their white noise and warm exhaust, are a series of tiny mirrors that wiggle around to project images. But have you ever seen them work? Now you can: Huygens Optics has posted a fascinating video deep-dive into the workings of digital light processors. With a stroboscopic camera and a lot of fussy work, the video reveals the microscopic movements of these mirrors and how that syncs up with the rotation of a color filter wheel. It’s really fascinating stuff, and hats off to Huygens for pulling off the setup needed to capture this.

And speaking of tiny optics, get a load of these minuscule digital cameras, aptly described by tipster David Gustafik as “disturbingly small.” We know we shouldn’t be amazed by things like this anymore, but c’mon – they’re ridiculously tiny! According to the datasheet, the smaller one will occupy 1 mm² on a PCB; the larger stereo camera requires 2.2 mm². Dubbed NanEye, the diminutive cameras are aimed at the medical market – think endoscopy – and at wearables manufacturers. These would be a lot of fun to play with – just don’t drop one.

Rideable Tank Tread: It’s A Monotrack Motorcycle That Begs You To Stop Very Slowly

There will always be those of us who yearn for an iron steed and the wind through your hair. (Or over your helmet, if you value the contents of your skull.) If having fun and turning heads is more important to you than speed or practicality, [Make it Extreme] has just the bike for you. Using mostly scrapyard parts, they built a monotrack motorcycle — no wheels, just a single rubber track.

[Make it Extreme] are definitely not newcomers to building crazy contraptions, and as usual the entire design and build is a series of ingenious hacks complimented by some impressive fabrication skills. The track is simply a car tyre with the sidewalls cut away. It fits over a steel frame that can be adjusted to tension the track over a drive wheel and a series of rollers which are all part of the suspension system.

Power is provided by a 2-stroke 100cc scooter engine, and transmitted to the track through a drive wheel made from an old scuba tank. What puts this build over the top is that all of this is neatly located inside the circumference of the track. Only the seat, handlebars and fuel tank are on the outside of the track. The foot pegs are as far forward as possible, which helps keep your center of gravity when stopping. It’s not nearly as bad as those self-balancing electric monocycles, but planning stops well in advance is advisable.

While it’s by no means the fastest bike out there it definitely looks like a ton of fun. Build plans are available to patrons of [Make it Extreme], but good luck licensing one as your daily driver. If that’s your goal, you might want to consider adding a cover over the track between the seat and handlebars to prevent your khakis from getting caught on your way to the cubicle farm.

Continue reading “Rideable Tank Tread: It’s A Monotrack Motorcycle That Begs You To Stop Very Slowly”