A Cyberdeck Built With Ergonomics In Mind

With a new decade looming over us, the hot new thing for hackers and makers everywhere is to build cyberdecks to go with the flashy black-and-neon clothing that the sci-fi films of old predicted we’d all be wearing come next year. [Phil Hagelberg] has been designing one based on his own ergonomic keyboard, prioritizing not only form but also function.

The Atreus mechanical keyboard has a split layout that foregoes the traditional typewriter-inherited staggered arrangement in favor of one that better fits the user’s hands. The reduced number of keys limits hand movement for a more comfortable writing experience, however if you use function keys often, the trade-off is that you’ll need to use an auxiliary key to access them.

The deck [Phil] documents for us here is built from the ground up around that same design and aims to be small enough for travel, yet pleasant enough for serious use. It’s gone through four revisions so far, including an interesting one where the keyboard is laid out on the sides for using while standing up. As for the brains of the machine, the past revisions have used different flavors of Raspberry Pi and even a Samsung Galaxy S4 phone, though the latest model has a Pine64 running the show. How much has changed between each finished prototype really goes to show that you don’t have to get it right the first time, and it’s always good to experiment with a new idea to see what works.

[Phil] is now moving onto a fifth prototype, and hopes to eventually sell kits for building the whole cyberdeck along with the kits already available for the standalone keyboard. We’ve been struck by the creativity shown in these cyberdeck builds, which range from reusing retro computer shells to completely printing out a whole new one for a unique look. We can’t say for sure if this custom form-factor will eventually surpass mass-produced laptops, but it sure would be hella cool if it did.

The Zen Of Mechanical Keyboard Wiring

Mechanical keyboards are all the rage right now, but the vast majority of them are purchased commercially. Only the most dedicated people are willing to put in the time and effort required to design and assemble their own custom board, and as you might imagine, we’ve featured a number of such projects here on Hackaday in the past.

But what makes this particular mechanical keyboard build from [kentlamh] so special isn’t the final product (though it’s certainly quite nice), but the care he took when hand-wiring all of the switches to the Teensy 2.0 microcontroller that serves as its controller. There’s no PCB inside this custom board, it’s all rainbow colored wires, individual diodes, and the patience to put it all together with tweezers.

[kentlamh] takes the reader through every step of the wiring process, and drops a number of very helpful hints which are sure to be of interest to anyone who might be looking to embark on a similar journey. Such as bending the diode legs en masse on the edge of a table, or twisting them around a toothpick to create a neat loop that will fit over the pin on the back of the switch.

He also uses a soldering iron to melt away the insulation in the middle of the wires instead of suffering through hundreds of individual jumpers. We’ve seen this trick before with custom keyboards, and it’s one of those things we just can’t get enough of.

Some will no doubt argue that the correct way to do this would be to use an automatic wire stripper, and we don’t necessarily disagree. But there’s something undeniably appealing about the speed and convenience of just tapping the wire with the iron at each junction to give yourself a bit of bare copper to work with.

Even if you aren’t enough of a mechanical keyboard aficionado to travel all the way to Japan to attend the official meetup or discuss the finer points of their design at the Hackaday Superconference, there’s an undeniable beauty to this custom board. With a little guidance from [kentlamh], perhaps it will be your own handwired masterpiece that’s next to grace these pages.

[Thanks to Psybird for the tip.]

A Macro Keyboard In A Micro Package

Remember back in the early-to-mid 2000s when pretty much every cheap USB keyboard you could find started including an abundance of media keys in its layout? Nowadays, especially if you have a customized or reduced-sized mechanical keyboard, those are nowhere to be seen. Whenever our modern selves need those extra keys, we have to turn to external peripherals, and [Gary’s] Knobo is one that looks like it could’ve come straight out of a fancy retail package.

The Knobo is a small macro keypad with 8 mechanical Cherry-style keys and a clickable rotary encoder knob as its main feature. Each key and knob gesture can be customized to any macro, and with five gestures possible with the knob, that gives you a total of thirteen inputs. On top of that, the build and presentation look so sleek and clean we’d swear this was a product straight off of Teenage Engineering’s money-printing machine.

The actions you can do with those inputs range from simple media controls with a volume knob all the way to shortcuts to make a Photoshop artist’s life easier. Right now you can only reprogram the Knobo’s Arduino-based firmware with an In-Circuit Serial Programmer to change what the inputs do, but [Gary] is currently working on configuration software so that users without any programming knowledge will be able to customize it too.

Knobs are just one of those things that everyone wants to use to control their computers, much like giant red buttons. Alternative input devices can range from accessibility-designed to just downright playful. Whatever the inspiration is for them, it’s always nice to see the creativity of these projects.

Continue reading “A Macro Keyboard In A Micro Package”

Jazzberry Bakes The Pi Into A Mechanical Keyboard

If you hang around Hackaday long enough, pretty soon you’ll start to see some patterns emerging. As the nexus of all things awesome in the hacking world, our front page offers a unique vantage point by which you can see what’s getting folks excited this particular month, year, or decade. Right now we can tell you hackers love the Raspberry Pi, 3D printing, and perhaps above all, they can’t get enough mechanical keyboards.

So that makes the Jazzberry by [Mattis Folkestad] something of a perfect storm in the hacker world. The project uses a 3D printed enclosure to combine a Raspberry Pi 3B+ and an Ajazz AK33 mechanical keyboard into a single unit like the home computers of old. Honestly, we’re just glad he didn’t sneak an ESP8266 in there; as the resulting combination might have been enough to crash the site.

That being said, we can’t help but notice there’s a lot of open space inside the 3D printed enclosure. Right now there’s nothing inside but the Raspberry Pi, which only takes up a fraction of the internal volume. Adding a battery and hard drive would be the logical next steps, but it could also be outfitted with a suite of radios and various other hacking and security research accoutrements. We’ve seen an influx of such builds over the last few months, and the Jazzberry seems like it could make a very slick entry into this burgeoning category of mobile pentesting devices.

The STL files are designed specifically for the combination of hardware that [Mattis] used, but it shouldn’t be too difficult to modify them for your own purposes. Even if you stick with the same AK33 keyboard, an upgrade to the impressively powerful Raspberry Pi 4 would be more than worth the time fiddling with the STLs in your CAD tool of choice. If you really want to go all in, add a display and you’re well on the way to that cyberdeck you’ve always wanted.

Tearing Apart Pulse Transformer Switches

If you like mechanical keyboards, you like switches. Historically, switches were weird, with strange capacitive rubber dome switches in Topre boards, buckling springs in the IBM Model M, and beamsprings in earlier IBM keyboards. This teardown of an HP signal generator has the weirdest keyboard switches ever. They’re being called pulse transformer switches, but they are the strangest, weirdest, and most complicated keyboard switch we’ve ever seen

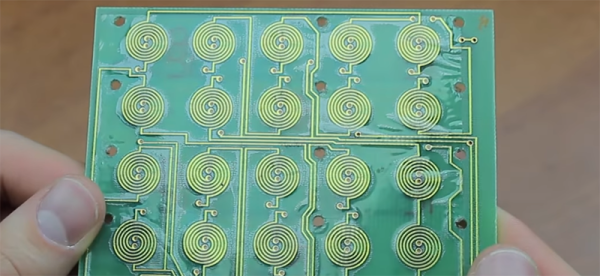
Mechanically, these keys are mounted on a 1×5 plastic frame with a plunger that presses down on a (brass?) photoetched plate. Mechanically, this is effectively a metal dome keyboard that simply presses a springy bit of metal against a contact on a printed circuit board. That’s the mechanical explanation, the electrical theory of operation is much, much weirder.

Electrically, this keyboard consists of a printed circuit board with two coils underneath each key. The circuit is wired up so two keys are ‘read’ at the same time with a pulse from a multiplexer. This pulse induces a current in the ‘sense’ coil of two individual keys which is sent to a comparator. If both keys are not pressed, the comparator sees a positive and a negative voltage which cancels out, meaning no keys are pressed. If one key is pressed, the metal dome shorts out the transformer underneath the keyboard, meaning only one voltage is seen by the comparator, and that key is registered as being pressed.

This is some crazy keyboard circuitry, and I do not say that lightly. There are ‘acoustic’ keyboards out there which consist of a row of keys striking a metal bar with an acoustic transducer on each end. By measuring the time it takes for the sound of a keypress to reach either end of the metal bar, a keypress can be registered. This is weird and expensive to build, and it’s still simpler than a pulse transformer switch. Check out the video below.

Continue reading “Tearing Apart Pulse Transformer Switches”

A Customizable Open Source Mechanical Numpad

Mechanical keyboards with reduced key counts are all the rage these days, but while those streamlined input devices might look cool on your desk, there are times when the traditional number pad or navigation keys are quite handy. Rather than just going without, [Mattia Dal Ben] decided to put together his own mechanical auxiliary input device for when the main board just isn’t cutting it.

[Mattia] is calling his creation the YamPAD, which stands for Yet Another Mechanical numPAD. One of the major goals for the project is to produce a design that’s easy for others to replicate and customize. His PCB has a socket designed to fit an Arduino Pro Micro, which combined with the QMK firmware, offers a wide array of configuration options. All that’s left is to add in the Cherry MX switches and some 1N4148 diodes.

But if you want to take things a little further, [Mattia] has that covered as well. The PCB design has provisions for RGB LED back-lighting should you find yourself in need of crunching some numbers in the dark. There’s even a spot for a 0.91″ OLED display if you really want to take things to the next level.

As of right now, the YamPAD is just a bare PCB, but [Mattia] is planning to design a 3D printed enclosure for it soon. The sketches he’s done so far depict a printed case which we think bears more than a passing resemblance to a Wii Fit Balance Board, but of course being a fully open source project, you’ll be free to design your own case based on the PCB’s dimensions. It would be interesting to see what other kind of customization the community might come up with once the design is finalized.

If you like the idea of the YamPAD, you might also want to check out the kbord we covered back in 2017. If you want to see the full keyboard done in this DIY open hardware style, there are already some choice entries into the field.

Need A Small Keyboard? Build Your Own!

If you want keyboards, we can get you keyboards. If you want a small keyboard, you might be out of luck. Unless you’re hacking Blackberry keyboards or futzing around with tiny tact switches, there’s no good solution to small, thin, customization keyboards. There’s one option though: silicone keyboards. No one’s done it yet, so I figured I might as well.

Unfortunately, there is no readily available information on the design, construction, or manufacture of custom silicone keypads. There is a little documentation out there, but every factory that does this seems to have copy and pasted the information from each other. Asking a company in China about how to do it is a game of Chinese Whispers. Despite this, I managed to build a custom silicone keypad, and now I’m sharing this information on how to do it with you.

Continue reading “Need A Small Keyboard? Build Your Own!”