Try Not To Fall Off The Backwards Brain Bike

[Destin] of SmarterEveryDay fame has a challenge for your brain : a bicycle where the handlebars turn the front wheel in the opposite direction of a typical bike (YouTube link). For example, turning the handlebars left turns the wheel right and vice versa. He warns you it’s harder than it looks.

The hack that pulls this off is a simple one compared to bike hacks we’ve previously covered. Gears on the head tube make this possible. It was built by his welder friends who challenged him to ride it. He couldn’t at first; determined to overwrite his brain’s memory of bike riding, he practiced until he finally succeeded. It took him eight months. When it was time to ride an old-fashioned bike, it only took him about twenty minutes to “un-learn” the Backwards Brain Bike. [Destin’s] biking illustrates neuroplasticity, memory, and learning in a fun way (fun for us; no doubt frustrating for him).

As a testament to the sponge-like brains of youth, [Destin’s] son learned to ride the Backwards Brain Bike in only two weeks.

Continue reading “Try Not To Fall Off The Backwards Brain Bike”

Injecting SD Card Bootloaders

[Frank] has a Ultimaker2 and wanted to install a new bootloader for the microcontroller without having physical access to the circuitry. That means installing a new bootloader for the ATMega2560 without an In System Programmer, and as is usual on AVRs, the bootloader can only be edited with an ISP. Additionally, modifying the bootloader in any way runs the risk of corruption and a bricked circuit. That’s okay, because [Frank] knows how to do it, and he’s here to show you how.

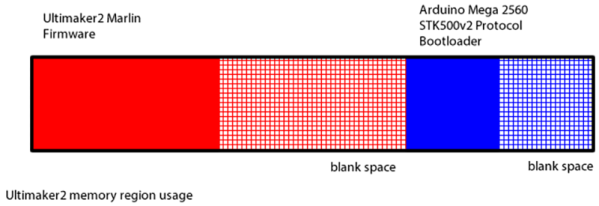
You can think of the memory layout of the ATMega in the Ultimaker as being split in half, with the printer firmware in the first half and the bootloader in the second half. There’s extra space in both halves, and that’s something that comes in very useful. When the circuit powers up, it jumps to the bootloader, does it’s thing, then jumps to the very beginning of the application code – a vector table – that starts up the actual firmware.

[Frank]’s trick to adding on to the bootloader is to place the SD card bootloader in the space normally reserved for applications, not where you would expect to find a bootloader. This code is accessed by the stock bootloader jumping into a modified vector table at the beginning of the application data that points to new executable code. That code is the actual SD card bootloader, but because it is in the application part of the memory, it can’t perform Flash writing or erasing. To fix that, a tiny bit of code is tacked onto the end of the bootloader for performing Flash writes and jumps back to the application part of memory.

New Part Day: SPI RAM And A Video Controller

Generating video signals with a microcontroller or old CPU is hard if you haven’t noticed. If you’re driving even a simple NTSC or PAL display at one bit per pixel, you’re looking at a minimum of around 64kB of RAM being used as a frame buffer. Most microcontrollers don’t have this much RAM on the chip, and the AVR video builds we’ve seen either have terrible color or relatively low resolution.

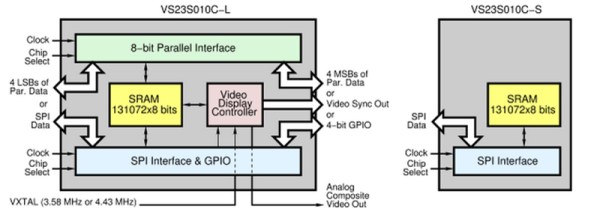
Here’s something interesting that solves the memory problem and also generates analog video signals. Yes, such a chip exists, and apparently this has been in the works for a very long time. It’s the VLSI VS23s010C-L, and it has 131,072 bytes of SRAM and a video display controller that supports NTSC and PAL output.

There are two chips in the family, one being an LQFP48 package, the other a tiny SMD 8-pin package. From what I can tell from the datasheets, the 8-pin version is only an SPI-based SRAM chip. The larger LQFP package is where the action is, with parallel and SPI interfaces to the memory, an input for the colorburst crystal, and composite video and sync out.

After looking at the datasheet (PDF), it looks like generating video with this chip is simply a matter of connecting an RCA jack, throwing a few commands to the chip over SPI, and pushing bits into the SRAM. That’s it. You’re not getting hardware acceleration, you’re going to have to draw everything pixel by pixel, but this looks like the easiest way to generate relatively high-resolution video with a single part.

Thanks [antibyte] for the tip on this one.

Store Digital Files For Eons In Silica-Encased DNA

If there’s one downside to digital storage, it’s the short lifespan.  Despite technology’s best efforts, digital storage beyond 50 years is extremely difficult. [Robert Grass, et al.], researchers from the Swiss Federal Institute of Technology in Zurich, decided to address the issue with DNA.  The same stuff that makes you “You” can also be used to store your entire library, and then some.

As the existence of cancer shows, DNA is not always replicated perfectly. A single mismatch, addition, or omission of a base pair can wreak havoc on an organism. [Grass, et al.] realized that for long-term storage capability, error-correction was necessary. They decided to use Reed-Solomon codes, which have been utilized in error-correction for many storage formats from CDs to QR codes to satellite communication. Starting with uncompressed digital text files of the Swiss Federal Charter from 1291 and the English translation of the Archimedes Palimpsest, they mapped every two bytes to three elements in a Galois field. Each element was then encoded to a specific codon, a triplet of nucleotides. In addition, two levels of redundancy were employed, creating outer- and inner- codes for error recovery. Since long DNA is very difficult to synthesize (and pricier), the final product was 4991 DNA segments of 158 nucleotides each (39 codons plus primers).

Continue reading “Store Digital Files For Eons In Silica-Encased DNA”

Mario Hack

Reprogramming Super Mario World From Inside The Game

[SethBling] recently set a world record speed run of the classic Super Nintendo game Super Mario World on the original SNES hardware. He managed to beat the game in five minutes and 59.6 seconds. How is this possible? He actually reprogrammed the game by moving specific objects to very specific places and then executing a glitch. This method of beating the game was originally discovered by Twitch user [Jeffw356] but it was performed on an emulator. [SethBling] was able to prove that this “credits warp” glitch works on the original hardware.

If you watch the video below, you’ll see [SethBling] visit one of the first available levels in the game. He then proceeds to move certain objects in the game to very specific places. What he’s doing here is manipulating the game’s X coordinate table for the sprites. By moving objects to specific places, he’s manipulating a section of the game’s memory to hold specific values and a specific order. It’s a meticulous process that likely took a lot of practice to get right.

Once the table was setup properly, [SethBling] needed a way to get the SNES to execute the X table as CPU instructions. In Super Mario World, there are special items that Mario can obtain that act as a power up. For example, the mushroom will make him grow in size. Each sprite in the game has a flag to tell the SNES that the item is able to act as a power up. Mario can either collect the power up by himself, or he can use his friendly dinosaur Yoshi to eat the power up, which will also apply the item’s effects to Mario.

The next part of the speed run involves something called the item swap glitch. In the game, Mario can collect coins himself, or Yoshi can also collect them by eating them. A glitch exists where Yoshi can start eating a coin, but Mario jumps off of Yoshi and collects the coin himself simultaneously. The result is that the game knows there is something inside of Yoshi’s mouth but it doesn’t know what. So he ends up holding an empty sprite with no properties. The game just knows that it’s whatever sprite is in sprite slot X.

Now comes the actual item swap. There is an enemy in the game called Chargin’ Chuck. This sprite happens to have the flag set as though it’s a power up. Normally this doesn’t matter because it also has a set flag to tell the game that it cannot be eaten by Yoshi. Also, Chuck is an enemy so it actually hurts Mario rather than act as a power up. So under normal circumstances, this sprite will never actually act as a power up. The developers never programmed the game to properly handle this scenario, because it was supposed to be impossible.

If the coin glitch is performed in a specific location within the level, a Chargin’ Chuck will spawn just after the coin is collected. When the Chuck spawns, it will take that empty sprite slot and suddenly the game believes that Yoshi is holding the Chuck in his mouth. This triggers the power up condition, which as we already know was never programmed into the game. The code ends up jumping to an area of memory that doesn’t contain normal game instructions.

The result of all of this manipulation and glitching is that all of the values in the sprite X coordinate table are executed as CPU instructions. [SethBling] setup this table to hold values that tell the game to jump to the end credits. The console executes them and does as commanded, and the game is over just a few minutes after it began. The video below shows the speed run but doesn’t get too far into the technical details, but you can read more about it here.

This isn’t the first time we’ve seen this type of hack. Speed runs have been performed on Pokemon with very similar techniques. Another hacker managed to program and execute a version of single player pong all from within Pokemon Blue. We can’t wait to see what these game hackers come up with next. Continue reading “Reprogramming Super Mario World From Inside The Game”

Hackaday Links Column Banner

Hackaday Links: The Last One Of 2014

The guy behind the Microslice, a tiny Arduino-controlled laser cutter, has a new Kickstarter out. It’s called the Multibox PC, and it’s exactly what you need if you want to turn a Raspi, Banana Pi, HummingBoard, or Odroid U3 into an all-in-one desktop. 14″ 1366 x 768 LCD, and speakers turns dev boards into a respectable little Linux box.

If you’re learning to design schematics and lay out PCBs, you should really, really think about using KiCAD. It’s the future. However, Eagle is still popular and has many more tutorials. Here’s another. [Mushfiq] put together a series of tutorials for creating a library, designing a schematic, and doing the layout.

Another kickstarter wristwatch. But wait, this thing has a circular display. That’s really cool. It’s a 1.4″ 220×220 pixel, 262k color display. No, the display doesn’t use a polar coordinate system.

[Jari] wrote a digital logic simulator, Atanua, started selling licenses, and figured out it wasn’t worth developing on his own anymore. As promised, Atanua is now open source. If you want to look at the finances behind Atanua, here you go.

In 1970, you didn’t have a lot of options when it came to memory. One of the best options was Intel’s 1405 shift register – 512 bits of storage. Yes, shift registers as memory. [Ken Shirriff] got his hands on a memory board from a Datapoint 2200 terminal. Each of the display boards had 32 of these shift registers. Here’s what they look like on the inside

There’s a lot of talk about North Korean hackers, and a quick review of the yearly WordPress stats for Hackaday puts a tear in our eye. This year, there were fifty-four views from the Democratic People’s Republic of Korea. That’s just great. It’s awesome to see the hacker ethos make it to far-flung lands and through highly restricted firewalls. There’s still a long road ahead of us, though, and we’ll redouble our efforts on bringing the hacker mindset to Tuvalu and Saint Helena in the year 2015.

Acoustic Delay Line Memory

Back in the olden days  when computers were both analog and digital, making RAM was actually very hard. Without transistors, the only purely electronic means of building a memory system was vacuum tubes; It could have been done, but for any appreciable amount of RAM means an insane amount of tubes, power, and high failure rates.

One of the solutions for early RAM was something called a delay line. This device used ultrasonic transducers to send a pulse through a medium (usually mercury filled tubes heated to 40°C) and reads it out at the other end. The time between the pulse being sent and received is just enough to serve as a very large, small capacity RAM.

Heated tubes filled with hundreds of pounds of mercury isn’t something you’d want sitting around for a simple electronics project. You can, however, build one out of a Radio Shack Electronics Learning Lab, a speaker, and a microphone.

[Joe] designed his delay line using an op-amp to amplify the train of acoustic pulses traveling through the air. A compactor picks up these pulses and sends them into a flip-flop. A decade counter and oscillator provide the timing of the pulses and a way to put each bit in the delay line. When a button on the electronics lab is pressed, a ‘tick’ is sent into the speaker where it travels across [Joe]’s basement, into the microphone, and back into the circuit.

The entire setup is able to store ten bits of information in the air, with the data conveniently visualized on an oscilloscope. It’s not a practical way to store data in any way, shape, or form, but it is an interesting peek into the world before digital everything.

Video below.

Continue reading “Acoustic Delay Line Memory”