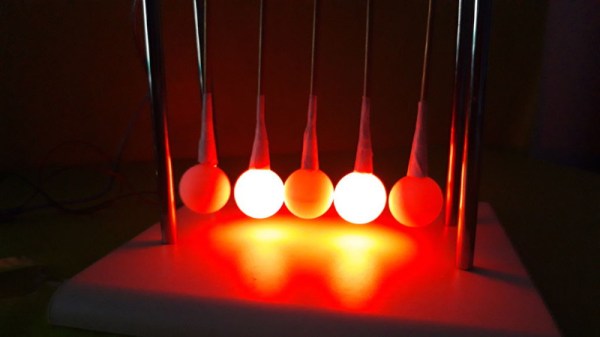
OpenISA Launches Free RISC-V VEGAboard

RISC architecture is gonna change everything, and I still can’t tell if we like that movie ironically or not. Nevertheless, RISC-V chips are coming onto the market, chipmakers seem really interested in not paying licensing fees, and new hard drives are shipping with RISC-V cores. The latest development in Open instruction sets chips comes from OpenISA. They’ve developed the VEGAboard, a dev board with two RISC-V chips and Arduino-style pin headers.

The VEGAboard comes loaded with an NXP chip which combines an ARM Cortex-M0 and Cortex-M4. So far, so good, but there are already dozens of boards that combine two ARM microcontrollers on a single development platform. The real trick is the RI5CY and Zero-RI5CY chips on the VEGAboard, a 4-stage RISC-V RV32IMCCXpulp CPU. This comes from the PULP platform, meant to be a small, low-power, but parallel platform for various processing needs. In short, with the VEGAboard, you’re not running a blink() sketch on the RISC-V microcontroller. You run the blink() sketch on the ARM microcontrollers, while using the RISC-V chip to read accelerometers and toggle pins. It’s a coprocessor, but it’s RISC-V.

Other features of the VEGAboard include 4MB of Flash, a light sensor, accelerometer, magnetometer, an RGB LED, OpenSDA serial debug adapter, an on-board BLE radio, and of course those wonky Arduino pin headers.

There are, or were, free VEGAboards available, but those are long gone. It’s still an interesting platform, though, and if you’d like to get your hands on one, production will resume shortly. Of course, if you need RISC-V right now, there are actual RISC-V Arduinos, a RISC-V with built-in neural networks, and SiFive will soon have a Linux-capable RISC-V multicore board. These are exciting times, and every day we’re seeing how RISC architecture is gonna change everything.

A Deep Dive Into Low Power WiFi Microcontrollers

The Internet of Things is eating everything alive, and the world wants to know: how do you make a small, battery-powered, WiFi-enabled microcontroller device? This is a surprisingly difficult problem. WiFi is not optimized for low-power operations. It’s power-hungry, and there’s a lot of overhead. That said, there are microcontrollers out there with WiFi capability, but how do they hold up to running off of a battery for days, or weeks? That’s what [TvE] is exploring in a fantastic multi-part series of posts delving into low-power WiFi microcontrollers.

The idea for these experiments is set up in the first post in the series. Basically, the goal is to measure how long the ESP8266 and ESP32 will run on a battery, using various sleep modes. Both the ESP8266 and ESP32 have deep-sleep modes, a ‘sleep’ mode where the state is preserved, a ‘CPU only’ mode that turns the RF off, and various measures for sending and receiving a packet.

The takeaway from these experiments is that a battery-powered ESP8266 can’t be used for more than a week without a seriously beefy battery or a solar panel. Run times are much longer with an open network as compared to a secured network, and that security eats up a ton of power: connecting to a secure network every now and again means your ESP might only run for a day, instead of a week.

There is another option, though: the ESP32. While the ’32 is vastly more powerful and more capable than the ESP8266, it also has a few improved features that help with power consumption. Importantly, there’s a bug in the ESP8266 where it drops into modem sleep instead of light sleep about half the time. This error was fixed in the ESP32, but all that power does come at a cost. On the whole, if you’re concerned about security, the ESP32 is slightly better, simply because it does the ‘security’ part of connecting to a WiFi network faster. This is really a remarkable amount of testing that’s gone into this write-up, so if you’re developing something battery-powered with any ESP, it’s well worth the read.

WebSockets Embedded With The ESP8266

It used to be that Web browsing was simple. You asked a server for some text, which was duly sent, and then formatted by your browser. Now a web page is as likely to be a full-blown application that is reading mail, editing text, or lots of other things and may use WebSockets to create a back channel to the server. Thanks to affordable hardware like the ESP8266 one of those things a modern web browser can do is sense and control the real world. [Acrobotic] has an interesting video about using WebSockets to allow a browser to talk to an ESP8266 web server in real time. You can see his simple demo in the video below.

Of course, you’ll use the usual language you use on the ESP8266 — [Acrobotic] uses C++ in the Arduino IDE. On the browser side you’ll use JavaScript, although that will be embedded in your C++ program which acts as a web server.

Continue reading “WebSockets Embedded With The ESP8266”

RIP DIP ARM

Every month, semiconductor manufacturers across the globe retire old devices. A product that has been superseded, isn’t selling well, or maybe whose application has declined, is removed from the catalogue and ceases to be manufactured. Usually these moments pass unnoticed, just one old device among many. Who is going to remark upon the demise of a chip for a VGA card for example, or a long-ago-left-behind Flash memory chip?

One has come to our attention that is pretty unremarkable, but that could concern some of our readers. NXP have stopped manufacturing the LPC810M021FN8. What on earth is an LPC810M021FN8, you ask, the answer being that it appears to have been the last microcontroller with an ARM core available in a DIP package. Even that in itself is hardly earth-shattering, for if you really must use an ARM core rather than any of the myriad 8, 16, or 32 bit microcontrollers still available you can always get a DIP breakout board for a small surface mount chip.

This turn of events comes as a reminder that, while breadboard-friendly and popular among a section of our community, DIP packages are now particularly old-school. Other once-popular devices such as the LPC1114 have also long-since ceased to be available in this format, and we have to wonder how long we will be able to take advantage of DIP packages for some of the other microcontroller families.

A few years ago this news might have come as something of a disaster, but it now has more of a sense of the passing of a bygone era. It’s normal to use microcontroller dev boards in a larger DIP format for prototyping, so maybe getting used to a bit of surface-mount soldering on a break-out board will be only for the truly hard-core when the last DIP package has been retired. Other than that of course, the 555 is still available in a DIP8, and you can make anything with one of them!

If you didn’t have a chance to take the 810 for a test drive, the usual suppliers still list it in stock, Adafruit have a starter pack for it, and it will no doubt be possible to find it in small quantities for years to come.

[Thanks Tod E. Kurt for the tip]

Getting Started With STM8

There are so many different CPUs today and often the hardest thing about using any of them is getting started and gathering the right software tools. If you’ve ever eyed up the very inexpensive STM8 processor, you’ll want to check out [Shane Burrell’s] video (see below) about how to get started with the STM8.

The STM8 isn’t a 32-bit processor — you could probably guess that from the name. [Shane] uses SDCC (small device C compiler) to target the little chip. He also shows how he manages a fairly substantial piece of code and how he controls the build process.

Continue reading “Getting Started With STM8”

Mbed Labs Chock Full Of Arm Goodies

One of the things we like about ARM processors is that there are a variety of options for library support. You can write your own code at the bare metal, of course, but you can also use many different abstraction libraries to make things easier. At the other end of the spectrum, there is Mbed, similar to the sort of libraries that Arduino supplies. Easy to use, although not always the best possible performance. Mbed now has an Mbed Labs site with a lot of extra goodies that go with the Mbed ecosystem, and it has quite a few interesting things.

You’ve always been able to write Mbed code in your browser — some people love that and some hate it and use locally-hosted tools like Platform.io. However, with the Mbed Lab, you can build and most importantly simulate your code in the browser (something we covered last year). There’s also a Javascript interpreter that runs on your chip, a small implementation of TensorFlow for deep learning, and a few other projects on the page.

Continue reading “Mbed Labs Chock Full Of Arm Goodies”

Electronics Workbench Goes Vertical With Pegboard Mounting

[JesusGomez] has certainly put work into his Vertical Laboratory concept. There’s a bit more to the idea than simply using 3D printed parts to move electronics from the desktop onto a metal pegboard, although that part is certainly nicely done. There are 3D models for securely mounting various hardware such as Raspberry Pi, Beaglebone, ESP32, cable management, breadboards, and other common parts to a metal pegboard. Instead of having parts and wires splayed across a workbench, it can be mounted and organized vertically. Having a project or prototype mounted on pegboard is easier to store, saves room, and frees up desk space in small work areas. It also makes for an organized and visually pleasing layout.

A clever piece of design is in the plastic mounts that he created. He wanted parts to remain securely mounted unless intentionally removed, allow different mounting orientations, and to never require access to the back side of the pegboard. To accomplish this, the parts use a combination of pegs that slide-lock with bendable sections that act as lock tabs. Once mounted, the parts stay put until the lock tabs are released by gently prying them out of position. Since mounting and removal can be done entirely from the front, wall mounted pegboards with inaccessible backs can be used.

Metal pegboard has its uses, even if the more common dead-tree version shows up more often in projects from DIY vacuforming to making a modular work surface for when space is at an absolute premium.