Powerful lasers get powerfully hot and if you don’t keep them cool you’ll pay the price. After two such experiences [NixieGuy] got smart and milled this flow sensor as a failsafe.
Laser cutters are awesome. But acquiring one can be expensive, and keeping them in working order is no small feat. From the gunk that builds up as a byproduct of vaporizing the cutting stock, to keeping the optics focused correctly, it’s a game that forces you to become a laser cutter operator and not merely a user. One of the worst things to deal with is having to replace a burnt out laser tube. They do have a life to them but in this case the filter on the water cooling system clogged and the tube cooked itself. Twice.
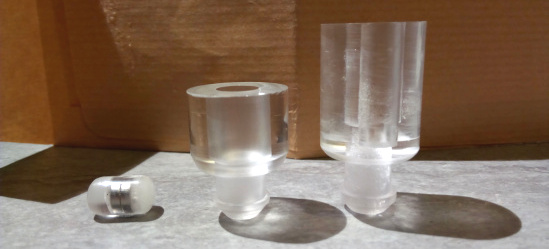
This flow sensor now acts as an interconnect with the laser enable line. Starting with an acrylic rod, [NixieGuy] machined out a center hole for a magnetic stopper, then milled three channels for water to pass around it. Each end of the rod was turned on a lathe to interface with plastic tubing of the water cooling system, and a slot was milled on the outside for a reed switch.
The demo video is below. You can see that when water flows it pushes the magnetic stop up (against gravity) where it engages the reed switch, allowing the laser to operate. If something impedes the flow of water (even if the pump still runs) the laser will be disabled and (hopefully) prevent future tube loss.
Want to see some of the oops moments faced by many a laser cutter operator? Check our guide on how to fail at laser cutting.
Continue reading “Milling A Flow Sensor To Safeguard A Laser Tube”