Hackaday Prize Entry: Modular, Low Cost Braille Display

A lot of work with binary arithmetic was pioneered in the mid-1800s. Boolean algebra was developed by George Boole, but a less obvious binary invention was created at this time: the Braille writing system. Using a system of raised dots (essentially 1s and 0s), visually impaired people have been able to read using their sense of touch. In the modern age of fast information, however, it’s a little more difficult. A number of people have been working on refreshable Braille displays, including [Madaeon] who has created a modular refreshable Braille display.

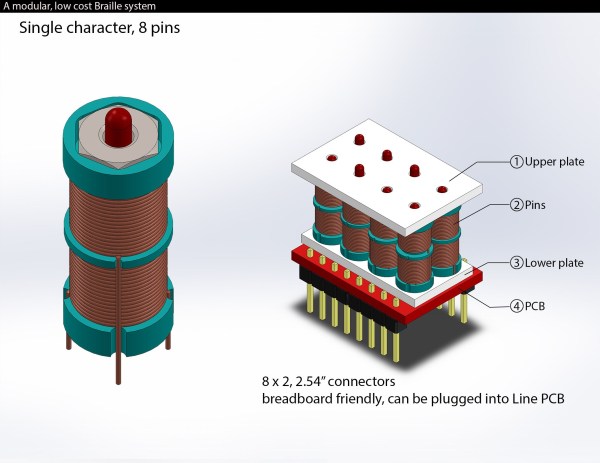
The idea is to recreate the Braille cell with a set of tiny solenoids. The cell is a set of dots, each of which can be raised or lowered in a particular arrangement to represent a letter or other symbol. With a set of solenoids, this can be accomplished rather rapidly. [Madaeon] has already prototyped these miniscule controllable dots using the latest 3D printing and laser cutting methods and is about ready to put together his first full Braille character.

While this isn’t quite ready for a full-scale display yet, the fundamentals look like a solid foundation for building one. This is all hot on the heels of perhaps the most civilized patent disagreement in history regarding a Braille display that’s similar. Hopefully all the discussion and hacking of Braille displays will bring the cost down enough that anyone who needs one will easily be able to obtain and use one.

Continue reading “Hackaday Prize Entry: Modular, Low Cost Braille Display”

The Key To Modular Smartphones

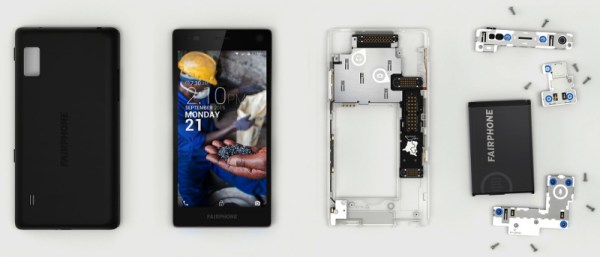
Cellphone startup Fairphone is now taking pre-orders for their modular smartphone, which is expected to start shipping in December of this year. Although I’m much more familiar with Google’s project Ara, this is the first modular concept to make it to market. It does lead me to a few questions though: is this actually a modular smartphone, and how widely will modular concepts be adopted?

Continue reading “The Key To Modular Smartphones”

Hackaday Prize Entry: 3D Printed Modular Keyboard

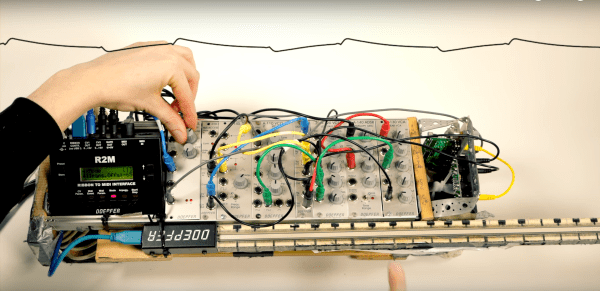
There is a big community of people creating all kinds of synthesizers, but until now no one has attempted to make a keyboard controller like the one [Tim] created. Not only has he created the keyboard synthesizer, but he’s developed one that is modular and 3D printed so you can just expand on the synth you have rather than go out and buy or build a new one.

The design has a lot useful features. Since the design is modular, you can 3D print extra octaves of keys if you need, and simply build off of the existing keyboard. The interior has mounts that allow circuit boards to be screwed down, and the exterior has plenty of available places to put knobs or sliders. Anything that could possibly be built into a synthesizer is possible with this system, and if you decide you want to start small, that’s possible too!

All of the design files are available from Pinshape if you want to get started. The great thing about this controller is that you could use a 555-based synth in this keyboard controller, or a SID synth, or any other synth you could think of!

The 2015 Hackaday Prize is sponsored by:

A Modular 1GHz Spectrum Analyzer

an

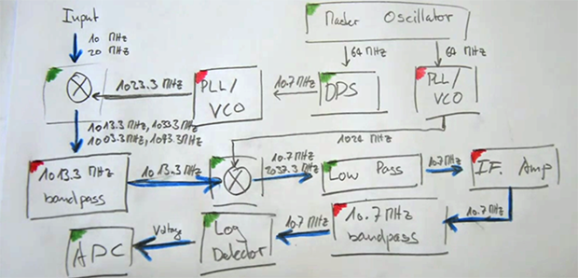
[MrCircuitMatt] has been doing a lot of radio repair recently, quickly realized having a spectrum analyzer would be a useful thing to have. Why buy one when you can build one, he thought, and he quickly began brushing up on his RF and planning out the design of a 1000 MHz spectrum analyzer

The project is based on Scotty’s Spectrum Analyzer, a sweep-mode, modular 1GHz spectrum analyzer that is, unfortunately, designed entirely in ExpressPCB. [Matt] didn’t like this proprietary design software tied to a single board house. The basic building blocks of [Scotty]’s spectrum analyzer were transferred over to KiCAD, the boards sent off to a normal, Chinese board house.

In the second video, [Matt] goes over the design of the control board, a small module that connects the spectrum analyzer to the parallel port of a PC. There’s a lot of well thought out design in this small board, a good thing, too, since he’s powering his VCO with a switched mode supply. The control board has a 32-bit I/O, so how’s he doing that with a parallel port, what is ultimately an 8-bit port? A quartet of 74ACT573, a quad buffer with latch enable. Using the eight data lines on the parallel port allows him to toggle some pins while the ancient pins on the parallel bus – Strobe, Select Printer, and Line Feed control the latches on each of the buffers. This gives him the ability to write to 32 different pins in his spectrum analyzer with a parallel port.

Right now, [Matt] is wrapping up the construction of his control board, with the rest of the modules following shortly. He thinks the completed analyzer might even be cheaper than a professional, commercial offering, and we can’t wait to see another update video.

Continue reading “A Modular 1GHz Spectrum Analyzer”

CuteUino: Only Use The Parts Of The Arduino That You Need For Each Project

CuteUino

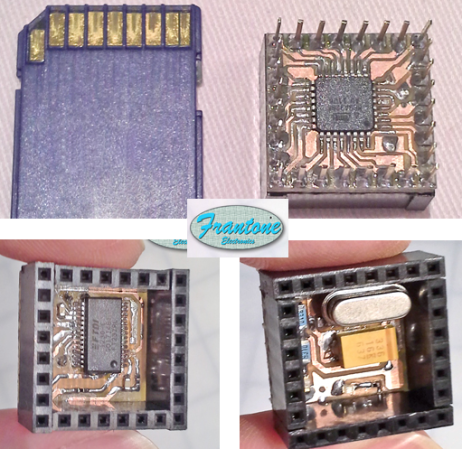
[Fran’s] been working on her own version of the Arduino. She calls it CuteUino for obvious reasons. The size of the thing is pretty remarkable, fitting within the outline of an SD card. But that doesn’t mean you won’t get the power that you’re used to with the device. She’s broken it up into several modules so you can choose only the components that you need for the project.

The main board is shown on the right, both top and bottom. It sports the ATmega328p (it’s hard to believe we could make out the label on the chip package in the clip after the break) in a TQFP-32 package soldered to the underside of what she calls the Brain Module. You can also see the extra long pins which stick through from the female pin headers mounted on the top side of the board. Inside of these pin headers you’ll find the clock crystal, status LEDs, and a capacitor. The other module is an FTDI board used to connect the AVR chip to a USB port.

You’ll definitely want to check out her prototyping post for this project. She uses a very interesting technique of combining two single-sided boards to make a 3-layer PCB. The side that was not copper clad is fitted with copper foil by hand to act as a ground plane for the vias. Neat!

Continue reading “CuteUino: Only Use The Parts Of The Arduino That You Need For Each Project”

A Respectable Electronics Bench That’s Not A Pain To Move

electronics-workstation-that-moves

Apartment dwellers who are living the nomadic lifestyle take note. You don’t need to live your tinkering lifestyle out of a toolbox. Here is a great example of a respectable electronics bench which breaks down when it’s time to move (translated). We’re sure you already belong to your local hackerspace for the big projects, but this corner office will let you take some of your creations home for continued tweaking.

The bench uses slotted aluminum rails as the support structure. The slots accept small nuts, which have a spring-loaded ball bearing to keep them from sliding freely ([Nerick] mentions this is especially nice for working with the vertical runs). These fasteners ended up being the most costly component.  The desktop itself is the largest solid piece. It was machined using a CNC mill (we already mentioned having a hackerspace membership) so that the mounting screws are countersunk to leave a perfectly flat surface. It’s clean, has a small footprint, and gives you a place to dump all of your gear. What else could you ask for?

Modular Computing

[youtube=http://www.youtube.com/watch?v=ZBFoFYhC9B4]

This is the Illuminato X Machina, a “cellular” style computing system.  Each unit is a fully functioning computer with its own processor, storage and communications.  You can watch above as a change in the operating software is propagated across the grid. You can see the LEDs in the video going nuts, there are actually LEDs on the sides too. [Justin] described it to us as a personal fireworks show on your desk.  This system is fully open with the schematics and source code available on their site. You might recognize these guys too, we covered their Open Source GameBoy.