Freeform ESP8266 Network Attached Data Display

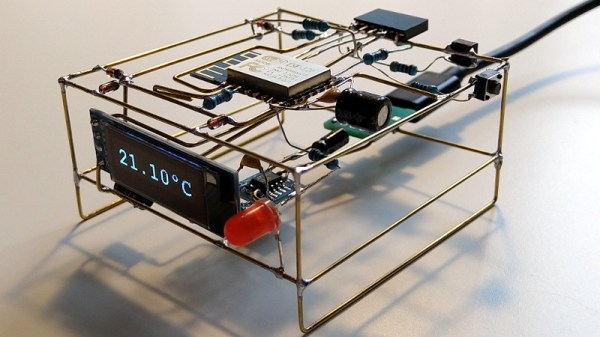
Like many of us, [Josef Adamčík] finds himself fascinated with so-called “freeform” electronic designs, where the three dimensional circuit makes up sections of the device’s structure. When well executed, such designs really blur the line between being a practical device and an artistic piece. In fact his latest design, an ESP8266 MQTT client, would seem to indicate there might not be much of a “line” at all.

The inspiration for this project actually comes from something [Josef] had worked on previously: an ESP8266-based environmental monitoring system. That device had sensors to pick up on things such as humidity and ambient light level, but it didn’t have a display of its own; it just pushed the data out onto the network using MQTT. So he thought a companion device which could receive this environmental data and present it to him in a unique and visually appealing way would be a natural extension of the idea.

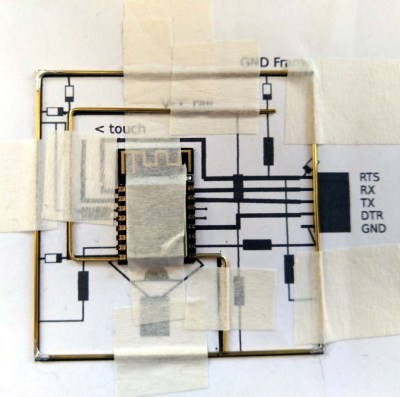
As the display doesn’t need any local sensors of its own, it made the design and construction much easier. Which is not to say it was easy, of course. In this write-up, [Josef] takes the reader through the process of designing each “layer” of the circuit in 2D, printing it out onto paper, and then using that as a guide to assemble the real thing. Once he had the individual panels done, he used some pieces of cardboard to create a three dimensional jig which helped him get it all soldered together.

On the software side it’s pretty straightforward. It just pulls the interesting bits of information off of the network and displays it on the OLED. Right now it’s configured to show current temperature on the display, but of course that could be changed to pretty much anything you could imagine if you’re looking to add a similar device to your desktop. There’s also a red LED on the device which lights up to let [Josef] know when the batteries are getting low on the remote sensor unit; a particularly nice touch.

If you’d like to see more of these freeform circuits, we’d advise you to checkout the finalists for our recently concluded “Circuit Sculpture” contest. Some of the finalists are truly beyond belief.

Not Happy With Smart Bulbs? Make Your Own

The idea of the so-called “smart bulb” sounds good; who wouldn’t want to be able to verify the porch light is on if you’re out of town for the night, or check to see if you left the bathroom lights on in your rush out the door in the morning? But in practice, it can be a nightmare. Each brand wants to push their own protocol. Even worse, it seems you can’t get anything done without signing up for three different services, each with its own application that needs to be installed on your phone. It’s a frustrating and often expensive mire to find yourself in.

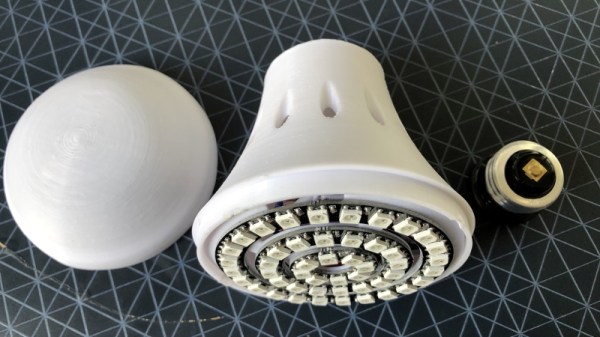
[Dom Gregori] liked the Hue bulbs offered by Philips, but didn’t want to buy into the whole ecosystem of phone apps and hardware hubs they require. So he decided to create his own open source version that would do everything he wanted, without any of the seemingly unavoidable baggage of the commercial offerings. The final result is a professional looking ESP8266 controlled RGB bulb that hooks into Home Assistant via MQTT.

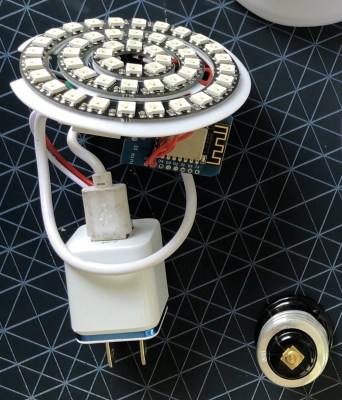
Looking at his Bill of Materials, it’s actually pretty amazing to see how little it really takes to pull a project like this off. Outside of the Wemos D1 Mini board, [Dom] just needed a few concentric WS2812 rings, and a USB charger small enough to fit into the base of his 3D printed enclosure.

We especially like how he handled the socket-side of the bulb, as that’s the part that would have left us scratching our heads. Rather than trying to salvage the base from an existing bulb, or come up with his own printed piece to stick in the socket, he just used a cheap and readily available light socket adapter. The solution might be a little bulky, but we like how he’s deftly avoided having to handle any AC voltages in this project.

Over the last couple years, we’ve seen more and more smart bulb related content come our way. From the ever popular teardown of a new entry into the market to the sobering realization that your light bulbs might provide the key attackers need to access your network, it’s been fascinating to see the transformation of these once simple pieces of hardware into something far more complex.

Transcending The Stack With The Right Network Protocol

The increase in network-connected devices the past years has been something of a dual-edged sword. While on one hand it’s really nice to have an easy and straight-forward method to have devices talk with each other, this also comes with a whole host of complications, mostly related to reliability and security.

With WiFi, integrating new devices into the network is much trickier than with Ethernet or CAN, and security (e.g. WPA and TLS) isn’t optional any more, because physical access to the network fabric can no longer be restricted. Add to this reliability issues due to interference from nearby competing WiFi networks and other sources of electromagnetic noise, and things get fairly complicated already before considering which top-layer communication protocol one should use. Continue reading “Transcending The Stack With The Right Network Protocol”

The Heat Is On With This ESP8266 Controlled Sauna

We’ll be perfectly honest: sitting inside a heated box sounds just a bit too much like torture for our tastes. But if we did somehow find ourselves in possession of a fancy new sauna, we’d more than likely follow in the footsteps of [Al Betschart] and make the thing controllable with the ESP8266. After all, if you’re going to be cooked alive, you might as well do it on your own terms.
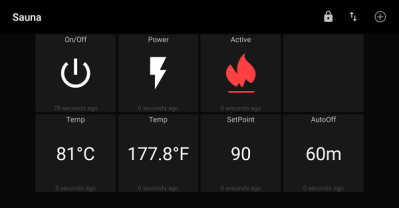
The sauna itself was purchased as a kit, and included an electric heater controlled by a thermostat. As explained in his detailed documentation, [Al] integrated a Sonoff TH16 into the original heater circuit so he could control power to the coils remotely. The TH16 also includes support for a thermal sensor, which allowed him to get a reading on the sauna’s internal temperature. The new electronics were mounted in a weather-proof box on the back of the sauna, complete with an external WiFi antenna to help get a good signal back to the house.

At this point the project could technically be done if all you wanted was remote control, but [Al] wanted to create a replacement firmware for the Sonoff that was specifically geared towards the sauna. So he came up with some code that uses MQTT to connect the heater to his home automation system, and allows configuring things like the maximum temperature and how long the sauna will run before turning itself off.

Interestingly, the company who makes these saunas thought the work [Al] did to integrate their product into his home automation system was so impressive they actually interviewed him about it and put it up on their site for others who might be inspired by his work. We’ve covered a lot of hacks to consumer devices here at Hackaday, and it’s exceedingly rare for a company to be so supportive of customers fiddling around with their products (especially in a case like this where there’s a real chance of burning your house down), so credit where credit is due.

The last time we brought you a sauna hack it was quite literally in a van down by the river, so the addition of an ESP8266 certainly brings this more into our comfort zone. Figuratively, if not literally.

[Thanks to Jon for the tip.]

Arduino Enters The Cloud

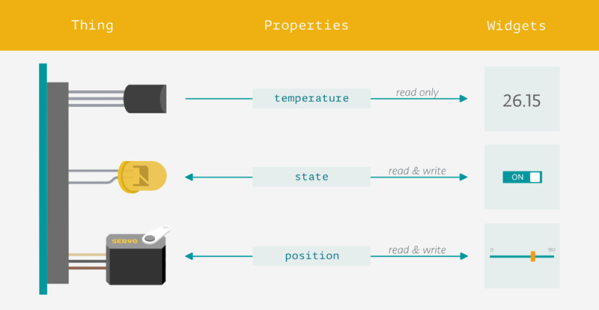
Love it or hate it, for many people embedded systems means Arduino. Now Arduino is leveraging its more powerful MKR boards and introducing a cloud service, the Arduino IoT Cloud. The goal is to make it simple for Arduino programs to record data and control actions from the cloud.

The program is in beta and features a variety of both human and machine interaction styles. At the simple end, you can assemble a dashboard of controls and have the IoT Cloud generate your code and download it to your Arduino itself with no user programming required. More advanced users can use HTTP REST, MQTT, Javascript, Websockets, or a suite of command line tools.

Continue reading “Arduino Enters The Cloud”

Controlling Non-Googley Devices With Google Assistant

In the near future of the Smart Home, you will be able to control anything with your voice. Assuming that everything supports the Smart Home standard you chose, that is. If you have a device that supports one of the other standards, you’ll end up uselessly yelling at it. Unless you use gBridge. As the name suggests, gBridge is a bridge between Google Assistant devices and the rest of the smart home universe. It’s an open source project that is available as a Docker image can be run on a low power device in the home, or on a hosted service.

Fundamentally, gBridge is a Google Assistant to MQTT translator. Message Queuing Telemetry Transport (MQTT) is the messaging protocol that many smart home devices use, as it runs over TCP and doesn’t take much power to implement. We’ve covered how to bash around in MQTT and do much of this yourself here, but gBridge looks to be somewhat easier to use. It’s just come out of beta test, and it looks like it might be a good way to get into Smart Home hacking.

There are, of course, plenty of other ways of doing this, such as IFFFT, but [Peter Kappelt], the brains behind gBridge, claims that it is more flexible, as it offers support for the whole Google Assistant vocabulary, so you can do things like put devices into groups or do more conditional control (such as if the light level in the hallway rises above a certain amount, start recording with a camera) with non-Google devices. [Peter] is also looking to run gBridge as a hosted service, where he does the behind the scenes stuff to update servers, etc, in return for a small fee.

Continue reading “Controlling Non-Googley Devices With Google Assistant”

The Linux Throwie: A Non-Spacefaring Satellite

Throwies occupy a special place in hardware culture — a coin cell battery, LED, and a magnet that can be thrown into an inaccessible place and stick there as a little beacon of colored light. Many of us will fondly remember this as a first project. Alas, time marches inevitably on, and launching cheerful lights no longer teaches me new skills. With a nod to those simpler times, I’ve been working on the unusual idea of building a fully functional server that can be left in remote places and remain functional, like a throwie (please don’t actually throw it). It’s a little kooky, yet should still deliver a few years of occasional remote access if you leave it somewhere with sunlight.

A short while ago, I described the power stages for this solar-powered, cloud accessible Linux server. It only activates on demand, so a small solar cell and modest battery are sufficient to keep the whole show running.

Where we left off, I had a solar cell that could charge a battery, and provide regulated 12 V and 5 V output. For it to be a functional device, there are three high level problems to solve:

  1. It must be possible to set up the device without direct physical access
  2. You must be able to remotely turn it on and off as needed.
  3. It needs to be accessible from the Internet.

The funny thing is, this hardware reminds me of a satellite. Of course it’s not meant to go into space, but I do plan to put it somewhere not easy to get to again, it runs off of solar power, and there’s a special subsystem (ESP8266) to tend the power, check for remote activation, and turn the main computer (Raspberry Pi 3) on and off as necessary. This sounds a lot like space race tech, right?

As I have a bit more code than usual to share with you today, I’ll discuss the most interesting parts, and provide links to the full firmware files at the end of the article.

Continue reading “The Linux Throwie: A Non-Spacefaring Satellite”