The Linux Throwie: Powering A Linux Server With A 0.3W Solar Panel

Have you ever had one of those moments, when you’re rummaging through your spare parts heap, and have a rather bizarre project idea that you can’t quite get out of your head? You know, the ones that have no clear use, but simply demand to be born, of glass and steel and silicon?

This time, the stubborn idea in question was sort of like a solar-rechargeable LED throwie, but instead of a blinking light, it has a fully cloud-accessible embedded Linux server in the form of a Raspberry Pi 3 Model B+. Your choice of embedded Linux board should work — I just happen to have a lot of these due to a shipping error.

There were two main challenges here: First, it would have to combine the smallest practical combination of solar panel, power supply, and Li-ion cell that could run the Raspberry Pi. Second, we’ll need to remotely activate and access the Pi regardless of where it is, as well as be able to connect it to WiFi without direct physical access. In this article we’ll be dealing with the first set of problems — stay tuned for the rest.

Continue reading “The Linux Throwie: Powering A Linux Server With A 0.3W Solar Panel”

Voice Controlled Stereo Balance With ESP8266

A stereo setup assumes that the listener is physically located between the speakers, that’s how it can deliver sound equally from both sides. It’s also why the receiver has a “Balance” adjustment, so the listener can virtually move the center point of the audio by changing the relative volume of the speakers. You should set your speaker balance so that your normal sitting location is centered, but of course you might not always be in that same position every time you listen to music or watch something.

[Vije Miller] writes in with his unique solution to the problem of the roving listener. He’s come up with a system that can adjust the volume of his speakers without having to touch the receiver’s setup, in fact, he doesn’t have to touch anything. By leveraging configurable voice control software running on his computer, his little ESP8266-based devices do all the work.

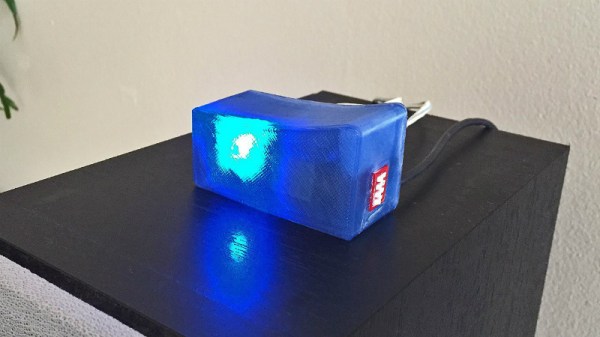
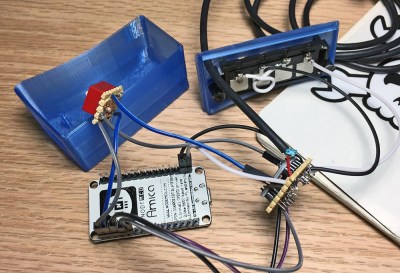
Each speaker has its own device which consists of a NodeMCU ESP8266 and X9C104 digital potentiometer inside of a 3D printed case. The audio terminal block on the gadget allows him to connect it inline between the speaker and the receiver, giving [Vije] the ability to adjust the volume through software. The source code, which he’s posted on the Hackaday.io project page, uses a very simple REST-style API to change speaker volume based on HTTP requests which hit the ESP8266’s IP address.

The second part of the project is a computer running VoiceAttack, which lets [Vije] assign different actions based on what the software hears. When he says the appropriate command, the software goes through and fires off HTTP requests to the nodes in the system. Everything is currently setup for two speakers, but it shouldn’t be too difficult to expand to more speakers (or even rooms) with some adjustment to the software.

It’s not the first voice controlled speaker we’ve ever seen, but it does solve a very specific problem in a unique way. We’d be interested in seeing the next logical step, which would see this technology integrated into the speaker itself.

Continue reading “Voice Controlled Stereo Balance With ESP8266”

The Solution To Oversized Dev Boards: A Literal Hack

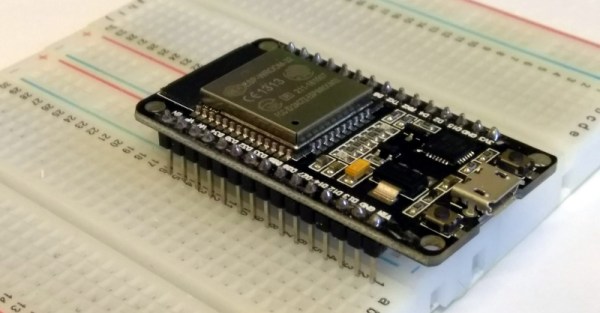
Oh, there was a time when you could prototype just about everything on a breadboard. The CPU in your computer came in a DIP package, and there were no BGA packages. to be found anywhere. In the forty years since then, chips have gotten smaller, packages have gotten more cramped, and you can barely hand-solder the coolest chips anymore. No worries — companies are still spitting out dev boards with 0.1″ headers, but there’s a problem: they don’t fit on a solderless breadboard. They’re too wide. Our world is falling apart.

[Luc] had a problem when he was playing with a few NodeMCU dev boards. These are too wide for a breadboard. [Luc] came up with not just one solution, but two. This is how you prototype with dev boards that are too large.

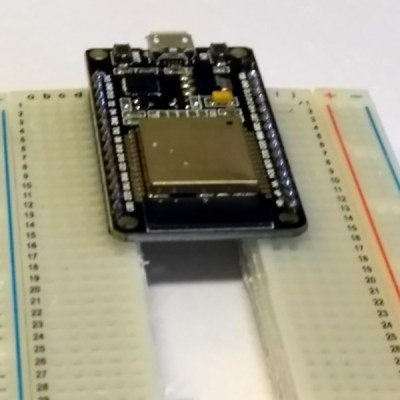
The solution came to [Luc] when he realized the center of every breadboard has no electrical connections, and was simply held together by a little piece of plastic. Yes, he took a hacksaw to the breadboard. This is technically a hack.
With two halves of a solderless breadboard torn asunder, [Luc] had an easy way to prototype with dev boards that are just too wide. But there is a simpler solution [Luc] realized after he destroyed a breadboard: those ubiquitous solderless breadboards have detachable power rails. If you simply take one of those power rails off, you have an easy way to use two breadboards across a module that’s too wide for one solderless breadboard.

Is this a hack? Oh, absolutely. [Luc] used a hacksaw. It’s also a nice reminder of a common trick that the noobies might not know. Thanks for that, [Luc].

What’s Behind The Door? An IoT Light Switch

We’re not sure who designed [Max Glenister]’s place, but they had some strange ideas about interior door positioning. The door to his office is right next to a corner, yet it opens into the room instead of toward the wall. Well, that issue’s been taken care of. But the architect and the electrician got the last laugh, because now the light switch is blocked by the open door.

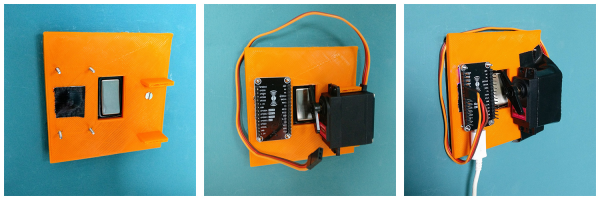
Folks, this is the stuff that IoT is made for. [Max] here solved one problem, and another sprang up in its place. What better reason for your maiden voyage into the cloud than a terrible inconvenience? He studied up on IoT servo-controlled light switching, but found that most of the precedent deals with protruding American switches rather than the rockers that light up the UK. [Max] got what he needed, though. Now he controls the light with a simple software slider on his phone. It uses the Blynk platform to send servo rotation commands to a NodeMCU, which moves the servo horn enough to work the switch. It’s simple, non-intrusive, and it doesn’t involve messing with mains electricity.

His plan was to design a new light switch cover with mounting brackets for the board and servo that screws into the existing holes. That worked out pretty well, but the weight of the beefy servo forced [Max] to use a bit of Gorilla tape for support. He’s currently dreaming up ways to make the next version easily detachable.

Got those protruding American switches? [Suyash] shed light on that problem a while back.

Track Everything, Everywhere With An IoT Barcode Scanner

I’ve always considered barcodes to be one of those invisible innovations that profoundly changed the world. What we might recognize as modern barcodes were originally designed as a labor-saving device in the rail and retail industries, but were quickly adopted by factories for automation, hospitals to help prevent medication errors, and a wide variety of other industries to track the movements of goods.

Medication errors in hospitals are serious and scary: enter the humble barcode to save lives. Source: The State and Trends of Barcode, RFID, Biometric and Pharmacy Automation Technologies in US Hospitals

The technology is accessible, since all you really need is a printer to make barcodes. If you’re already printing packaging for a product, it only costs you ink, or perhaps a small sticker. Barcodes are so ubiquitous that we’ve ceased noticing them; as an experiment I took a moment to count all of them on my (cluttered) desk – I found 43 and probably didn’t find them all.

Despite that, I’ve only used them in exactly one project: a consultant and friend of mine asked me to build a reference database out of his fairly extensive library. I had a tablet with a camera in 2011, and used it to scan the ISBN barcodes to a list. That list was used to get the information needed to automatically enter the reference to a simple database, all I had to do was quickly verify that it was correct.

While this saved me a lot of time, I learned that using tablet or smartphone cameras to scan barcodes was actually very cumbersome when you have a lot of them to process. And so I looked into what it takes to hack together a robust barcode system without breaking the bank.

Continue reading “Track Everything, Everywhere With An IoT Barcode Scanner”

Morphing Digital Clock Will Show You A Good Time

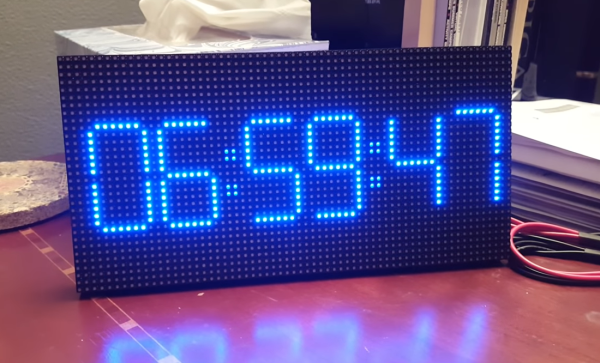
A few weeks ago, [HariFun] set out to emulate a 7-segment display with an LED matrix. Seems easy enough, right? Right. He also wanted to come up with a new way to transition between digits, which is a much harder task. But he did it, and it’s really cool. At a viewer’s suggestion, [Hari] used the transition as the basis for a mesmerizing clock that brings the smooth sweep of an analog second-hand into the digital age.

This is the coolest way to watch the time pass since the hourglass. You can almost hear the light move as one digit slides into the next. Each transition is totally unique, so depending on the digit this involves one or more vertical segments sliding from right to left, or multiple segments moving in a counter-clockwise circle.

You too can watch time glide by with little more than a 64×32 RGB LED matrix, a NodeMCU, and [Hari]’s digit transition code. It only costs about $25 to build, and you really can’t beat the quality of instruction he’s put together. Take a second or two and check it out after the break.

If you prefer OLEDs and vertical transitions, there’s a clock for that, too.

Continue reading “Morphing Digital Clock Will Show You A Good Time”

Move Aside Mercury: Measuring Temperature Accurately With An RTD

Temperature is one of the most frequently measured physical quantities, and features prominently in many of our projects, from weather stations to 3D printers. Most commonly we’ll see thermistors, thermocouples, infrared sensors, or a dedicated IC used to measure temperature. It’s even possible to use only an ordinary diode, leading to some interesting techniques.

Often we only need to know the temperature within a degree Celsius or two, and any of these tools are fine. Until fairly recently, when we needed to know the temperature precisely, reliably, and over a wide range we used mercury thermometers. The devices themselves were marvels of instrumentation, but mercury is a hazardous substance, and since 2011 NIST will no longer calibrate mercury thermometers.

A typical Pt100 RTD probe

Luckily, resistance temperature detectors (RTDs) are an excellent alternative. These usually consist of very thin wires of pure platinum, and are identified by their resistance at 0 °C. For example, a Pt100 RTD has a resistance of 100 Ω at 0 °C.

An accuracy of +/- 0.15 °C at 0 °C is typical, but accuracies down to +/- 0.03 °C are available. The functional temperature range is typically quite high, with -70 °C to 200 °C being common, with some specialized probes working well over 900 °C.

It’s not uncommon for the lead wires on these probes to be a meter or more in length, and this can be a significant source of error. To account for this, you will see that RTD probes are sold in two, three, and four wire configurations. Two-wire configurations do not account for lead wire resistance, three-wire probes account for lead resistance but assume all lead wires have the same resistance, and four-wire configurations are most effective at eliminating this error.

In this article we’ll be using a 3-wire probe as it’s a good balance between cost, space, and accuracy. I found this detailed treatment of the differences between probe types useful in making this decision.

Continue reading “Move Aside Mercury: Measuring Temperature Accurately With An RTD”