Massive Shift Register Switches Lights

Sometimes you have to switch a light. Maybe it’s an LED but sometimes it’s mains-powered. That’s not too hard, a transistor and a relay should do it. If you have to switch more lights, that’s not too bad either, as long as your microcontroller has enough free GPIOs. But, if you need to switch a large number of lights, like 256 of them, for example, you’re going to need something else.

[Jan]’s project didn’t switch quite that many lights, but 157 of them is still enough of a chore to need a creative solution so he decided to use a 256-bit shift register to do the legwork. The whole thing is powered by a NodeMCU ESP8266 and was professionally built on DIN rails in a metal enclosure.

The build is interesting, both from a technical point of view and from an artistic one. It looks like it uses more than a mile of wiring, too. The source code is also available on the project page if you happen to have a need for switching a huge number of lightbulbs. Incandescent blulbs aren’t only good for art installations and lamps, though, they can also be used in interesting oscillator circuits too.

Look Out Nest — Here Comes The WIoT-2

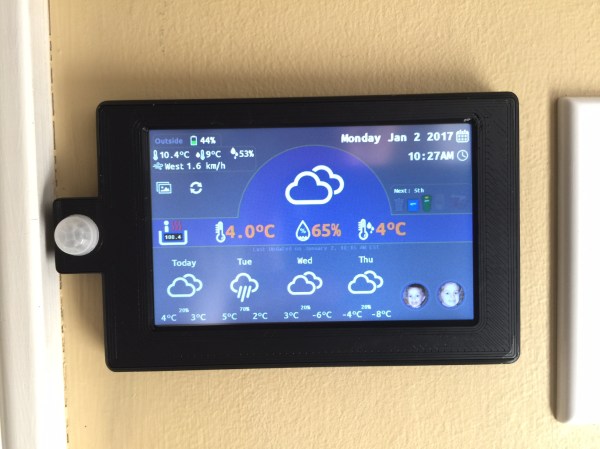
[Dave] is an avid hacker and no stranger to Hackaday. When he decided to give his IoT weather display an upgrade, he pulled out all the stops.

The WIoT-2 is less of a weather station and more of an info center for their house — conveniently located by their front door — for just about anything [Dave] or his partner need to know when entering or exiting their home. It displays indoor temperature and humidity, date, time, garbage collection schedule, currency exchange rates, whether the garage door is open or closed, the hot tub’s temperature, a check in for his kids, current weather data from a custom station [Dave] built outside his house, and the local forecast.

WIoT-2’s display is a Nextion TFT and the brains behind the operation is a NodeMCU 8266. He made extensive use of Blynk to handle monitoring of the various feeds, and will soon be integrating master control for all the networked outlets in the house into the system. He found setting up the hardware to be fairly clear-cut but notes that he cannot have the screen powered on when uploading sketches to the NodeMCU.  He circumvented the problem by adding a latching switch to the screen’s power line.

[Dave] curated a robust explanation of his build that includes tips, tricks, code — and a how-to to boot! If you’re not already starting your own build of this info suite, you may be tantalized by some of his other projects.

Continue reading “Look Out Nest — Here Comes The WIoT-2”

Monitor Power Consumption Of Low-Power Devices

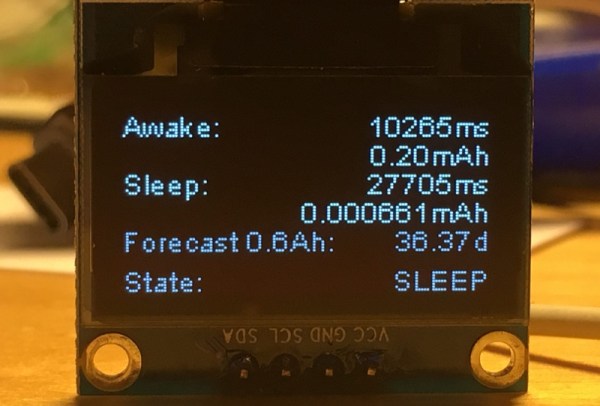
Perhaps the most important consideration to make when designing a battery-operated device of any kind is the power consumption. Keeping it running for longer between battery changes is often a key design point. To that end, if you need to know how small programming changes will impact the power consumption of your device then [Daniel] has a great tool that you might find helpful: an ESP8266-based live power meter.

The power meter itself is battery-powered via a 600 mAh battery and monitors an e-paper module, which also displays information about power consumption. It runs using a NodeMCU and measures voltage and current across a 100-ohm resistor to calculate the power use, although the resolution does start to get noisy when the device is in standby/sleep mode. One presumes this could be solved by changing the value of the resistor in order to get more accurate measurements at the expense of losing accuracy during moments of high power consumption.

While this power monitor was built specifically to monitor power consumption on this particular e-paper display project, it should be easily portable into other battery-based systems that need fine tuning in order to maximize battery life. As a bonus, the display is already included in the project. There are ways of getting even more information about your battery usage, although if power consumption is important than you may want to stick with a more straightforward tool like this one.

Capture The Flag Challenge Is The Perfect Gift

Nothing says friendship like a reverse engineering challenge on unknown terrain as a birthday present. When [Rikaard] turned 25 earlier this year, his friend [Veydh] put together a Capture the Flag challenge on an ESP8266 for him. As a software guy with no electronics background, [Rikaard] had no idea what he was presented with, but was eager to find out and to document his journey.

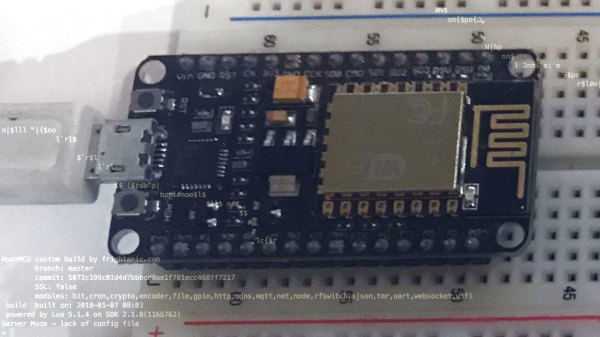
Left without guidance or instructions, [Rikaard] went on to learn more about the ESP8266, with the goal to dump its flash content, hoping to find some clues in it. Discovering the board is running NodeMCU and contains some compiled Lua files, he stepped foot in yet another unknown territory that led him down the Lua bytecode rabbit hole. After a detour describing his adjustments for the ESP’s eLua implementation to the decompiler he uses, his quest to capture the flag began for real.

While this wasn’t [Rikaard]’s first reverse engineering challenge, it was his first in an completely unknown environment outside his comfort zone — the endurance he demonstrated is admirable. There is of course still a long way down the road before one opens up chips or counts transistors in a slightly more complex system.

Finding Your Motorbike Using Wi-Fi

An urban planner once told me that every car requires at least four times as much space as they actually occupy. Each needs a spot on the roads, and three available parking spaces: one at home, one at work, and one to shop. Motorcycles are much smaller, but they still spend most of their time parked.

Motorcycles are the primary means of transport in Southeast Asia, and learning to safely drive one is an essential part of adapting to life here. Assuming it’s not pouring rain and you’re not flooded past your ankles, it’s actually quite a pleasant experience… until you have to park.

Unlike the parking lots you may be familiar with, there’s no expectation that your bike won’t be moved. In fact, it might very well end up on another floor, in another parking lot, or behind hundreds of impassable parked bikes on the roof. In the latter case, the attendant will shrug and suggest you come back in a few hours. Eventually, this won’t even register as a frustration – you will simply reason that there are plenty of other things that are more convenient here, like the weather (recent typhoon aside) or unlimited symmetrical fiber to the home for USD 5 a month.

That being said, with a little technology the problem could be lessened a bit while waiting for automated parking lots to become commonplace. On rare occasions I see people with little radio emitters that make their headlights flash, but they’re not terribly common here and require carrying yet another thing on my already full key chain (homes here typically use several different locks). It seemed pretty easy to pull off something similar using my smart phone with an ESP8266 running NodeMCU. I had been meaning to try out the sleep modes to save battery power anyway, so off I went.

Continue reading “Finding Your Motorbike Using Wi-Fi”

An IoT Christmas Tree For Your Hacker-Mas Celebrations

Smart Christmas trees may soon come to mean something more than a fashionably decorated tree. Forging ahead with this new definition, [Ayan Pahwa], with help from [Akshay Kumar], [Anshul Katta], and [Abhishek Maurya] turned their office’s Christmas Tree into an IoT device you can watch live!

As an IoT device, the tree relies on the ever-popular ESP8266 NodeMCU — activated and controlled by Alexa, as well as from a web page. The LEDs for the tree — and the offline-only tree-topper controlled by an Arduino Pro Mini — are the similarly popular Neopixels.

For those viewing online, a Raspberry Pi and camera have been attached to this project to check out the tree’s lighting. To make that possible, [Pahwa] had to enlist the use of ngrok to make the Pi’s –normally — LAN-only camera server accessible over the internet. The aforementioned web page was coded in Javascript/CSS and hosted on a server running an instance of Ubuntu 16.04.

Continue reading “An IoT Christmas Tree For Your Hacker-Mas Celebrations”

The Smartest Air Freshener In The Room

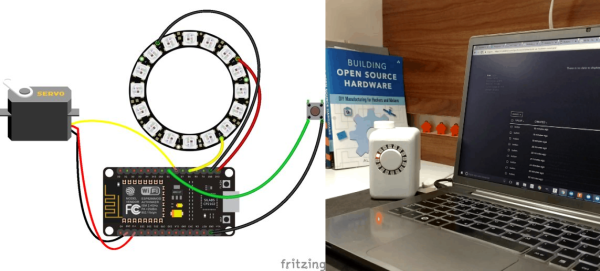
Many automatic air fresheners are wasteful in that they either ceaselessly spritz the room, and manual ones need to be — well — manually operated. This will not do in an era of smart products, so Instructables user [IgorF2] has put together an air freshener that does more than check if you’re around before freshening things up.

The air freshener uses a NodeMCU LoLin and an MG 995 servomotor, with a NeoPixel ring acting as a status light. Be aware — when the servo is triggered there is a significant spike in current, so be sure you aren’t powering the air freshener from a PC USB port or another device. After modeling the air freshener’s case in Fusion 360 — files available here — [IgorF2] wired the components together and mounted them inside the 3D printed case.

Hardware work completed, [IgorF2] has detailed how to set up the Arduino IDE and ESP8266 support for a first-time-user, as well as adding a few libraries to his sketch. A combination of an Adafruit.IO feed and ITTT — once again, showing the setup steps — handles how the air freshener operates: location detection, time specific spritzing, and after tapping a software button on your phone for those particularly lazy moments.

Continue reading “The Smartest Air Freshener In The Room”