Looking For Pi In The 8087 Math Coprocessor Chip

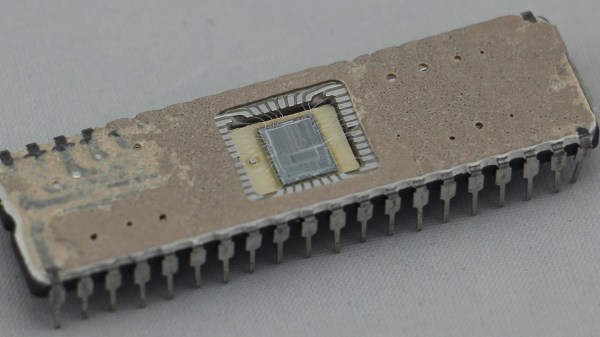
Even with ten fingers to work with, math can be hard. Microprocessors, with the silicon equivalent of just two fingers, can have an even harder time with calculations, often taking multiple machine cycles to figure out something as simple as pi. And so 40 years ago, Intel decided to give its fledgling microprocessors a break by introducing the 8087 floating-point coprocessor.

If you’ve ever wondered what was going on inside the 8087, wonder no more. [Ken Shirriff] has decapped an 8087 to reveal its inner structure, which turns out to be closely related to its function. After a quick tour of the general layout of the die, including locating the microcode engine and ROM, and a quick review of the NMOS architecture of the four-decade-old technology, [Ken] dug into the meat of the coprocessor and the reason it could speed up certain floating-point calculations by up to 100-fold. A generous portion of the complex die is devoted to a ROM that does nothing but store constants needed for its calculation algorithms. By carefully examining the pattern of NMOS transistors in the ROM area and making some educated guesses, he was able to see the binary representation of constants such as pi and the square root of two. There’s also an extensive series of arctangent and log2 constants, used for the CORDIC algorithm, which reduces otherwise complex transcendental calculations to a few quick and easy bitwise shifts and adds.

[Ken] has popped the hood on a lot of chips before, finding butterflies in an op-amp and reverse-engineering a Sinclair scientific calculator. But there’s something about seeing constants hard-coded in silicon that really fascinates us.

Giving The Pi 4 PCI Express

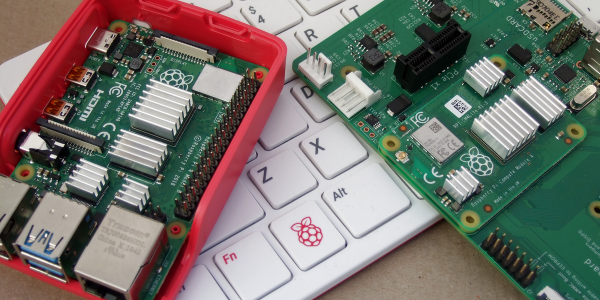
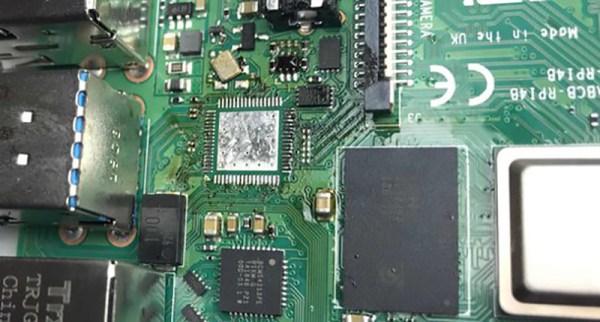
The release of the Raspberry Pi 4 brought us a new SoC, up to 4 Gigs of memory, and most importantly, got away from that janky USB to USB and Ethernet solution. The Raspberry Pi 4 has a PCI Express interface buried under some chips, and if you’re very good at soldering you can add a PCIe x1 device to the new best single board computer.

[Thomasz] took a look at the Raspberry Pi 4 and realized the new USB 3.0 chip is attached to the PCI Express interface on the SoC. That is, if you remove this chip and you have some very fine wires, you can patch in a real PCI Express slot. Removing the chip is easy enough with a hot air gun, although a few caps did get messed up. Throw that in an ultrasonic cleaner, and you have a blank canvas to work PCI magic.

This hack requires six wires, or three differential pairs, there’s a reference clock, a lane 0 transmit, and a lane zero receive. Working backwards from a PCI Express riser, [Thomasz] traced out these connections and soldered a few wires in. On the Pi side, a few capacitors were required to be compliant with the PCI Express spec, but the soldering isn’t too bad. You can do a lot with a small tip on an iron and a microscope.

The Pi was successfully wired up to a PCI Express riser card, along with the lines for ground, 5V, link reactivation, and a power good signal. The only thing left to do was to plug in a PCI card and test. This didn’t go as well as expected, because the PCI Express adapter didn’t like being enumerated by the Raspberry Pi kernel. In subsequent experiments, an Adaptec SAS controller worked. Does this mean external graphics cards for the Pi? No, not quite; this is only one lane of PCIe, where modern graphics cards require an x16 slot for the best performance. Still, if you’ve ever wanted a SCSI card for a Pi, this is the best option yet.

PiFX, The Pi-Powered Pedal Board

Since the beginnings of the Raspberry Pi, [Tibbbbz] has wanted to build a DIY guitar effects board and amp simulator. A device like this, and similar ones sold by Boss and Kemper, put a bunch of processing power inside a metal enclosure with some footswitches and a pair of quarter inch jacks for input and output. Mash some buttons and wicked toanz come out the other end. Now this is actually possible with a Pi, and it’ll sound great too.

Because this is an audio application, latency is critical. It doesn’t really matter if you have 200 milliseconds of latency when scrolling through your Facebook feed, but for real-time audio processing anything over five milliseconds is disorienting and nearly unusable. [Tibbbbz] is using a standard, off-the-shelf USB audio adapter that gets the latency down to about that level. A Raspberry Pi is never going to have latency as low as a handful of transistors in a analog effects pedal, but it’s close enough.

For the audio system, it’s all about JACK audio: a wonderful frontend for the Linux audio system. The actual pedal emulation is happening with Guitarix. For the hardware part of this build, there’s actually not that much going on here apart from a USB sound card and a touch screen display. The footswitches are the most interesting as they’re wired up as buttons in a repurposed USB keyboard controller board. This repurposing of a USB keyboard is rather interesting, because it vastly simplifies the entire build. All of this is wrapped up in a wedge-shaped walnut pedalboard that’s sturdy enough to live on the stage at least part of the time. You can check out the demos here.

Python And Pi Provide Heads Up Display For Your Experimental Airplane

You shouldn’t be looking at screens when you’re driving, but what about a heads-up display? A screen that could put relevant information in your field of vision would be great, even more so if it used a Raspberry Pi. That’s exactly what [John] did, only he did it with an airplane.

First up, the legality of this build. [John]’s plane is registered as experimental, which, provided you know what you’re doing, is pretty close to ‘anything goes’ as you would want in a manned aircraft. [John] has a sufficient number of hours in his log book, and he’s built a Zenith 701.

For hardware, the hard part of this build is constructing a heads-up display. Fortunately, aftermarket HUDs exist, and [John] is using a Kivic projector, a $200 piece of equipment that’s readily available on Amazon. If you need a HUD for your car, there you go. The software is another thing entirely, with the goal of having the software decoupled from the display and data sources. This is somewhat easy to accomplish with a Raspberry Pi; the display is actually just some minimal text-based blocky graphics built in PyGame. This build is also decoupled from the data sources by building this as a user interface for Stratux, an independent Raspberry Pi-based ADS-B receiver for pilots.

There are several views available with this HUD, with the AHRS + ADS-B providing information on the aircraft’s attitude and altitude, along with a few indicators of the nearest planes. The traffic view expands on the ADS-B data, showing the nearest eight or so aircraft in the air, with a range, bearing, and difference in altitude. There’s a diagnostic window, and since [John]’s plane is a backcountry STOL thingamado that can hover in a strong wind, there’s also a digital version of a norden bombsight. It’s for dropping bags of flour onto a grass strip. You can check out [John]’s entire AirVenture presentation of the build below, with all the code available here.

Continue reading “Python And Pi Provide Heads Up Display For Your Experimental Airplane”

Portable Pi Power Pack Makes For Petite Projects

Since the Pi Zero was released, there have been many attempts to add a power bank. Cell phone batteries are about the same size as a Pi Zero, after all, and adding a USB charging port and soldering a few wires to a Pi is easy. The PiSugar is perhaps the cutest battery pack we’ve seen for the Pi Zero, and it comes in a variety of Hats compatible with the Pi, capable of becoming a small display, a keyboard, or any other thing where a small, portable Linux machine is useful.

The core of this build is a small circuit board the size of a Pi Zero. Attached to this board is a 900mAh battery, and the entire assembly is attached to the Pi Zero with a set of two spring clips that match up with with a pair of pads on the back of the Pi. Screw both of these boards together, and you have a perfect, cableless solution to adding power to a Pi Zero.

But the PiSugar doesn’t stop there. There are also cases, for a 1.3 inch LCD top, a 2.13 inch ePaper display, an OLED display, a camera, a 4G module, and something that just presents the pins from the Pi GPIO header. This is an entire platform, and if you print these parts in white plastic, they look like tiny little sugar cubes filled to the brim with electronics and Linux goodness.

Yes, you’ve seen 3D printed Pi cases before, but nothing in the way of an entire platform that gives you a Pi Zero in an extensible platform that can fit in your pocket and looks like sweet, sweet cubes of sucrose.

Set Up A Headless Raspberry Pi, All From Another Computer’s Command Line

There are differences between setting up a Raspberry Pi and installing an OS on any other computer, but one thing in common is that if you do enough of them, you seek to automate the process any way you can. That is the situation [Peter Lorenzen] found himself in, and his solution is a shell script to install and configure the Raspberry Pi for headless operation, with no need to connect either a keyboard or monitor in the process.

[Peter]’s tool is a script called rpido, and with it the process for setting up a new Raspberry Pi for headless operation is super streamlined. To set up a new Pi, all [Peter] needs to do is:

  1. Plug an SD card into his laptop (which happens to be running Ubuntu.)
  2. Run: rpido -w -h myhostname -s which downloads and installs the newest version of Raspbian lite, does some basic setup (such as setting the hostname), configures for headless operation, and launches a root shell.
  3. Use the root shell to do any further tweaks or checks (like launching raspi-config for additional changes.)
  4. Exit the shell, remove the SD card from his laptop, and install the card into the Raspberry Pi.

There are clear benefits to [Peter]’s script compared to stepping through a checklist of OS install and setup tasks, not to mention the advantage of not needing to plug in a keyboard and monitor. Part of the magic is that [Peter] is mounting the SD card’s filesystem in a chroot environment. Given the right tools, the ARM binaries intended for the Pi run on his (Intel) Ubuntu laptop. It’s far more convenient to make changes to the contents of the SD card in this way, before it goes to its new home in a Pi.

Not everything has to revolve around an SD card, however. [Jonathan Bennet] showed that it’s possible to run a Raspberry Pi without an SD card by using the PXE boot feature, allowing it to boot and load its file system from a server on the same network, instead of a memory card.

Oil-Immersed Raspberry Pi Keeps Its Cool Under Heavy Loads

As a general rule, liquids and electronics don’t mix. One liquid bucks that trend, though, and can contribute greatly to the longevity of certain circuits: oil. Dielectric oil cools and insulates everything from the big mains transformers on the pole to switchgear in the substation. But what about oil for smaller circuits?

[Lord_of_Bone] was curious to see if an oil-cooled Raspberry Pi is possible, and the short answer is: for the most part, yes. The experimental setup seen in the video below is somewhat crude — just a Pi running Quake 3 for an hour to really run up the CPU temperature, which is monitored remotely. With or without heatsinks mounted, in free air the Pi ranges from about 50°C at idle to almost 70°C under load, which is pretty darn hot. Dunking the Pi in a bath of plain vegetable oil, which he admits was a poor choice, changes those numbers dramatically: 37°C at idle and an only warmish 48°C after an hour of gaming. He also tested the Pi post-cleaning, which is where he hit a minor hiccup. The clean machine started fine but suffered from a series of reboots shortly thereafter. Twelve hours later the Pi was fine, though, so he figures a few stray drops of water that hadn’t yet evaporated were to blame.

Is oil immersion a practical way to cool a Pi? Probably not. It doesn’t mean people haven’t tried it before, of course, but we applaud the effort and the careful experimentation.

Continue reading “Oil-Immersed Raspberry Pi Keeps Its Cool Under Heavy Loads”