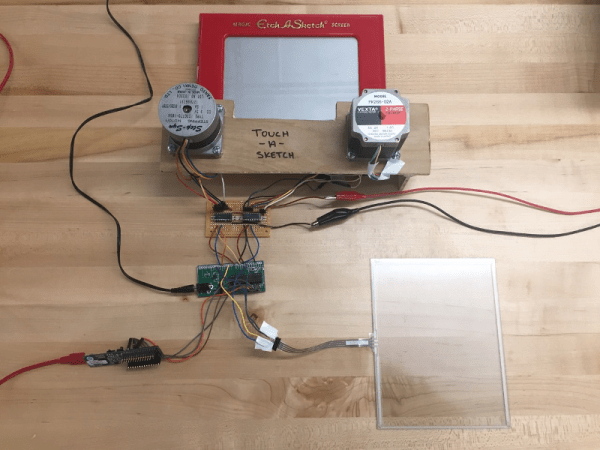
An Automated Ice Cream Topper For The Ultimate In Zero Effort Desserts

It’s a highly personal facet of the eating experience, the choice of topping applied to your frozen dessert. Everybody has their own preferences when it comes to whipped cream, sprinkles, and chocolate syrup. Should the maintenance of those preferences become a chore, there is a machine for that, and it comes courtesy of [Kristen Vilcans] and [Ramita Pinsuwannakub] in the form of their Cornell University project as students of [Bruce Land]. Their Automated Ice Cream Topper holds profiles for each registered user, and dispenses whipped cream, chocolate sauce, and candy sprinkles onto ice cream at the simple push of a button.

The hardware seems simple enough until you appreciate the many iterations used to ensure that it works smoothly. The bowl of ice cream sits on a motorised turntable, and a can of whipped cream is suspended above it upon rails made from kebab skewers. A servo and lever operates the can to release the cream.  Meanwhile the sprinkles come from an inverted spice jar with a motorised disc to momentary align a hole with the jar’s spout, and the chocolate syrup comes courtesy of an air pump and some plastic tubing. The whole is controlled from a PIC32 microcontroller.

It is refreshing to see that such projects do not have to tackle especially high-tech problems to be extremely successful. We could all dispense our own toppings, but now we know there’s s machine for the task, who wouldn’t want to give it a try!

If ice cream student projects are your thing, perhaps you’d like a 3D printer?

POV Display Is FAN-tastic

Persistence-of-vision displays come in all shapes and sizes. But when you get a couple of [Bruce Land’s] students involved, well let’s just say they tend to up the ante. When [Emily] and [Han] decided to make a POV display for their next class project, they did so with style. Unsatisfied with smaller displays they saw on YouTube – they decided to make a larger one out of an old box fan and a DotStar LED strip, which are similar to NeoPixels except they use SPI, which means you can update the LEDs at a much faster rate. This makes them perfect for a POV display!

As usual with projects out of Cornell’s EE class – this POV project is extremely well documented and it’s nice to see the fundamental details of a POV display explained. So be sure to check out this project if you’re rusty on the inner workings of POV displays.

We’ve seen some interesting POV displays here at Hackaday, including one strapped to a dog to display its running speed. What’s the coolest POV display you’ve seen?

A Robot Arm For Virtual Beer Pong

Leave it to engineering students to redefine partying. [Hyun], [Justin], and [Daniel] have done exactly that for their final project by building a virtually-controlled robotic arm that plays beer pong.

There are two main parts to this build: a sleeve worn by the user, and the robotic arm itself. The sleeve has IMUs at the elbow and wrist and a PIC32 that calculates their respective angles. The sleeve sends angle data to a second PIC32 where it is translated it into PWM signals and sent to the arm.

There’s a pressure sensor wired sleeve-side that’s worn between forefinger and thumb and functions as a release mechanism. You don’t actually have to fling your forearm forward to get the robot to throw, but you can if you want to. The arm itself is built from three micro servos and mounted for stability. The spoon was a compromise. They tried for a while to mimic fingers, but didn’t have enough time to implement grasping and releasing on top of everything else.

Initially, the team wanted wireless communication between the sleeve and the arm. They got it to work with a pair of XBees, but found that RF was only good for short periods of use. Communication is much smoother over UART, which you can see in the video below.

You don’t have to have a machine shop or even a 3-D printer to build a robot arm. Here’s another bot made from scrap wood whose sole purpose is to dunk tea bags.

Continue reading “A Robot Arm For Virtual Beer Pong”

Guitar Game Plays With Enhanced Realism

There’s a lot more to learning how to play the guitar than just playing the right notes at the right time and in the right order. To produce any sound at all requires learning how to do completely different things with your hands simultaneously, unless maybe you’re a direct descendant of Eddie Van Halen and thus born to do hammer ons. There’s a bunch of other stuff that comes with the territory, like stringing the thing, tuning it, and storing it properly, all of which can be frustrating and discouraging to new players. Add in the calluses, and it’s no wonder people like Guitar Hero so much.

[Jake] and [Jonah] have found a way to bridge the gap between pushing candy colored buttons and developing fireproof calluses and enough grip strength to crush a tin can. For their final project in [Bruce Land]’s embedded microcontroller design class, they made a guitar video game and a controller that’s much closer to the experience of actually playing a guitar. Whether you’re learning to play for real or just want to have fun, the game is a good introduction to the coordination required to make more than just noise.

Continue reading “Guitar Game Plays With Enhanced Realism”

Smart Station Runs Entertainment, Is Entertainment

It’s that special time of year—time for the parade of student projects from [Bruce Land]’s embedded microcontroller design course at Cornell. [Timothy], [Dhruv], and [Shaurya] are all into remote sensing and control applications, so they built a smart station that combines audiovisual entertainment with environmental sensing.

As with the other projects in this course, the smart station is built on a PIC32 dev board. It does Bluetooth audio playback via RN-52 module and has a beat-matching light show in the form of a NeoPixel ring mounted atop the 3D-printed enclosure. But those blinkenlights aren’t just there to party. They also provide visual feedback about the environment, which comes from user-adjustable high and low trigger values for the mic, an accelerometer, a temperature and humidity sensor, and a luminosity sensor.

The group wanted to add an ultrasonic wake-up feature, but it refused to work with the 3.3V from the PIC. The NeoPixel ring wanted 5V too, but isn’t as picky. It looks to be plenty bright at 3.3V. Another challenge came from combining I²C, UART, analog inputs, and digital outputs. They had to go to the chip’s errata to verify it, but it’s there: whenever I²C1 is enabled, the first two analog pins are compromised, and there’s no official solution. The team got around it by using a single analog pin and a multiplexer. You can check out those blinkenlights after the break.

Maybe you prefer working in wood. If so, you might like this hexagonal take on audio-visualization.

Continue reading “Smart Station Runs Entertainment, Is Entertainment”

Fully-functional Oscilloscope On A PIC

When troubleshooting circuits it’s handy to have an oscilloscope around, but often we aren’t in a lab setting with all of our fancy, expensive tools at our disposal. Luckily the price of some basic oscilloscopes has dropped considerably in the past several years, but if you want to roll out your own solution to the “portable oscilloscope” problem the electrical engineering students at Cornell produced an oscilloscope that only needs a few knobs, a PIC, and a small TV.

[Junpeng] and [Kevin] are taking their design class, and built this prototype to be inexpensive and portable while still maintaining a high sample rate and preserving all of the core functions of a traditional oscilloscope. The scope can function anywhere under 100 kHz, and outputs NTSC at 30 frames per second. The user can control the ground level, the voltage and time scales, and a trigger. The oscilloscope has one channel, but this could be expanded easily enough if it isn’t sufficient for a real field application.

All in all, this is a great demonstration of what you can accomplish with a microcontroller and (almost) an engineering degree. To that end, the students go into an incredible amount of detail about how the oscilloscope works since this is a design class. About twice a year we see a lot of these projects popping up, and it’s always interesting to see the new challenges facing students in these classes.

Continue reading “Fully-functional Oscilloscope On A PIC”

Rushing The Design And Construction Of LED Centerpieces

‘Dragon Flame’ RGB LED table centerpieces, by [Alex Lao]
Sometimes the most important thing is getting something done.

[Alex Lao] was recently in such a situation. His sister was getting married and he designed, built, and delivered twenty RGB LED table centerpieces in a rush. There were no prototypes made, and when the parts arrived all twenty were built all at once over a single weekend. These table centerpieces are illuminated by RGB LEDs and battery-powered, but have an option to be powered by a wall adapter.

[Alex] helpfully shared some tips on reducing the production risks and helping ensure results in such a limited time frame. His advice boils down to this: reduce the unknowns. For Alex this meant re-using code and components from a previous project — even if they were not optimal — so that known-good schematic and footprint libraries could be used for the design.

From one perspective, the PIC32 microcontroller inside each lamp is overkill for an LED centerpiece. From another perspective, it was in fact the perfect part to use because it was the fastest way for [Alex] to get the devices working with no surprises.

For an added perspective on needing to get production right the first time on a much larger scale, be sure to check out getting an installation made up of 25,000 PCBs right the first time.