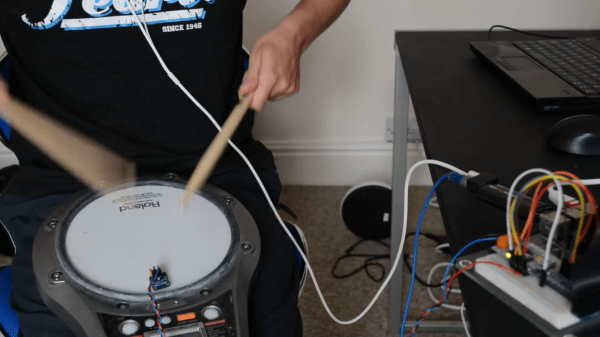
Piezoelectric sensors are great for monitoring mechanical impacts with a microcontroller. Whether you’re monitoring knocks on a door or watching a heartbeat, they are a cheap way to get the job done. They do have their downsides, though, so when [Jeremy] wanted to build an electronic drum set, he decided to use more expensive accelerometers to measure the percussive impacts instead.
Even though piezo sensors are cheap, they require a lot of work to get them working properly. The ADXL377 3-axis accelerometer that [Jeremy] found requires much less work, plus provides more reliable data due to a 1kHz low-pass filter at the output. In his setup, a Raspberry Pi handles all of the heavy lifting. An ADC on each drum sends data about each impact of the drum, and the Raspberry Pi outputs sound via the native Alsa driver and a USB sound card.
This project goes a long way to show how much simpler a project like this is once you find the right hardware for the job. [Jeremy]’s new electronic drums are very well documented as well if you are curious about using accelerometers on your newest project rather than piezo sensors. And, if you’re into drums be sure to see how you can have drums anywhere, or how you can build your own logic drums.
Look around for heart rate sensors that interface easily to microcontrollers, and you’ll come up with a few projects that use LEDs and other microcontrollers to do the dirty work of filtering out pulses in a wash of light.
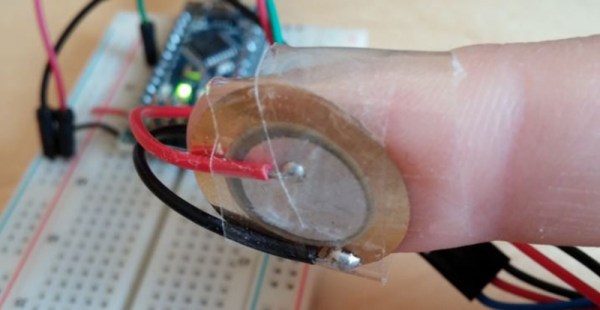
[Thomas] was working on a project that detects if water is flowing through a pipe with a few piezoelectric sensors. Out of curiosity, he taped the sensor to his finger, and to everyone’s surprise, the values his microcontroller were spitting out were an extremely noise-free version of his heart rate.
The piezo in question is a standard, off the shelf module, and adding this to a microcontroller is as easy as putting the piezo on an analog pin. From there, it’s just averaging measurements and extracting a heartbeat from the data.
It’s a much simpler solution to measuring a heart rate, and since two people haven’t heard of this technique, it’s likely a lot more people haven’t heard of this technique either. If you’re looking for an entry to The Hackaday Prize, this would be a great jumping off point for anything in either the fitness or medical domains.
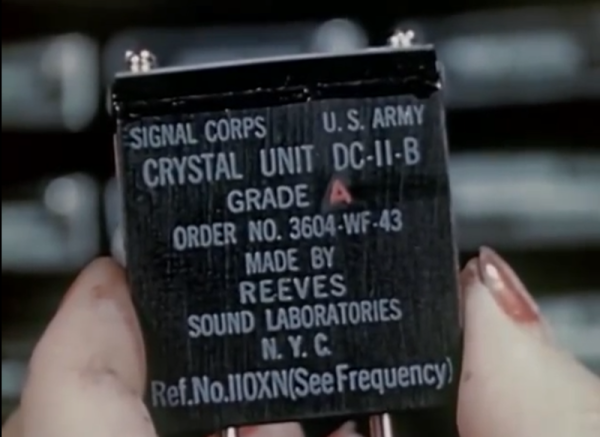
More than one of our readers suggested we highlight this beautifully-shot process documentary about the laborious and precise manufacturing of piezoelectric quartz crystals in the early 1940s. Just a few years later, Bell Labs would perfect a method of growing synthetic crystals, sending droves of brave men and daintily-handed women from the Reeves Sound Laboratories to the unemployment line.
Early radio equipment relied upon tuned or L-C circuits for clocking. These were prone to drift by a few kHz, which prompted the use of crystal oscillators for stable frequencies in the 1920s. The lives of our armed forces and those of our WWII allies depended on reliable communication equipment, so the crystal oscillators they used were top shelf, produced by hand from Brazilian crust.
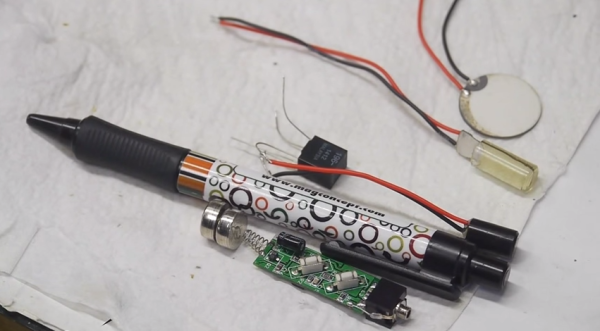
[Ben Krasnow’s] latest project will be good for anyone who wants a complicated way to cheat on a test. He’s managed to squeeze a tiny FM radio receiver into a ballpoint pen. He also built his own bone conduction microphone to make covert listening possible. The FM radio receiver is nothing too special. It’s just an off the shelf receiver that is small enough to fit into a fatter pen. The real trick is to figure out a way to listen to the radio in a way that others won’t notice. That’s where the bone conduction microphone comes in.
A normal speaker will vibrate, changing the air pressure around us. When those changes reach our ear drums, we hear sound. A bone conduction mic takes another approach. This type of microphone must be pressed up against a bone in your skull, in this case the teeth. The speaker then vibrates against the jaw and radiates up to the cochlea in the ear. The result is a speaker that is extremely quiet unless it is pressed against your face.
Building the bone conduction mic was pretty simple. [Ben] started with a typical disk-shaped piezoelectric transducer. These devices expand and contract when an alternating current is passed through them at a high enough voltage. He cut the disk into a rectangular shape so that it would fit inside of the clicker on the ballpoint pen. He then encased it in a cylinder of epoxy.
The transducer requires a much higher voltage audio signal than the litter radio normally puts out. To remedy this problem, [Ben] wired up a small impedance matching transformer to increase the voltage. With everything in place, all [Ben] has to do to listen to the radio is chew on the end of his pen. While this technology might help a cheater pass an exam, [Ben] also notes that a less nefarious use of this technology might be to place the speaker inside of the mouthpiece of a CamelBak. This would allow a hiker to listen to music without blocking out the surrounding noise. Continue reading “Turning An Ordinary Pen Into A Covert Radio Receiver”→
We find this offering far more engaging. He has ditched the ultrasonic module seen in those experiments. The new rig drives the piezo element using a 27V source. After each ping is sent out, the microphone input is immediately captured to detect the return of the audible sound. [Jason] mentions that the TI Launchpad he’s using for the project is fast enough for these experiments but he may switch to a Teensy 3.1 in order to double the RAM and thereby increase the sample size he is able to record.
Of course this is intended for underwater ROVs so his next iteration will involve a DIY hydrophone. We can’t wait to see that one as the process of converting this test rig into one that works underwater evades us. If you have some tips on that topic please let us know in the comments.
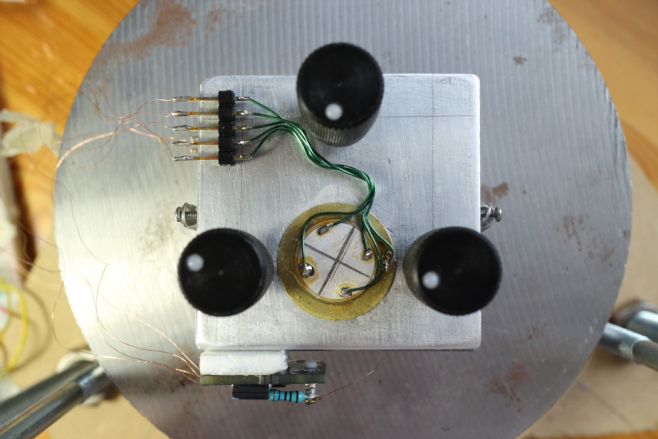
This is not an artist’s rendering, nor a physics simulation. This device held together with hardware-store MDF and eyebolts and connected to a breadboard, is taking pictures of actual atomic structures using actual measurements. All via an 80¢ piezo buzzer? Madness.
Gold atoms in a crystal.
This apparent wizardry is called a scanning tunneling microscope which takes advantage of quantum tunneling. The device brings a needle atomically close to the object to be measured (by hand), applying a small voltage (+-15V), and stopping when it starts to conduct. Depending on the distance between the tip and the target, the voltage varies and does so precisely enough to identify whether an atom is underneath or not, and by how much.
The “pictures” are not photographs like a camera might take from a standard optical microscope, however they are neither guesses nor averages. They are representations of real physical measurements of specific individual atoms as they exist on the infinitesimal area being probed. It “sees” by measuring small voltage changes. Another difference lies in the “scanning.” The probe examines atoms the way one would draw ASCII images – single pixels at a time until an entire atom was drawn. Note that the resolution – as shown in the pictures – is sub-atomic. Sizes of atoms are apparent as are the distances between them. In this they are closer related to the far more expensive Scanning Electron Microscope technology, but are 10-100x zoomier; resolving 0.00000000001m, or 0.00000000039″.
Scan Head – Piezo cut into quadrants
One would presume that dealing with actual atoms requires precision machining vast orders of magnitude beyond the home hobbyist but, no. Any one of us could make this at home or in our hackerspaces, for nearly free. Apparently even sharpening a tip to a single atom is, as [Dan] says “not as hard to achieve as you might think!” You take some tungsten wire and pull on it as you cut so that it shatters diagonally. There are better ways he suggests, but that method is good enough.
The ordinary piezo buzzer that is key to the measurement is chopped into quadrants with an ordinary X-Acto knife by hand. Carefully, because it is fragile, but, nothing more to it than that. There are two better and common methods but they cost hundreds of dollars, not 80 cents. It should be carefully glued since soldering heat will damage it, but, [Dan] soldered his anyway because it was easier. Continue reading “Cheap DIY Microscope Sees Individual Atoms”→
If you’re going to be the drummer in a band for a Back to the Future themed New Years Eve party, you really need to add something to your gig that captures that kitschy futuristic ambiance as seen by the 80s. Rainbow LEDs will do the trick.
For his drum set’s reactive trailing light display, [Alec Smecher] was inspired by a similar project he’d seen in the past where Neopixels were added to a regular drum kit and activated with several individual microphones. Since the microphones ultimately heard all of the thundering noise from every drum and cymbal at once, there was a lot of bleed over in the response of the LEDs. To remedy this, [Alec] used piezo pickups which listen to discrete surface vibrations rather than sound in order to clean up the effect produced by the lights. Each of the five LED strips lining the stands of his cymbal and inside of his drums were programmed to react with a burst of light equal in brightness to the intensity of the vibration sensed by the piezo.
To insure everything kept together amidst all the constant motion and shaking during performance, [Alec] soldered his connections directly onto his Trinket’s pins as well as the fragile pickup of the piezo. The pickup of the sensors were taped directly against the skin of his drums and along the inside of each cymbal to maximize responsiveness. After ringing in the new year appropriately as the ‘band from the future’, [Alec] reports that his colorful addition worked fantastic the whole night.
Those interested in building their own can find a nice schematic on [Alec’s] blog as well as the code he used on github. Difficulty level taken into account, this is a great first project for a musician who has yet to dabble in electronics… and seeing that it’s a brand new year, there’s no better time to have a go at something new.