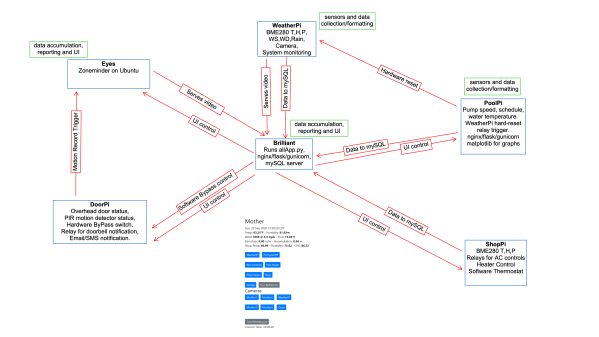
A few years ago, [Gregory Sanders] aka [Dr Gerg] had one simple wish in mind when he started what is now the PiNet project — to know whether his garage door was open or closed. Instead of searching out off-the-shelf solutions, he looked at the project as a learning opportunity. After picking up Python, he built a system from a Raspberry Pi, a 12V gel cell battery, and a power supply / charger circuit. Thus project Overhead Door (ohd) was complete (see the ohd GitHub repository) and [Dr Gerg] was done.
Or so he thought. After getting a swimming pool installed, he got the itch again, and started a new project called Pool Controls, because:
The controls for your average backyard in-ground pool are pathetic. I felt like I could do better with a Raspberry Pi, a relay board and some Python. And so I did, and frankly, it’s awesome.
Then he built his own weather station to replaced a commercial one which had died twice in as many years, followed by his own web-based UI framework. Next was the integration of an outdoor security camera system. And finally, although we don’t believe it’s really final, he ripped out the cloud-based controls from his shop air conditioner and added his own Raspberry Pi-based solution. All of these projects are available on his GitHub page.
[Dr Gerg]’s goal in posting all this work is not necessarily so people can duplicate it, although that is okay as well. Instead, he hopes that people will realize that they can build these types of projects on their own, perhaps leaning some things and picking up new skills along the way — have fun doing it. We like the way you think, [Dr Gerg]. Do you know of any small projects which grew and grew and took on a life of their own?
At this point, it’s safe to say that word clocks aren’t quite as exciting as they once were. We’ve seen versions that boil the concept down to what amounts to a parts bin build, which for better or for worse, takes a lot of the magic out of it. You just get an array of LEDs, put some letters in front of it, write some code, and you’re done.
But then [Mark Sidell] sent in his build, and we remembered why we collectively fell in love with these clocks in the first place. It wasn’t the end result that captivated us, although the final clock is indeed gorgeous, but the story of its painstaking design and construction. The documentation created for this project is unquestionably some of the best we’ve seen in a very long time, and whether or not you have any desire to build a word clock of your own, you won’t regret sitting down and reading through it.
If you can somehow come away from reading through that build log and not be impressed, surely the clock’s feature set will put you over the edge. The ability to show time in just five minute increments makes this one of the most practical word clocks we’ve seen, and the quality of life features such as automatic brightness control based on ambient light level, and a smartphone-controlled web interface for configuring the clock are just a few of its standout features.
Incidentally the glow behind the clock, provided by a dedicated array of WS2812 RGB LEDs, isn’t just for ambiance. It indicates the position of the sun in the sky as calculated by the Python astral package, as well as mimicking the colors of the sunrise and sunset. There’s even a compass onboard to make sure the LEDs are properly aligned with their astronautical counterpart.
[Mark] actually made several of these clocks, most of which were given away as gifts. Some of the lucky recipients lived far enough away that the clock had to be shipped, so he designed a custom shipping case to hold everything securely during the trip. It also meant he had to come up with a way of remotely maintaining the code on these clocks without user intervention, so he created a firmware update and telemetry gathering backend with Amazon Web Services that they check into periodically. Honestly, the attention to detail put into every element of this project is just staggering.
If you’re interested in seeing what all the fuss is about with these word clocks, but aren’t quite at [Mark]’s level, don’t worry. As we said earlier, you can build a small version with little more than an LED array and a microcontroller. Just don’t blame us if it ends up turning into an obsession.
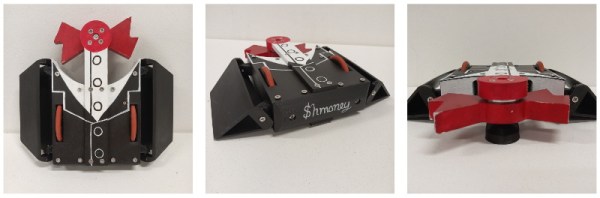
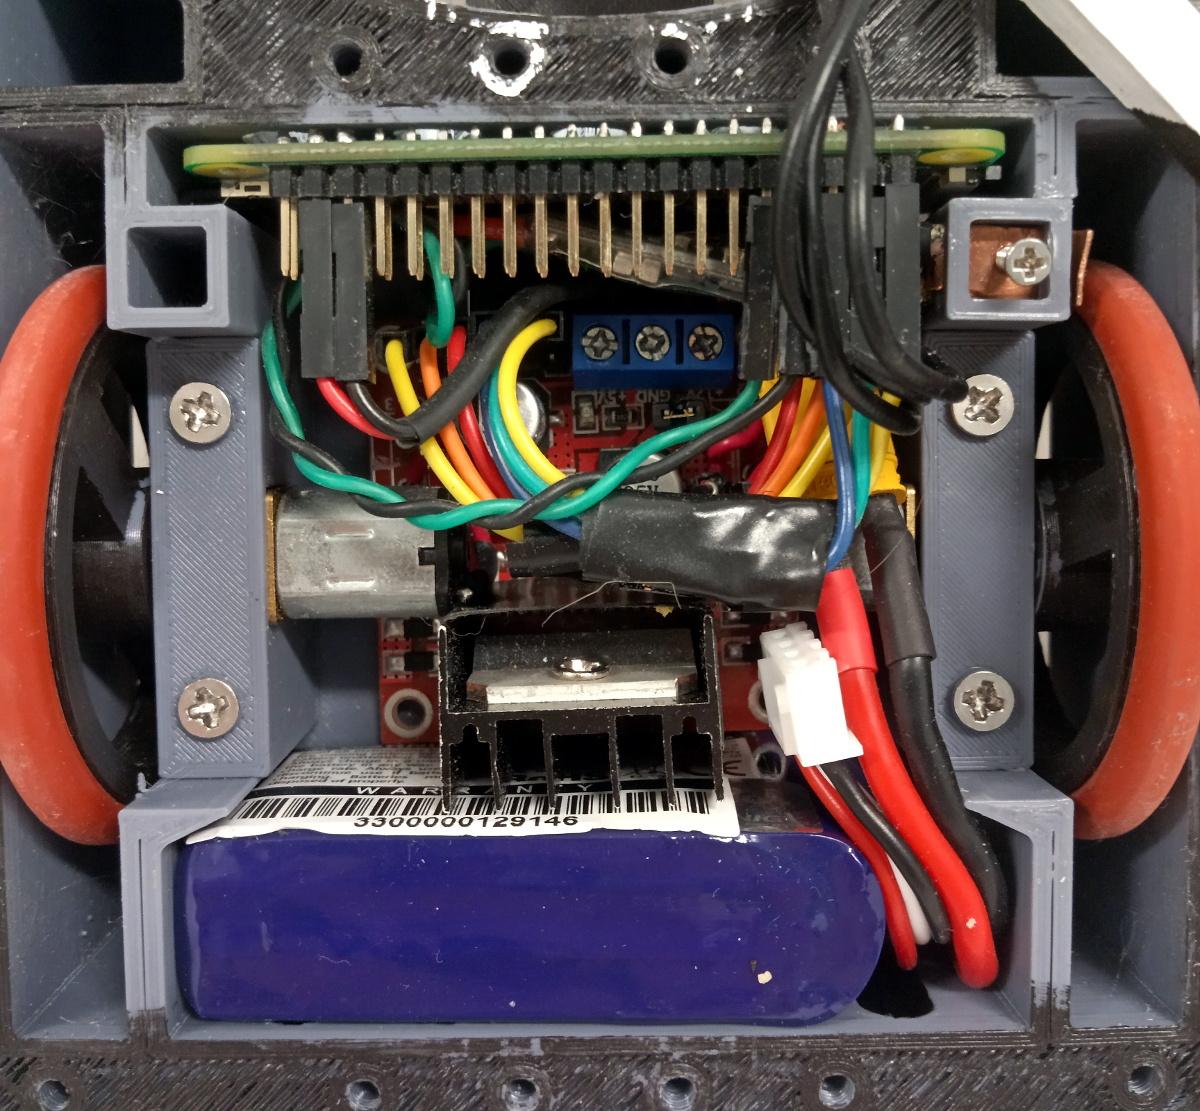
Compared to using traditional hobby-grade RC hardware, [Sebastian] says using the Pi represented a considerable cost savings. With Python and evdev, he was able to take input from a commercial Bluetooth game controller and translate it into commands for the GPIO-connected motor controllers. For younger competitors especially, this more familiar interface can be seen as an advantage over the classic RC transmitter.
A L298N board handles the two N20 gear motors that provide locomotion, while a Tarot TL300G ESC is responsible for spinning up the brushless motor attached to the “bow tie” spinner in the front. Add in a Turnigy 500mAh 3S battery pack, and you’ve got a compact and straightforward electronics package to nestle into the robot’s 3D printed chassis.
In a Reddit thread about $hmoney, [Sebastian] goes over some of the lessons his team has learned from competing with their one pound Linux bot. An overly ambitious armor design cost them big at an event in Oklahoma, but a tweaked chassis ended up making them much more competitive.
There was also a disappointing loss that the team believes was due to somebody in the audience attempting to pair their phone with the bot’s Pi Zero during the heat of battle, knocking out controls and leaving them dead in the water. Hopefully some improved software can patch that vulnerability before their next bout, especially since everyone that reads Hackaday now knows about it…
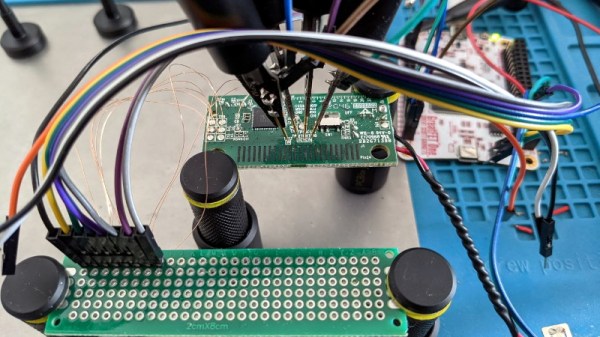
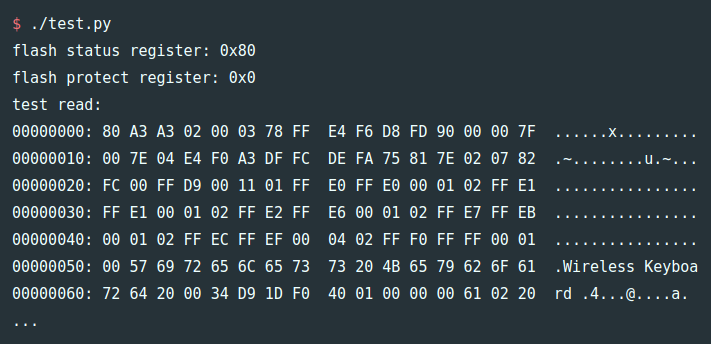
Looking to hone his hardware hacking skills, [James Chambers] recently set out to reverse engineer a common cheap wireless keyboard: the Logitech K360. The chipset it uses has already been fairly well explored (and exploited) by security researchers, but the goal here was more about gaining some practical hands-on experience than it was breaking any new ground.
Of course, even with the best of tools, there’s always a few stumbling blocks. After identifying what was clearly some kind of programming header on the K360’s diminutive PCB, it took a few failed attempts at reading the firmware before [James] realized he needed to tap into more pins on the keyboard’s nRF24LE1 microcontroller. Once everything was physically wired up, he wrote some code for the GreatFET that would perform the proper incantations on the chip’s PROG and RESET pins to enable its programming interface.
[James] goes on to explain how you can pull some extended chip information out of the hardware and verify the contents of the firmware dump with Gihdra, but any more advanced analysis will have to wait until the next post in the series. In the meantime, if you like reading about hardware hacking from this “over the shoulder” viewpoint, you should check out some of the fantastic work that [wrongbaud] has sent in over the last year or so.
Music boxes are awesome little mechanical devices. These days, they even make some with slightly more modern tunes, like the Zelda and Star Wars themes. But they don’t have everything, of course — certainly not that one song from that TV series that [RandomPrototypes]’ girlfriend absolutely adores.
[RandomPrototypes] started by taking the music box apart to measure the cylinder, and then created a software representation of a cylinder that’s designed to pluck the eighteen notes from low to high rather than play a song. Then he used a Python script to turn it in a 3D model. The slicing preview showed a lot of stops and starts and weak points, so [RandomPrototypes] generated the Gcode directly so that it would print in one continuous spiral and be much stronger.
In order to generate a cylinder with the song his girlfriend likes so much, [RandomPrototypes] printed this scale cylinder and used it to record the notes as a single mp3 and make note of the start times of each note. Finally, he built the new score based on the available notes built into the music box comb. If you want to do this yourself, the code is freely available. The hard part will be choosing a music box mechanism, because they tend to come with a single comb that’s designed to play a specific song. You’ll have to figure out which tune has most or all of the notes you need.
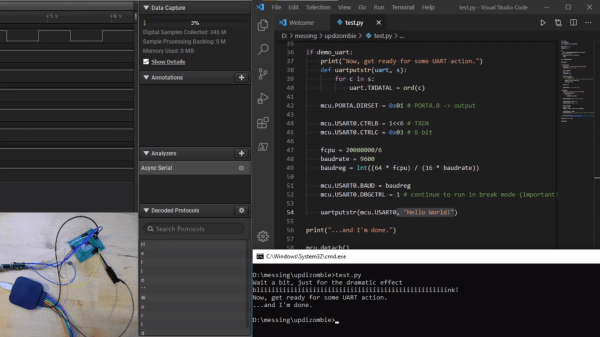
As amazing as CircuitPython is, it hasn’t yet been ported to any 8-bit microcontrollers. [Chris Heo] was unsatisfied with his inability to use Python on his 8-bit ATmega4808 AVR, so he worked out a way to zombify it and bend it to his will using Python on his PC.
The trick to making this all work is the UPDI interface: a single-wire UART interface for programming and debugging Microchip’s newer 8-bit AVR microcontrollers. UPDI reaches deep into the microcontroller’s core, allowing you to stop and start execution of microcontroller code and access all of the onboard data and I/O. [Chris] realized this could be used to stop execution of any code running on the AVR and directly control the output pins using the pyupdi library. Since UPDI lets him modify the AVR’s I/O registers, he was also able to blink an LED and use the microcontrollers UART to send a message back to his PC without compiling a single line of code.
This may seem like an entirely unnecessary hack, but for devices too small or basic to have a JTAG interface for debugging this could be the best way to test and debug peripherals in an assembled circuit. We hope this catches on and would love to see how much of the chip can be controlled in this way. Maybe this will make it easy to experiment with the programmable logic that’s on some of the newer AVRs.
The epicenter of the Chinese electronics scene drew a lot of attention this week as a 70-story skyscraper started wobbling in exactly the way skyscrapers shouldn’t. The 1,000-ft (305-m) SEG Plaza tower in Shenzhen began its unexpected movements on Tuesday morning, causing a bit of a panic as people ran for their lives. With no earthquakes or severe weather events in the area, there’s no clear cause for the shaking, which was clearly visible from the outside of the building in some of the videos shot by brave souls on the sidewalks below. The preliminary investigation declared the building safe and blamed the shaking on a combination of wind, vibration from a subway line under the building, and a rapid change in outside temperature, all of which we’d suspect would have occurred at some point in the 21-year history of the building. Others are speculating that a Kármán vortex Street, an aerodynamic phenomenon that has been known to catastrophically impact structures before, could be to blame; this seems a bit more likely to us. Regardless, since the first ten floors of SEG Plaza are home to one of the larger electronics markets in Shenzhen, we hope this is resolved quickly and that all our friends there remain safe.
In other architectural news, perched atop Building 54 at the Massachusetts Institute of Technology campus in Cambridge for the last 55 years has been a large, fiberglass geodesic sphere, known simply as The Radome. It’s visible from all over campus, and beyond; we used to work in Kendall Square, and the golf-ball-like structure was an important landmark for navigating the complex streets of Cambridge. The Radome was originally used for experiments with weather radar, but fell out of use as the technology it helped invent moved on. That led to plans to remove the iconic structure, which consequently kicked off a “Save the Radome” campaign. The effort is being led by the students and faculty members of the MIT Radio Society, who have put the radome to good use over the years — it currently houses an amateur radio repeater, and the Radio Society uses the dish within it to conduct Earth-Moon-Earth (EME) microwave communications experiments. The students are serious — they applied for and received a $1.6-million grant from Amateur Radio Digital Communications (ARDC) to finance their efforts. The funds will be used to renovate the deteriorating structure.
Well, this looks like fun: Python on a graphing calculator. Texas Instruments has announced that their TI-84 Plus CE Python graphing calculator uses a modified version of CircuitPython. They’ve included seven modules, mostly related to math and time, but also a suite of TI-specific modules that interact with the calculator hardware. The Python version of the calculator doesn’t seem to be for sale in the US yet, although the UK site does have a few “where to buy” entries listed. It’ll be interesting to see the hacks that come from this when these are readily available.
Did you know that PCBWay, the prolific producer of cheap PCBs, also offers 3D-printing services too? We admit that we did not know that, and were therefore doubly surprised to learn that they also offer SLA resin printing. But what’s really surprising is the quality of their clear resin prints, at least the ones shown on this Twitter thread. As one commenter noted, these look more like machined acrylic than resin prints. Digging deeper into PCBWay’s offerings, which not only includes all kinds of 3D printing but CNC machining, sheet metal fabrication, and even injection molding services, it’s becoming harder and harder to justify keeping those capabilities in-house, even for the home gamer. Although with what we’ve learned about supply chain fragility over the last year, we don’t want to give up the ability to make parts locally just yet.
And finally, how well-calibrated are your fingers? If they’re just right, perhaps you can put them to use for quick and dirty RF power measurements. And this is really quick and really dirty, as well as potentially really painful. It comes by way of amateur radio operator VK3YE, who simply uses a resistive dummy load connected to a transmitter and his fingers to monitor the heat generated while keying up the radio. He times how long it takes to not be able to tolerate the pain anymore, plots that against the power used, and comes up with a rough calibration curve that lets him measure the output of an unknown signal. It’s brilliantly janky, but given some of the burns we’ve suffered accidentally while pursuing this hobby, we’d just as soon find another way to measure RF power.