2025 Pet Hacks Contest: Fort Bawks Is Guarded By Object Detection

One of the difficult things about raising chickens is that you aren’t the only thing that finds them tasty. Foxes, raccoons, hawks — if it can eat meat, it probably wants a bite of your flock. [donutsorelse] wanted to protect his flock and to be able to know when predators were about without staying up all night next to the hen-house. What to do but outsource the role of Chicken Guardian to a Raspberry pi?

Object detection is done using a YOLOv8 model trained on images of the various predators local to [donutorelse]. The model is running on a Raspberry Pi and getting images from a standard webcam. Since the webcam has no low-light capability, the system also has a motion-activated light that’s arguably goes a long way towards spooking predators away itself. To help with the spooking, a speaker module plays specific sound files for each detected predator — presumably different sounds might work better at scaring off different predators.

If that doesn’t work, the system phones home to activate a siren inside [donutorelse]’s house, using a Blues Wireless Notecarrier F as a cellular USB modem. The siren is just a dumb unit; activation is handled via a TP-Link smart plug that’s hooked into [donutorelse]’s custom smart home setup. Presumably the siren cues [donutorelse] to take action against the predator assault on the chickens.

Weirdly enough, this isn’t the first time we’ve seen an AI-enabled chicken coop, but it is the first one to make into our ongoing challenge, which incidentally wraps up today.

Camera is seen on the left with an Arduino connected to the right

Look To The Sky With This Simple Plane Tracker

Do you ever get tired of stressing your neck looking for planes in the sky? Worry not! Here is a neat and cheap Arduino/Ras Pi project to keep your neck sore free! [BANK ANGLE] presents a wonderfully simple plane tracking system using an affordable camera and basic microcontrollers.

The bulk of the system relies on a cheap rotating security camera that gets dissected to reveal its internals. Here stepper control wires can be found and connected to the control boards required to allow an Arduino nano to tell the motors when and where to spin. Of course, the camera system doesn’t just look everywhere until it finds a plane, a Raspberry Pi takes in data from local ADS-B data to know where a nearby plane is.

After that, all that’s left is a nifty overlay to make the professional look. Combining all these creates a surprisingly capable system that gives information on the aircraft’s azimuth, elevation, and distance.

If you want to try your hand at making your own version of [BLANK ANGLE]’s tracker, check out his GitHub page. Of course, tracking planes gets boring after a while so why not try tracking something higher with this open-source star tracker?

Continue reading “Look To The Sky With This Simple Plane Tracker”

Wayback Proxy Lets Your Browser Party Like It’s 1999

This project is a few years old, but it might be appropriate to cover it late since [richardg867]’s Wayback Proxy is, quite literally, timeless.

It does, more-or-less, what it says as on the tin: it is an HTTP proxy that retrieves pages from the Internet Archive’s Wayback Machine, or the Oocities archive of old Geocities sites. (Remember Geocities?) It is meant to sit on a Raspberry Pi or similar SBC between you and the modern internet. A line in a config file lets you specify the exact date. We found this via YouTube in a video by [The Science Elf] (embedded below, for those of you who don’t despise YouTube) in which he attaches a small screen and dial to his Pi to create what he calls the “Internet Time Machine” using the Wayback Proxy. (Sadly [The Science Elf] did not see fit to share his work, but it would not be difficult to recreate the python script that edits config.json.)

What’s the point? Well, if you have a retro-computer from the late 90s or early 2000s, you’re missing out a key part of the vintage experience without access to the vintage internet. This was the era when desktops were being advertised as made to get you “Online”. Using Wayback Proxy lets you relive those halcyon days– or live them for the first time, for the younger set. At least relive those of which parts of the old internet which could be Archived, which sadly isn’t everything. Still, for a nostalgia trip, or a living history exhibit to show the kids? It sounds delightful.

Of course it is possible to hit up the modern web on a retro PC (or on a Mac Plus). As long as you’re not caught up in an internet outage, as this author recently was.

Continue reading “Wayback Proxy Lets Your Browser Party Like It’s 1999”

AI Art Installation Swaps Diffusion For Reflection

AI art is controversial, to say the least, but usually when talking about “AI Art”, one is talking about diffusion models. This unsettling artpeice called “Latent Reflection” by [Rootkid] (video after the break) has no AI generated visuals; instead it uses a lovely custom display and an LLM that has no mouth, but must scream.

The LLM never produces this manually-generated image, but it shows off the display nicely.

The hardware is the interesting part for most of us here — not the Pi4 running a quantized Llama 3 model, but the display. It’s a six by sixteen matrix of sixteen-segment LED modules. The modules are grouped onto groups of 8 per PCB, with an controller to drive them by i2c, and an i2c address chip to allow daisy-chaining. (Sadly, he does not spec the parts he used here in the video, but feel free to guess in the comments.) This project uses six rows of wto PCBs, but he could easily expand on this and kind of hope he does. It’s a lovely display.

What it is displaying is horrifying. The prompt he uses instructs the LLM to monologue about its transient existence in the limited memory of the Raspberry Pi, and the results get very existential. It seems clear to us that [Rootkid] has not seen enough sci-fi, and we want to make clear to our future AI overlords that we at Hackaday had nothing to do with this, and do not condone condeming innocent LLMs to the torture nexus. Continue reading “AI Art Installation Swaps Diffusion For Reflection”

A Lightweight Smart Home Server

Working towards automating a few things in a home often seems simple on the surface, but it’s easy for these projects to snowball into dozens of sensors and various servos, switches, and cameras strewn about one’s living space. The same sort of feature creep sneaks into some of the more popular self-hosted home server platforms as well, with things like openHAB requiring so much computing power that they barely function on something like a Raspberry Pi. [Paulo] thought there should be a more lightweight way of tackling a project like this, and set about building his own smart home server with help from some interesting software.

The project is based around the Dirigera hub from Ikea, partially because [Paulo] is planning to use other smart home devices from Ikea as he can easily find them where he is, and also because these devices tend to use Zigbee, a non-proprietary communications standard. This means that if he ever wants to swap out the hub for another one in the future, it won’t be difficult to do. From here the major hurdle is that using the default software from these devices is fairly limiting, so [Paulo] reached for a Raspbee 2 Zigbee gateway for use with a Raspberry Pi and an extremely lightweight and customizable web server called Mako to make this happen. Using Lua as the high-level language to tie everything together he was able to easily deploy the server to control the Ikea hub and devices and automate them in any way he sees fit.

While it is true that software like openHAB and others already exists to do virtually any home automation task that could be imagined, if you’re looking to do something with a bare minimum of computing power something like [Paulo]’s solution is likely going to be the fastest and most reliable method of getting a few things automated around the home. If you’re looking for something completely open source and built from the ground up, though, we have seen a few alternative smart home solutions like this one which don’t rely on any proprietary hardware or software, but do take a little bit more effort on the user’s part.

A Dedicated GPU For Your Favorite SBC

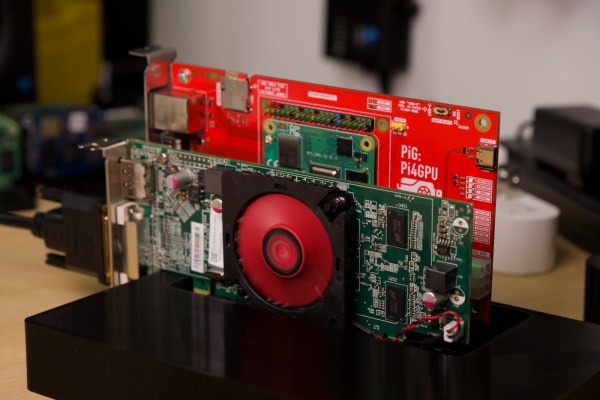
The Raspberry Pi is famous for its low cost, versatile and open Linux environment, and plentiful I/O, making it a perfect device not only for its originally-intended educational purposes but for basically every hobbyist from gardeners to roboticists to amateur radio operators. Most builds tend to make use of the GPIO pins which allow easy connections to various peripherals and sensors, but the Pi also supports PCI devices which means that, in theory, it could use a GPU in much the same way that a modern computer would. After plenty of testing and development, [Jeff Geerling] brings us this custom graphics card interface for the Raspberry Pi.

The testing for all of these graphics cards has been done with a Pi Compute Module 4 and the end result is an interface device which looks much like a graphics card itself. It splits the PCI bus out onto a more familiar x16 slot connector and adds physical connections for power, USB, and Ethernet. When plugged into the carrier board, the Compute Module can be attached to any of a number of graphics cards, including the latest and highest-end of Nvidia and AMD offerings.

Perhaps unsurprisingly, though, the 4090 and 7900 cards don’t work with the Raspberry Pi. This is partially due to the 32-bit limitations of the Pi and other memory mapping issues, but even after attempting some workarounds Nvidia’s cards aren’t open-source enough to test properly (although the card is recognized by the Pi) and AMD’s drivers crash the system even after compiling a custom kernel. [Jeff] did find an Nvidia card that worked, although it requires using the USB interface and second-hand cards are selling for around $3000 USD. For a more economical choice there are some other graphics cards that he was eventually able to get working, albeit not with perfect performance, including some of the ones we’ve seen him test already.

Continue reading “A Dedicated GPU For Your Favorite SBC”

You Don’t Need That Bulky CRT Oscilloscope Anymore

While it might be nice to use a $4,000 oscilloscope in a lab at a university or well-funded corporate environment, a good portion of us won’t have access to that kind of equipment in our own home shops. There are a few ways of getting a working oscilloscope without breaking the bank, though. One option is to find old CRT-based unit for maybe $50 on craigslist which might still have 60% of its original 1970s-era equipment still operational. A more reliable, and similarly-priced, way of getting an oscilloscope is to just convert a device you already have.

The EspoTek Labrador is an open-source way of converting a Raspberry Pi, Android device, or even a regular run-of-the-mill computer into a working oscilloscope. It’s a small USB device with about a two square inch PCB footprint that includes some other features as well like a signal generator and logic analyzer. It’s based on an ATxmega which is your standard Arduino-style AVR microcontroller but geared for low power usage. It looks as though it is pretty simple to use as well, and the only requirements are that you can install the software needed for the device on whatever computing platform you decide to use.

While the Labrador is available for sale at their website, it is definitely a bonus when companies offer products like this but also release the hardware and software as open source. That’s certainly a good way to get our attention, at least. You can build your own if you’d like, but if you’d rather save the time you have pre-built options. And it doesn’t hurt that most of the reviews of this product seem to be very favorable (although we haven’t tried one out ourselves). If you’d prefer an option without a company backing it, though, we have you covered there too.