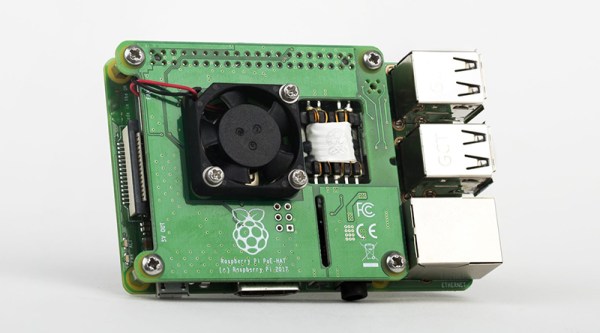
Visualizing Blocked Ads With The Pi Sense Hat

Pi-hole is an open source project to turn that Raspberry Pi collecting dust in your drawer into a whole-network ad blocking appliance. Not only does it stop ads from showing up on all your computers and mobile devices, it also keeps track of how many ads have been blocked and where they came from. Just in case you wanted to know how many thousands of ads you missed out on for a given time period.

While the graphs generated in the web interface of Pi-hole are slick and all, what if you just wanted a quick way of visualizing how effective your ad blocking system is? You’re not so much worried about the exact figures, you just want something to blink away on your desk and let you know all those ads are going to /dev/null. Enter the aptly named pi-hole-visualizer by [simianAstronaut].

With the addition of a Sense HAT to the Pi running the ad blocking, this Python script will generate an animated visualization that can be easily interpreted even from a distance. The primary display is a bar graph of DNS traffic, where the height and color of each column indicate relative activity within a specific time interval. A second screen shows a spiral graph which gives you an idea of what percentage of ads were blocked before they hit your devices.

An array of options can be given to the script from the command line; controlling both physical aspects of the display like orientation and LED brightness, as well the configurable parameters for the different available visualizations. As an added bonus, there’s also support for using the Sense HAT joystick to switch between modes interactively.

Turning the Raspberry Pi into an ad blocking appliance goes back to the olden days of the original Raspberry Pi, but it’s interesting to see how advanced the concept has become. Just remember, not all ads are bad.

A Hacker’s Epic Quest To Keep His Son Entertained

Little humans have a knack for throwing a wrench in the priorities of their parents. As anyone who’s ever had children will tell you, there’s nothing you wouldn’t do for them. If you ever needed evidence to this effect, just take a gander at the nearly year-long saga that chronicles the construction of an activity board [Michael Teeuw] built for his son, Enzo.

Whether you start at the beginning or skip to the end to see the final product, the documentation [Michael] has done for this project is really something to behold. From the early days of the project where he was still deciding on the overall look and feel, to the final programming of the Raspberry Pi powered user interface, every step of the process has been meticulously detailed and photographed.

The construction methods utilized in this project run the gamut from basic woodworking tools for the outside wooden frame, to a laser cutter to create the graphical overlay on the device’s clear acrylic face. [Michael] even went as far as having a custom PCB made to connect up all the LEDs, switches, and buttons to the Arduino Nano by way of an MCP23017 I2C I/O expander.

Even if you aren’t looking to build an elaborate child’s toy that would make some adults jealous, there’s a wealth of first-hand information about turning an idea into a final physical device. It isn’t always easy, and things don’t necessarily go as planned, but as [Michael] clearly demonstrates: the final product is absolutely worth putting the effort in.

Seeing how many hackers are building mock spacecraft control panels for their children, we can’t help but wonder if any of them will adopt us.

Continue reading “A Hacker’s Epic Quest To Keep His Son Entertained”

Making Custom Silicon For The Latest Raspberry Pi

The latest Raspberry Pi, the Pi 3 Model B+, is the most recent iteration of hardware from the Raspberry Pi Foundation. No, it doesn’t have eMMC, it doesn’t have support for cellular connectivity, it doesn’t have USB 3.0, it doesn’t have SATA, it doesn’t have PCIe, and it doesn’t have any of the other unrealistic expectations for a thirty-five dollar computer. That doesn’t mean there wasn’t a lot of engineering that went into this new version of the Pi; on the contrary — the latest Pi is filled with custom silicon, new technologies, and it even has a neat embossed RF shield.

On the Raspberry Pi blog, [James Adams] went over the work that went into what is probably the most significant part of the new Raspberry Pi. It has new, custom silicon in the power supply. This is a chip that was designed for the Raspberry Pi, and it’s a great lesson on what you can do when you know you’ll be making millions of a thing.

The first few generations of the Raspberry Pi, from the original Model B to the Zero, used on-chip power supplies. This is what you would expect when the RAM is soldered directly to the CPU. With the introduction of the Raspberry Pi 2, the RAM was decoupled from the CPU, and that meant providing more power for more cores, and the rails required for LPDDR2 memory. The Pi 2 required voltages of 5V, 3.3V, 1.8V, and 1.2V, and the sequencing to bring them all up in order. This is the job for a power management IC (PMIC), but surprisingly all the PMICs available were more expensive than the Pi 2’s discrete solution.

The MXL7704, with four switching power supplies. The four symmetric gray and brown bits are inductors.

However, where there are semiconductor companies, there’s a possibility of having a custom chip made. [James] talked to [Peter Coyle] of Exar in 2015 (Exar was then bought by MaxLinear last year) about building a custom chip to supply all the voltages found in the Raspberry Pi. The result was the MXL7704, delivered just in time for the production of the Raspberry Pi 3B+.

The new chip takes the 5V in from the USB port and converts that to two 3.3V rails, 1.8V and 1.2V for the LPDDR2 memory, 1.2V nominal for the CPU, which can be raised and lowered via I2C. This is an impressive bit of engineering, and as any hardware designer knows, getting the power right is the first step to a successful product.

With the new MXL7704 chip found in the Raspberry Pi 3B+, the Pi ecosystem now has a simple and cheap chip for all their future revisions. It might not be SATA or PCIe or eMMC or a kitchen sink, but this is the kind of engineering that gives you a successful product rather than a single board computer that will be quickly forgotten.

Beautiful Pi-Powered Cocktail Machine

Science fiction has long had the idea that a good drink should just appear from a sliding panel in a wall. Bartending is to be the preserve of robots and AIs – manual control is for the past, and in an effort to continue our progress to towards that sci-fi future, Reddit user [HighwingZ] has built a beautiful machine that mixes and serves drinks.

Instead of a sliding wall panel, [HighwingZ] has built a hexagonal container. Five of the six sides contain bottles to fill the drink with, the last panel contains the spigot and a spot for the glass. The machine works by weighing the liquid that gets poured into the glass using a load cell connected to a HX711 load cell amplifier. An aquarium pump is used to push air into whichever bottle has been selected via some magnetic valves which forces the liquid up its tube and into the glass. A simple touch screen UI is used so the user can select which drink and how much of it gets poured. All of this is connected to a Raspberry Pi to control it all.

The whole thing is built into a great looking wooden showcase with see-through sides, so you can see the bottles to be used to make the drinks. [HighwingZ] put the Python code that controls everything on github for anyone wanting to make their own. There are a few cocktail making hacks on the site, like this one, or this one if you need some inspiration.

Continue reading “Beautiful Pi-Powered Cocktail Machine”

The Better RetroPie Handheld

The Raspberry Pi has become the best video game console on the planet. With RetroPi, anyone can play Super Mario 3, Doctor Mario, and even Doki Doki Panic. Adafruit’s PiGRRL Zero and [Wermy]’s reconfabulation of an old brick Game Boy to house a Raspi Zero and display have made the Raspberry Pi portable, along with all those retro games we love so dearly.

There’s a problem with these builds, though. They only use the Raspberry Pi Zero, and with that the limitations on emulation performance, and the Raspi 3 is far too big for a portable console. What’s the solution? It’s the greatest homebrew console ever created. For this year’s Hackaday Prize, [DeanChu] is building the Retro-CM3. It’s a retro handheld with a 3D printed enclosure, that’s powered by the Raspberry Pi Compute Module 3. Stand back, folks. We have a winner that will top the Raspberry Pi and 3D printing subreddits.

The key feature for this build is, of course, the raw processing power of the Raspberry Pi Compute Module 3. This is a Raspberry Pi 3 with 4 GB of eMMC stuffed onto a board that fits into an SODIMM socket. The pins on this device give you access to the GPIOs and the DSI connector. All you really need to turn this into an amazing vintage emulation console is a breakout board with a few buttons, power supply, and a display.

The extra components for this build include a 3.2 inch LCD using the DPI interface. There’s a speaker, and a 2000mAh battery. The real tricky part here is the custom PCB, breaking out the DPI pins on the Compute Module, adding a small speaker, and throwing a small STM32 to read the buttons. It’s an entire system, ready to be housed in a 3D printed enclosure.

This is, simply, the best Raspberry Pi portable you’ll ever see, at least until we get a Rasberry Pi Zero with the capabilities of the Pi 3. It’s an excellent use of the very small Compute Module, and one of the most polished Hackaday Prize entries we’ve seen thus far.

Filter Your Pi And Be A Responsible Pirate

At this point it’s pretty well-known that you can tack a long wire to the Raspberry Pi’s GPIO, install some software, and you’ve got yourself the worlds easiest pirate FM radio station. We say that it’s a “pirate” station because, despite being ridiculously easy to do, broadcasting on these frequencies without a license is illegal. Even if you had a license, the Raspberry Pi with a dangling bit of wire will be spewing out all kinds of unintentional noise, making it a no-go for any legitimate purposes.

Unfiltered output of Pi broadcasting on 107.3 MHz

In an effort to address that issue, [Naich] has written up a couple posts on his blog which not only discuss why the Pi is such a poor transmitter, but shows how you can build a filter to help improve the situation. You’ll still be a lawless pirate if you’re transmitting on FM stations with your Pi, but you won’t be a filthy lawless pirate.

In the first post, [Naich] shows us exactly what’s coming out of the wire antenna when the Pi is broadcasting some tunes on the default 107.3 MHz, and it ain’t pretty. The Pi is blasting out signals up and down the spectrum from 50 MHz to 800 MHz, and incredibly, these harmonics are in some cases stronger than the intentional broadcast. Definitely not an ideal transmitter.

[Naich] then goes on to show how you can build a DIY filter “hat” for the Pi that not only cuts down a lot of the undesirable chatter, but even boosts the intended signal a bit. The design is surprisingly simple, only costs a few bucks in components, and conveniently is powered directly from the Pi’s GPIO. It even gives you a proper antenna jack instead of a bare wire wound around a header pin.

We’ve seen plenty of projects utilizing the Raspberry Pi FM transmission hack, and while this mod still doesn’t make it perfect, it’s always nice to see an awesome hack made even better.

Yellow Robot Wheels Rolling Out

Small wheeled robots are great for exploring robotics and it’s easier than ever to get started, thanks to growing availability and affordability of basic components. One such component is a small motorized wheel assembly commonly shown when searching for “robot wheel”: a small DC motor mounted in a gearbox to drive a single plastic wheel (inevitably yellow) on which a thin rubber tire has been mounted for traction. Many projects have employed these little motor + gearbox + wheel modules, such as these three entries for 2018 Hackaday Prize:

BoxBotics takes the idea of an affordable entry point and runs with it: build robot chassis for these wheels out of cardboard boxes. (Maybe even the exact box that shipped the yellow wheels.) Cardboard is cheap and easy to work with, making cardboard projects approachable to any creative mind. There will be an audience for something like a Nintendo Labo for robotics, and maybe BoxBotics will grow into that offering.

Cing also intends to make a friendly entry point for robotics and they offer a different chassis solution. Instead of cardboard, they use a circuit board. The yellow gearbox is mounted directly to the main circuit board making it into the physical spine, along with its copper traces serving as the spinal cord of the robot. While less amenable to mechanical creativity than BoxBotics, Cing’s swappable modules might be a better fit for those interested in exploring electronics.

ROS Starter Robot caters to those who wish to go far beyond simple “make it move” level of robot intelligence. It aims to lower the barrier to enter the world of ROS (robot operating system) which has historically been the domain of very capable (but also very expensive) research-oriented robots. This project could become the bridge for aspiring roboticists who wish to grow beyond hobbyist level software but can’t justify the cost typical of research level hardware.

All three of these projects take the same simple motorized wheel and build very different ideas on top of them. This is exactly the diversity of ideas we want to motivate with the Hackaday Prize and we hope to see great progress on all prize contestants in the month ahead.