Twin Pis For Remote Computer Management

Sometimes you have a whole bunch of computers that you need to work with, and having a keyboard, monitor, and mouse for each one becomes too much to deal with. There are a multitude of solutions to this problem, but [Fmstrat] went the hacker route, and built their own.

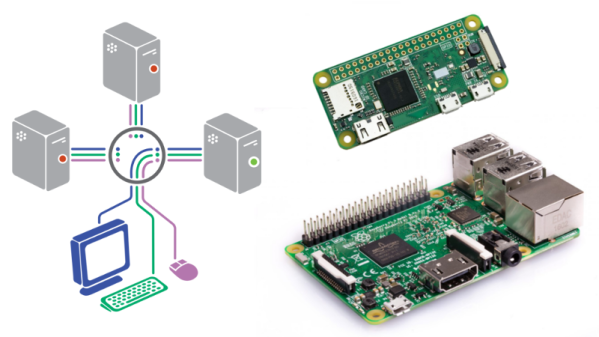
The build is a rather unique way of controlling PCs remotely, but it does the job. A Raspberry Pi 3 is pressed into service as the core of the operation. It’s accessible over IP for remote control. Video is captured from the controlled machines through the combination of an HDMI-to-S-Video adapter and an analog video capture card plugged into the Pi. Keystrokes are sent in a roundabout way, first sent to a Pi Zero over a USB-to-Serial adapter. From there, the Pi acts as an emulated mouse and keyboard to the PC under control.

One caveat of remotely controlling computers over a network is that if things go pearshaped, it can become necessary to power cycle the machine. [Fmstrat] deals with this by fitting a relay board to the Pi 3, which is connected to the reset buttons of the machines under control.

It may not be the quickest, easiest, or industry standard way of controlling remote computers, but it works. [Fmstrat] tells us this build was primarily designed to get around the fact that there aren’t any decent cheap IP-KVM systems, and consumer motherboards don’t support the IPMI standard that would otherwise be useful here.

We particularly like the hard-wired relays for rebooting a machine – great for when a network dropout is stopping Wake-on-LAN packets from achieving their goal. While the conversion of HDMI outputs into analog video for capture is unusual and somewhat costly on a per-machine basis, it’s functional and gives the system the ability to work with any machine capable of outputting a basic analog video signal. With the Pi Zero keyboard emulation and analog video capture, we could see this being used with everything from modern computers to vintage 80s hardware. If you’ve ever needed to control an Amiga 2000 remotely for whatever reason, this could be the way to do it.

We’ve seen plenty of other KVM builds over the years, too – like this low-cost HDMI switcher.

DIY Multi-Touch All The Surfaces

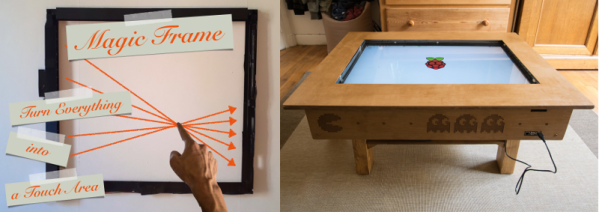
Ever wanted to build a touch table or other touch-input project, but got stuck figuring out the ‘touch’ part? [Jean Perardel] has your back with his multi-touch frame over on IO that makes any surface touch-reactive. In [Jean]’s case, that surface is ultimately a TV inside of a table.

Of course, it’s a bit of a misnomer to say the surface itself becomes touch-reactive. What’s really happening here is that [Jean] is using light triangulation to detect shadows and determine the coordinates of the shadow-casting object. Many barcode scanners and consumer-level document scanners use a contact image sensor (CIS) to detect objects in the path of IR LEDs. These are a low-power, lower-resolution alternative to the CCDs found in high-grade scanners.

As [Jean] explains in the video below, an object placed in the path of a single IR LED facing a sensor array of either type will block the light from reaching the sensors. Keep adding LEDs and their emission angles will begin to overlap, increasing the detection precision. [Jean] reverse engineered a couple of different types of scanners until he found a suitable one. He ended up with CIS that has 2700 light sensors lined up in the space of 20cm (7.87″).

[Jean] designed a 3D-printable frame to hold 96 IR LEDs in stacks of three. A Teensy turns on the LEDs, detects the touch event, calculates the position, and sends those coordinates to a Pi to be displayed on the screen. He eventually went wireless and then built a nice looking touch table to house a 32″ TV.

This is not the only way to build a multi-touch table, nor is it the simplest. Here’s one that uses finger presses to scatter light and an industrial strength projection-based table that was open-sourced a few years ago.

Continue reading “DIY Multi-Touch All The Surfaces”

What Is Entropy And How Do I Get More Of It?

Let’s start off with one of my favorite quotes from John von Neumann: “Any one who considers arithmetical methods of producing random digits is, of course, in a state of sin. For, as has been pointed out several times, there is no such thing as a random number — there are only methods to produce random numbers, and a strict arithmetic procedure of course is not such a method.”

What von Neumann is getting at is that the “pseudo” in pseudorandom number generator (PRNG) is really a synonym for “not at all”. Granted, if you come in the middle of a good PRNG sequence, guessing the next number is nearly impossible. But if you know, or can guess, the seed that started the PRNG off, you know all past and future values nearly instantly; it’s a purely deterministic mathematical function. This shouldn’t be taken as a rant against PRNGs, but merely as a reminder that when you use one, the un-guessability of the numbers that it spits out is only as un-guessable as the seed. And while “un-guessability” isn’t a well-defined mathematical concept, or even a real word, entropy is.

That’s why entropy matters to you. Almost anything that your computer wants to keep secret will require the generation of a secret random number at some point, and any series of “random” numbers that a computer generates will have only as much entropy, and thus un-guessability, as the seed used. So how does a computer, a deterministic machine, harvest entropy for that seed in the first place? And how can you make sure you’ve got enough? And did you know that your Raspberry Pi can be turned into a heavy-duty source of entropy? Read on!

Continue reading “What Is Entropy And How Do I Get More Of It?”

Pi Handheld With A Mindblowing Enclosure

The Raspberry Pi is possibly the world’s most popular emulation platform these days. While it was never intended to serve this purpose, the fact remains that a small, compact computer with flexible I/O is ideally suited to it. We’ve featured a multitude of builds over the years using a Pi in a mobile form factor to take games on the go. [Michael]’s build, however, offers a lot more than a few Nintendo ROMs and some buttons from eBay. It’s a tour de force in enclosure design.

The build starts with the electronics. In 2017 it’s no longer necessary to cobble together five different accessory boards to handle the controls, battery charging, and display. Boards like Kite’s Super All In One exist, handling everything necessary for a handheld game console. With this as a starting point, he then set out to recreate Nintendo’s classic Game Boy, with a few tweaks to form and function.

It’s a textbook example of smart planning, design, and execution. We are taken through the process of creating the initial CAD drawings, then combining 3D printed parts with wood and carbon fibre for a look that is more akin to a high-end piece of hi-fi gear than anything related to gaming. The attention to detail is superb and the write-up makes it look easy, while [Michael] shares tips on how to safely cut carbon fibre to make your own buttons.

The final results are stunning, and it’s a great example of why a fine piece of wood is always a classy way to go for an enclosure. For another great example, try this walnut keyboard, or check out the roots of the Raspberry Pi Game Boy movement.

Pumpkin Piano Promises A Gourd Time

Fall – it’s that time of year that brings falling leaves, Hallowe’en, and a pumpkin version of everything that you hold dear. In this case, it’s not a latte – it’s [Robert Vorthman]’s Pumpkin Piano.

[Robert] took a straightforward approach to the build, pressing a Raspberry Pi into service as the backbone of the operation. This is combined with an Adafruit breakout board for the MPR121, which is a chip that provides 12 capacitive touch-sensitive inputs. These are connected to the bountiful produce which make up the piano keys in this fun holiday hack. [Robert] uses some Python code that talks to fluidsynth, a software synthesizer that uses Soundfont files to create different sounds. It’s all wrapped up with some Neopixels that flash when each vegetable is triggered.

The build would make a great party piece for just about any fall gathering, and [Robert] has done a great job of rolling up all the hardware and software required in the write-up. For another take on a vegetable-based orchestra, check out last year’s Harpsi-gourd.

Raspberry Pi Media Streamer Is Combat Ready

We are truly living in the golden age of media streaming. From the Roku to the Chromecast, there is no shortage of cheap devices to fling your audio and video anywhere you please. Some services and devices may try to get you locked in a bit more than we’d like (Amazon, we’re looking at you), but on the whole if you’ve got media files on your network that you want to enjoy throughout the whole house, there’s a product out there to get it done.

But why buy an easy to use and polished commercial product when you can hack together your own for twice the price and labor over it for hours? While you’re at it, why not build the whole thing into a surplus ammo can? This the line of logic that brought [Zwaffel] to his latest project, and it makes perfect sense to us.

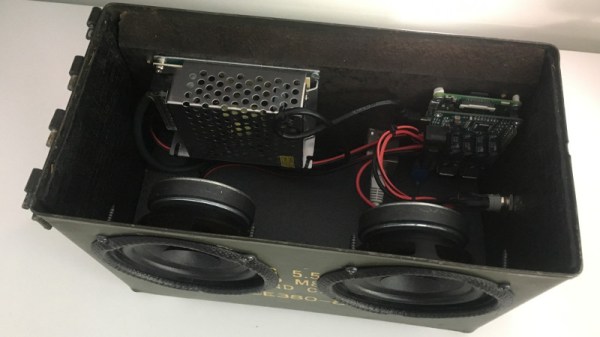
It should come as no surprise that a military ammo can has quite a bit more space inside than is strictly required for the Raspberry Pi 3 [Zwaffel] based his project on. But it does make for a very comfortable wiring arrangement, and offers plenty of breathing room for the monstrous 60 watt power supply he has pumping into his HiFiBerry AMP+ and speakers.

On the software side the Pi is running Max2Play, a Linux distro designed specifically for streaming audio and video remotely. [Zwaffel] says that with this setup he is able to listen to music on his Squeezebox server as well as watch movies via Kodi.

While none are quite as battle-hardened as this, we have seen several other Raspberry Pi Squeezebox clients over the years if you’re looking for more inspiration.

Remote controlled Billy from the Saw movies

Pi-Controlled Billy From The Saw Horror Flicks

[David0429] has made a very scary Raspberry Pi controlled puppet. Scary that is if you’ve seen the Saw movies where a serial killer uses one like it, called Billy, to communicate with his victims. If you haven’t, then it’s a pretty neat remote-controlled puppet-on-a-tricycle hack.

A stepper motor hidden under the front fender moves the trike by rotating the front wheel. It does this using a small 3D printed wheel that’s attached to the motor’s shaft and that presses against the trike’s wheel. Steering is done using a 3D printed gear mounted above the fender and attached to the steering column. That gear is turned by a servo motor through another gear. And another servo motor in the puppet’s head moves its mouth up and down.

All these servos and motors are wired to an Adafruit stepper motor HAT stacked on a Raspberry Pi hidden under the seat. Remote control is done from a webpage in any browser. The Flask python web framework runs on the Pi to both serve up the webpage and communicate with it in order to receive commands.

[David0429] took great care to make the puppet and tricycle look like the one in the movie. Besides cutting away excess parts of the trike and painting it, he also ran all the wires inside the tubular frame, drilling and grinding out holes where needed.  The puppet’s skeleton is made of wood, zip ties and hinges but with the clothes on, it’s pretty convincing. Interestingly, the puppet in the first movie was constructed with less sophistication, having been made out of paper towel rolls and papier-mâché. The only things [david0429] would like to do for next time are to quieten the motors for maximum creepiness, and to make it drive faster. However, the need for a drive system that could be hidden under the fender resulted one that could only work going slowly. We’re thinking maybe driving it using the rear wheels may make it possible provide both speed and stealth. Ideas anyone?

In any case, as you can see in the video below, the result is suitably creepy.

Continue reading “Pi-Controlled Billy From The Saw Horror Flicks”