Taking apart printers to salvage their motors and rods is a common occurrence in hacker circles, but how about salvaging the electronics? A lot of printers come with WiFi modules, and these can be repurposed as USB WiFi dongles. Tools required? And old printer, 3.3 V regulator, and a USB cable. Couldn’t be simpler.
The Raspberry Pi has a connector for a webcam, and it’s a very good solution if you need a programmable IP webcam with GPIOs. How about four cameras?. This Indiegogo is for a four-port camera connector for the Raspi. Someone has a use for this, we’re sure.
The one flexible funding campaign that isn’t a scam. [Kyle] maintains most of the software defined radio stack for Arch Linux, and he’s looking for some funds to improve his work. Yes, it’s basically a ‘fund my life’ crowdfunding campaign, but you’re funding someone to work full-time on open source software.
Calibration tools for Delta 3D printers. It’s just a few tools that speed up calibration, made for MATLAB and Octave.
[Oona] is doing her usual, ‘lets look at everything radio’ thing again, and has a plan to map microwave relay links. If you’ve ever seen a dish or other highly directional antenna on top of a cell phone tower, you’ve seen this sort of thing before. [Oona] is planning on mapping them by flying a quadcopter around, extracting the video and GPS data, and figuring out where all the other microwave links are.
PowerPoint presentations for the Raspberry Pi and BeagleBone Black. Yes, PowerPoint presentations are the tool of the devil and the leading cause of death for astronauts*, but someone should find this useful.
* Yes, PowerPoint presentations are the leading cause of death for astronauts. The root cause of the Columbia disaster was organizational factors that neglected engineer’s requests to use DOD space assets to inspect the wing, after which they could have been rescued. These are organizational factors were, at least in part, caused by PowerPoint.
Challenger was the same story, and although PowerPoint didn’t exist in 1986, “bulletized thinking” in engineering reports was cited as a major factor in the disaster. If “bulletized thinking” doesn’t perfectly describe PowerPoint, I don’t know what does.
As far as PowerPoint being the leading cause of death for astronauts, 14 died on two shuttles, while a total of 30 astronauts died either in training or in flight.

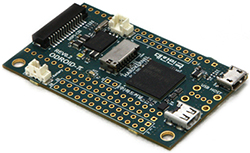 A few years ago, Broadcom had a pretty nice chip – the BCM2835 – that could do 1080 video, had fairly powerful graphics performance, run a *nix at a good click, and was fairly cheap. A Broadcom employee thought, “why don’t we build an educational computer with this” and the Raspberry Pi was born. Since then, Broadcom has kept that chip to themselves, funneling all of them into what has become a very vibrant platform for education, tinkering, and any other project that could use a small Linux board. Recently, Broadcom has started to sell the BCM2835 to anyone who has the cash and from the looks of it,